Showing posts with label 2017 finishes. Show all posts

Friday, January 5, 2018

Scripture Tote

My oldest daughter turned eight the first week in January. First of all, I can't believe that I have an eight-year-old! Second, eight is a really big birthday for Mormons. Eight-year-olds are eligible to be baptized, which is pretty exciting! Like many other families do for their eight-year-olds upon their baptisms, we gave her her first set of real scriptures (as opposed to cheap paperbacks) and I really wanted to make her a scripture tote for them.


A few years back when our oldest niece was baptized, I made her a simple tote bag, but I wanted something a little more structured this time. I have more experience with bags now, and I just wanted something a little more finished.


I turned, naturally, to my favorite bag designer, Dog Under My Desk. She has a quick zip lunch tote that looked perfect! She recently released an updated version of the pattern including two sizes. I let my daughter pick the fabric, though I pointed out an Alison Glass Ex-Libris panel that I thought she'd love.


(Don't worry; she vetoed several of my suggestions...I may have shown her this panel but I didn't force anything on her) She picked out a black fabric to go with it. and luckily I had a green zipper that is a pretty great match for the panel.


This pattern was great, and so quick. I made a couple of changes; I used fusible fleece instead of insulated batting (obviously, there was no need for insulated batting, and it's so loud) and I also added a piece of Peltex in the bottom to add structure to support the scriptures (which are not light...). I added it after the fact, because I felt the bag sagged under the weight. But with the way the bag was sewn together, it was easily added after--I just had to rip out the last seam and slip it in, and stitch it back up.


Anyway, the bag is a perfect fit for the scriptures, and the panel turned out to be the perfect size for the front. I really think she'll love it.

Saturday, December 30, 2017

Christmas Sewing

I haven't posted a lot on Instagram of what I've been sewing lately because I was mostly sewing Christmas gifts. And, while my kids don't check Instagram (my oldest, after all, is only 7!), I still felt weird about posting pictures of gifts. But, I did a lot of sewing for Christmas. I give my girls a sewn gift every year for Christmas; it's a tradition I really love.

So, for my older girls, I made matching aprons. A while ago, they were fighting over the one too-small apron that matched one I have, so I decided to make new aprons for them and one for me that matched. I picked up some fabric at a local quilt shop's sidewalk sale. I totally scored: I got some Art Gallery Fabric yardage for $5 or $6 a yard. I bought enough for a quilt back, too. Anytime I can get a beautiful print for around the same price as Kona solids or less, I like to buy a backing. The girls' aprons were quick to whip up (although I still need to adjust the neck strap to be a little smaller for them). Mine took a bit longer, because I wanted to do a different style than I what I used to sew. I looked around for a pattern, but aprons are kinda out of style right now. Their popularity really peaked a few years back. And I really didn't want a pattern that sewed the skirt separately from the bib (bodice piece?). I think they look weird. So, in the end, I decided to trace an apron that fits well that looked like I could easily sew it. It was bound with bias tape, it really couldn't be that hard. It wasn't, and even though I wish the fabric were a little heavier (the apron I love is made of canvas not quilting cotton...), it's comfortable and the pockets are great. And it matches my daughters' and they're thrilled about that. :-)


I really considered making teeny tiny aprons for my twins (because everything small is adorable!), but I really felt that was a waste of time. And fabric. I mean, really. So instead, I made them shirts. I bought the Pippa pattern from Sew Kate Sew.


It's a quick sew and I'm pretty pleased with them! The neck line is a little gapey, so I tried to make it smaller on the second, but I think I made them one size too big. I went by the measurements, but the measurements put it at the top end of the 18 month size (my girls are currently 15 months...) and I'm not about to spend a bunch of time sewing them something that won't fit for more than a few weeks. So I made the 2T size...at least, since it's too big, they'll grow into them...and they're still wearable. Just a bit big. Bonus: I sewed these shirts from leftover knit from other projects, and I still have enough to make another shirt out of the tulip print. Yay!


The last gift I made was a last minute addition to the line up. I decided to make a wallet for my husband. After I made my own wallet (from the Dog Under My Desk Get Carded wallet pattern), my husband mentioned that he wanted one of his own. That was a while ago, and I didn't think he was serious, but when I found that I had time, I went for it. This pattern isn't too time-consuming, and since I've already sewn it, I knew I could do it fairly quickly. I picked out a black print and a turquoise print for the lining, and I had a turquoise zipper that just so happened to be a perfect match for the lining. I finished it up in an afternoon, and he was definitely surprised.


We'll see if he uses it. :-)

Christmas sewing can be stressful, but this year, it really wasn't. I picked doable projects, which had a lot to do with it, of course. I love this tradition. It's a way I can really give to my girls.

Friday, November 24, 2017

Get Carded Wallet

For a while, I've wanted to make myself a new wallet. I had previously made a wallet from my friend's tutorial, and I really liked it. But, I didn't do a great job: the card slots were a little loose and the zipper stuck a little. And, while I like the design, I wish that the credit card slots faced the opposite direction because I tended to drop them out if I needed to access the zippered pouch. Not ideal.

So, I started looking for a tutorial or a pattern, and started with Dog Under My Desk, my favorite bag pattern writer. Her patterns are thorough, well-tested, and just all around amazing. I ordered the Get Carded pattern, and set about making myself a new wallet.


I had made a second Dollie cross body bag I made this summer for a friend, and had enough leftover fabric to make a matching wallet.


This pattern, like Erin's other patterns, is well written and well-thought-out. She even has figured out a way to make it without any hand-sewing and no binding. Such a win, and she does it in such a cool way. She also provides several variations for the two outside pockets. I opted for the gathered pocket (it's so feminine!) but I'll probably make one with a flat pocket for my husband, and you can make a vinyl ID pocket, or a plain one. It's so nice to have options, but I found that it made the pattern hard to follow.


Even with that minor thing, the pattern is awesome. Really, if you want to try bag making, try Erin's patterns. They're amazing!

Tuesday, November 21, 2017

Christmas Table Runner

I wasn't planning on doing any Christmas sewing this year. Sewing gifts, sure. I sew each of my daughters a gift every year. But I didn't plan any Christmas quilts or decor. I have so many other things to sew. And then I was thinking about my brother who moved across the country earlier this year, and how it will be the first year he and his wife will be away from family.

So, of course, I decided to make them a gift. I thought they might appreciate having a table runner, to use all season long. I settled on making the same pattern I had made for my friend, a modified Seaside Quilt from Vintage Quilt Revival. I love that book.


Luckily, I had all the materials I needed, including enough white batting scraps (my big roll is cream) to piece together. It was the first time I've used frankenbatting, and I was pleased that it worked! I wouldn't want to do it for a large quilt, but this small quilt was fine. 

One thing I love about this quilt pattern is the center the four blocks form. Wish I'd gotten those top green corners to line up better, but the others look good! 


Here's a picture of the individual blocks. There are four for this mini quilt, and they go together really quickly.


I used a quilting pattern from Jacquie Gering's book Walk. I LOVE how it turned out and added movement. You can see a little bit of it on the back. The backing I used was this awesome woven green fabric that has woven ovals. It's pretty cool.


Anyway, it's on its way to them now, and I hope they love it!

Christmas Seaside Table Runner
Pieced and quilted by me
Completed November 2017

Friday, November 17, 2017

Beauty and the Beast mini quilt

Many moons ago, I was excited about mini quilt swaps. It took me a while to get the courage to sign up, and then I waited for a swap I was excited about, and over the course of several months, I signed up for three swaps. The first was an Around the World craft swap, and I got a beautiful mini with a bicycle. After how well that one went, I signed up for Kate Basti's rainbow swap round 2, and then couldn't resist signing up for the second round of the Disney quilt swap.

And then I got pregnant with twins.

I was far enough along on the rainbow swap that I was able to finish that one, but while I had started the Disney mini, I wasn't clear enough on my direction, so I dropped out. I was heartbroken, but mostly I was nauseous and exhausted. Exhausted.

My partner was a librarian who loved Beauty and the Beast, among other things. I wasn't familiar with Mary Blair, who she noted she liked, but I had a great idea for Beauty and the Beast. I found a paper-pieced pattern for Chip, and decided to put him on a pile of books. Perfect, right?


I was certain that my partner would love it. Alas, she never got it because I had to drop out and she received a Mary Blair inspired mini that she loved.

Of course, it is perfect for me, too. :-) I have an MA in English literature, so a Beauty and the Beast book-inspired mini is just right.


I wanted to receive a beautiful, perfect, Disney-inspired mini.

And in a way, I did.

I clipped off one corner of a book, which bums me out, but it's not too noticeable. I had a hard time figuring out how to quilt it, but I like what I did, and it was pretty simple. I used one inch painter's tape to mark off columns and then marked the tape with a pen at even intervals to make sure the lines lined up evenly.

Chip
completed March 2017

Wednesday, August 9, 2017

Vintage Holiday Quilt

Last year, I joined a quilt along that Chrissy at Sew Lux hosted on Instagram for the Vintage Holiday pattern. I think I was one of the only ones to jump in, but I'm glad I did! The pattern goes together really quickly, which was just what I needed with two babies!


I knew I wouldn't have it ready for Christmas because I do NOT quilt my own quilts unless they're mini quilts. So I wasn't really stressed about it, and it was a fun pattern to put together. I pulled out my cherished Sweetwater Christmas stash (I even have a few pieces left from the first line, Countdown to Christmas!) and mixed in a few scraps from Kate Spain's Christmas lines and a Cotton and Steel print, and I had a great time picking fabrics for individual ornaments. 


I thought about using a low volume snowflake print for the background, but was concerned it would be too busy and opted instead to use just white. And I luckily had enough yardage from the first Sweetwater line for sashing and the outside border. I wasn't trying to use it up, per se, but, in some ways I regret buying so much (even though I was glad to have it available for this project!). I tend to buy just half yards now which are just perfect for most of my needs, except for sashing/borders. I was glad to be able to use my stash, and I was glad to have a purpose for the yardage I have. So, I didn't have to buy any fabric for this project. I even managed to get the backing out of my yardage. I had a piece of brushed cotton that I had purchased years ago for a Christmas quilt I had started but had never finished. I didn't purchase much because I didn't know how much you needed for backings, but I was able to get it to work with a whopping 12"x2" piece left. Yay!


I'm also glad to have gotten it bound (FINALLY) at our neighborhood quilt retreat last weekend. Hooray for friends who sew!

Monday, August 7, 2017

Shimmer Quilt

The twins (and just having 4 kids in general...) have really taken a toll on my sewing time. I still get time, of course, but not nearly as often and not nearly as much. And finding a chunk of an hour or more at a time? Forget about it!

So, since I don't get large chunks of time...I tend to do quicker things. Single blocks for samplers, bags that can be easily broken down into small chunks, etc. Binding did not make the list.

Also, I dislike binding.

So, there you go. :-)

However, I do like completing projects...so when our neighborhood sewing retreat rolled around, I planned to finish up two quilts that had been waiting for bindings since early spring.


MONTHS.

Yikes.

But, I got both of them done and it feels great! I'd hesitated because I really like to get a binding done in one go. It's no fun to drag it out over days. So the retreat was the perfect opportunity.

The first one is this Shimmer quilt (pattern by Cluck Cluck Sew). I used this photo that I took a few years ago up Provo Canyon for color inspiration, and it's really unlike any color scheme I've done before. It's my "autumn quilt." And I think I'll pull it out to rest on my couch during the fall.


Lately, I've sewn my quilts entirely from my stash, and while I still fabric shop a lot (who doesn't love fabric shopping?!), I really love quilting from my stash. Even the background fabric is Hometown by Sweetwater and I had *just* enough. I was worried it would be too busy, but I actually really like it. I even pulled the backing and the binding from my stash, wahoo! The backing was actually a piece of fabric I got from a friend when she moved. She had a closet FULL of fabric (mostly apparel stuff) and didn't want to take it so she put it all out for all of us neighborhood sewists to go through. The backing was pretty thick and tightly woven, and I think it probably had some polyester in it, but it was free and a great color, and if anything, it'll be durable! :-)


Shimmer
quilted by Abby Latimer
completed (finally) August 2017

Sunday, July 30, 2017

Odile's Bag

I have to admit, I feel really cool when I get to announce that I have a French friend. I mean, how many people have international pals? Okay, okay, a lot...but I still feel pretty cool.

I met Odile while on a study abroad to Paris with my university. My university contracted with a local housing company to place students with host families, and Odile happened to rent a room from the same woman I was placed with. At the time, she didn't speak English, and I spoke French very poorly, but we still became friends and have stayed in touch over the past 14 years. I can't believe it's been that long! Wow. We've seen each other a few times since then, I've been back to Paris twice (and last time, she took me down to her family's home in Lyon) and she's been to the US once.


So, it had been a couple of months since I'd heard from her, and I just wondered how she was doing. While I was thinking about her, I decided that I wanted to send her a package. Because who doesn't love getting mail? And mail is even better if it has something exciting inside. But, shipping to France is decidedly not cheap, of course, and so I set out to come up with a gift that would be worth the postage, and decided to sew her something. Now, as any sewist knows, the problem with sewn gifts is that people who don't sew rarely appreciate the work (or the item) and people who do sew may appreciate it, but don't really need you to sew them anything. So, Odile is not a sewist, so I wanted to come up with an idea that anyone would love. I settled on a bag, but I wanted to make sure it was stylish and not cute in the quilters' idea of cute. Does that make sense?


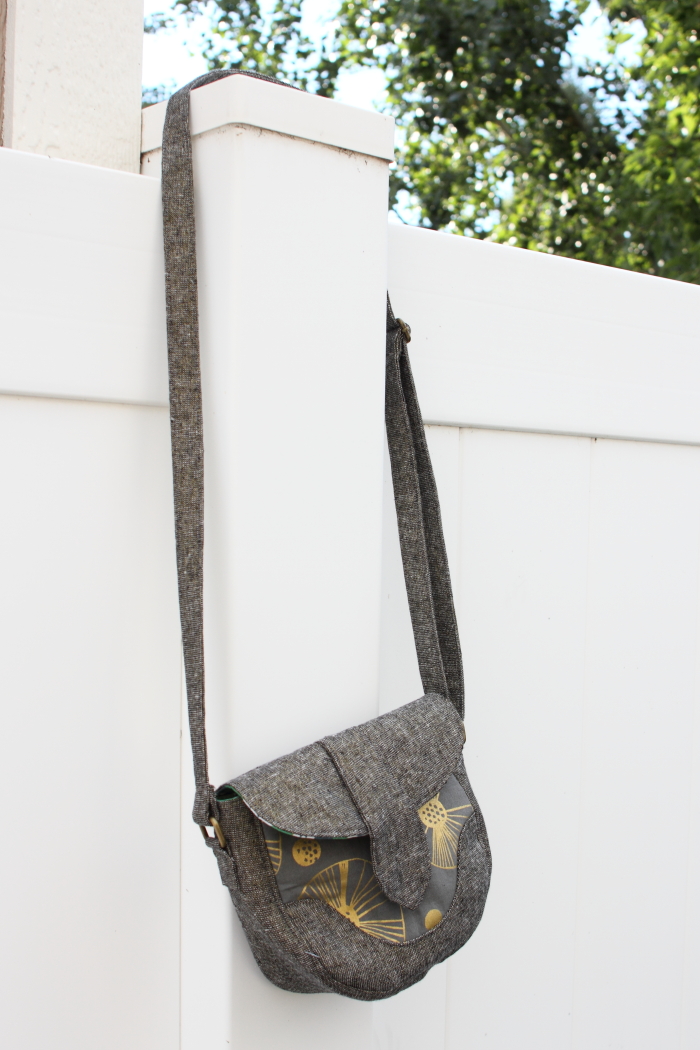
I picked a smallish bag so I would be able to fit it in a small box for shipping, and the pattern is a free pattern from Swoon Patterns. I had made a free Swoon pattern before, and knew the patterns were well written. For the record, I was willing to pay for a pattern, but the Dollie Mini Crossbody was perfect for what I wanted.

This is the back of the bag and it's a pocket.

I started searching for fabrics to use, and found this awesome Cotton and Steel gray with metallic gold print. And I knew it was perfect--it's modern, and fresh, and not quilty. I wanted to use a linen for the main fabric, and had considered a camel/khaki color, but the awesome folks at Hawthorne Threads helped me out with fabric matching and suggested this Essex linen in black with gold metallic thread. It is perfect! I love how it turned out. I also found some Joel Dewberry fabric in green (her favorite colors are green and yellow) and I think it works really well to add a fun element while still being stylish.


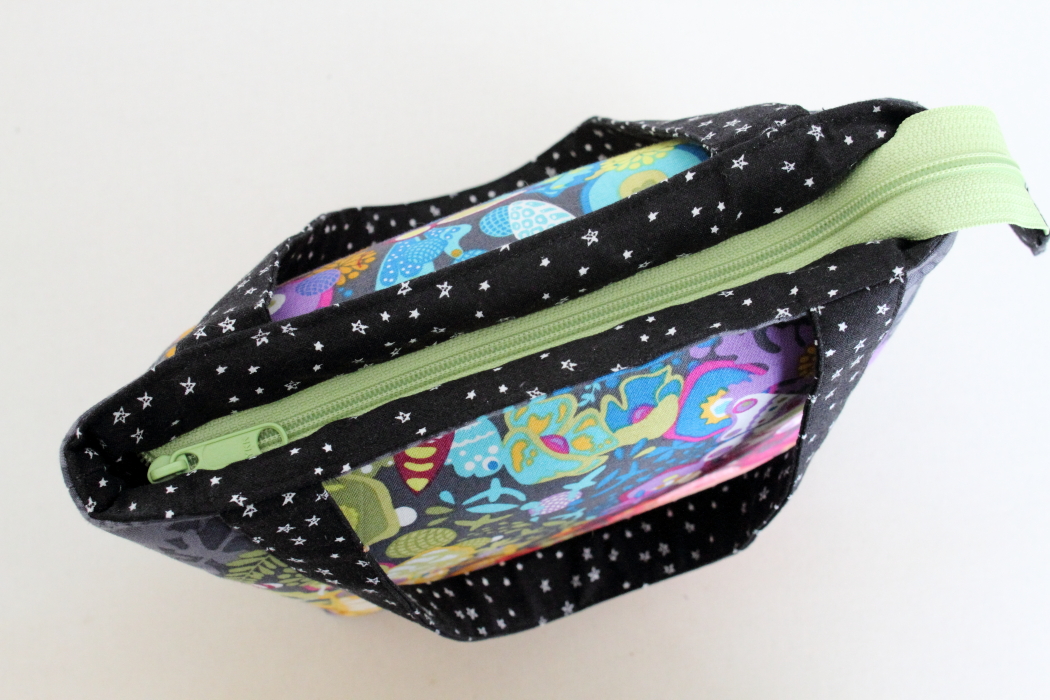
I made one change to the pattern to add an interior pocket. I originally planned to stitch down the middle of the pocket to create two pockets but opted against it because the bag is pretty small to start with, about 6-1/2" wide.


Since the fabric had gold metallic in it, I knew I couldn't use my standard chrome hardware and ordered antique brass hardware from Bagmaker Supply on Etsy. They have a good selection, good pricing, and fast shipping!


I really love how it turned out. The magnet is a little strong for the bag, and kinda pulls on the front of the bag when you try to open it, and the flap is a little stiffer due to the heavier linen, so I'm hoping it relaxes a little with use. But I also assume that once it is full of stuff, it'll hold its shape a little better, too! And really, I just hope Odile loves it. She's been a great friend over the years and I hope she enjoys it.

Monday, February 13, 2017

Time for a Change Diaper Bag

I finished sewing my new diaper bag a few nights ago, hooray! So, I guess that means I can start taking my babies out, now, right?

Right... *sigh*


But still...I finished my bag! Yippee!


When I found out I was expecting twins, I knew I'd need a better bag solution. I had used a shoulder bag from my university days for my other girls and loved the size, the material (strong, black canvas), and the strap, which had a shoulder pad and swivel clips. But I didn't think it would be big enough for two kids. I started looking into Petunia Pickle Bottom bags because it seems like everyone in my neighborhood has one. Even my friend who couldn't stomach buying one with her first baby bought one somewhere along the way to her second. However, I just don't get the hype. And they're pretty expensive...and I don't think they're that attractive: I think the shape is a little strange. I looked at other styles of the Petunia Pickle Bottom, but didn't see any I loved, and again...the price...I just couldn't see myself spending that much money on something I didn't love. 


So I started looking for patterns and got SO lucky. Erin of Dog Under My Desk released a diaper bag pattern just this year! Perfect! I was not thrilled that she put her store on sale a mere 10 days after I purchased the pattern at full price, but I had sewn a bag from a pattern of hers before and knew they were worth the $10, so I tried to not feel too upset. 

It sort of worked.

I decided to use a lightweight denim (or chambray, maybe?) from my stash for the main fabric and I ordered a piece of Handcrafted 2 by Alison Glass for the lining. I love it! I had the yellow zips already so I didn't have to order any, and I ordered the killer hardware from Bag Maker Supplies on Etsy. I think the hardware is just beautiful, I really love it and I'll definitely order it again.


Even though I complained mightily about the price of commercial diaper bags, this isn't a cheap sew, especially if you want to use AG Handcrafted fabric. I bought the main fabric too long ago to remember how much I paid, and I had most of the interfacings in my stash, but if I had to guess, I'd bet this bag cost about $75-$85 to make, including the pattern purchase. I think it's worth it.


I thought adding a pieced strip of Handcrafted scraps would look really cool as a focal point on the bag and I'm so glad I went to the trouble of doing it, I love how it turned out!


I also added a pocket on the inside with elastic. This was an add-on on her blog and I went ahead and added one because you can never have too many pockets, am I right? 

I'm really excited to start using it. I love how it turned out! I did run into a couple problems while sewing it, but really, her patterns are amazingly written and make it pretty easy to be successful. And now, if I make the pattern again (my daughter has already requested one...we'll see), I'll know where to be careful (hint: the zipper on the top isn't lined up straight, but since it still works and hangs well, I left it).


I really recommend Dog Under My Desk patterns, especially if you're new to bag making but want to start. They're amazing!