As I thought about it, I realized I've developed my own preferences for binding and that maybe it would help you if you're still figuring out what you like and how to get your binding to place where you're happy with it. If you're looking for show quilt binding tips, this is not it. But if you want to be happy with secure and even machine binding, keep on reading!

Showing posts with label tutorial. Show all posts
Showing posts with label tutorial. Show all posts
Monday, November 4, 2024
Come Bind with Me (A machine binding tutorial)
I have made over 50 quilts over the past 15 years and I can hardly believe it! I was reflecting on that, and how much my binding skills have improved, as I finished the binding on my Picture Perfect Snap Happy quilt. My bindings still aren't perfect and I know I can see the flaws, but they're so much better and I'm really happy with them. I feel like I've found a good balance of secure and good enough. I choose to machine bind for a couple reasons. First, it's faster. By the time it comes to binding, I want to snuggle with my quilt, and not while I'm hand sewing on the binding. Second, I don't enjoy hand sewing. I have started English Paper Piecing, but that's really it. I loathe appliqué. I tolerate hand binding on mini quilts and really special quilts not meant to be used hard, and only if they don't have minky. And third, machine binding is more secure. My quilts are for loving, and with four girls they get loved. And occasionally used for forts.
Wednesday, April 5, 2017
Fabric Notebook Cover Tutorial
While I was still pregnant, I did a lot of internet surfing. I was stuck in bed for much of the day because I was so exhausted and uncomfortable, and while I did a lot of non-computer things, too, I needed variety. Or a break for my fingers from hand sewing. While surfing, I spent some time hanging around The Red Headed Hostess's website. She has great resources for religious study, including some great items to purchase. A lot is geared toward Mormons, but much of it could be applied equally well to other religious groups, as well. I was really intrigued by her scripture study packets, but hesitated to purchase for two reasons. I wasn't sure how well I would use it for my studying, and I didn't feel like I needed "pretty" study sheets. So, I created a printed sheet for myself for general conference talk studying that had the sections I thought I would need (inspired by but not identical to hers), and I started a scripture journal following instructions she had on her blog here (scroll to the bottom for a link to a PDF with concise instructions and tips).

I bought a simple composition notebook at Target before school started, and started my journal. But I decided it really needed a cover. I looked around online, especially Pinterest (see note above about internet surfing...) but couldn't find what I was looking for. I wanted it to have a pen pocket and some sort of closure, I was leaning toward an elastic strap rather than a button and loop, but would have taken either. So, I decided to wing it. I measured the book and guessed at a good placement and size for a pen pocket, and went for it. And decided that someone else might like to make one, too, so I thought I'd write up a tutorial. I made my first one out of solids that I had leftover from other projects, as a trial, but I liked it well enough that it's the one I use. I've made one for my sister, one for my mom, one for my daughter, and one for a friend out of cute fabric now that I have the sizing and technique down!
First, you'll need a few materials.
Fabric
Pellon SF101 fusible interfacing: enough to fuse to the cover pieces and the pocket background
Step one: Fuse the interfacing to the cover pieces and pocket background. I like to fuse a larger piece of interfacing than I need to an even larger piece of fabric so that I can trim it to size. You could use a heavier weight fabric instead, but I like using my quilting cotton stash, so interfacing helps make it a little sturdier. I know some people complain about rippling from interfacing, but I have found that if I press the front of the fabric well after I fuse it that it looks pretty flat. Trim the pieces to the sizes listed above.

Step two: Prepare the pocket. Press the pocket front fabric in half matching the short ends. Using an 1/8" seam allowance, sew the pocket front to the pocket background along the bottom edge (short end) with the raw edges of the pocket front at the bottom. This is technically unnecessary but will help keep the pocket pieces lined up in the next step. (no photos, sorry!)
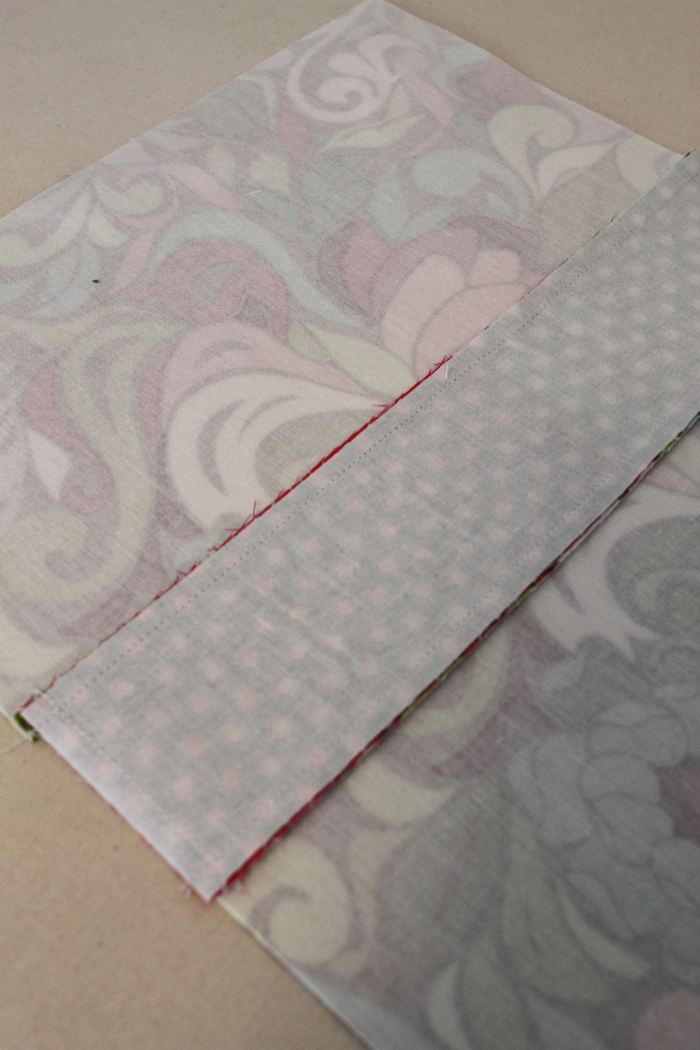
Step three: Prepare the front cover piece. Using a 1/4" seam allowance and with right sides together, sew the pocket pieces to the front cover pieces so the pocket is to the right of the longer piece.
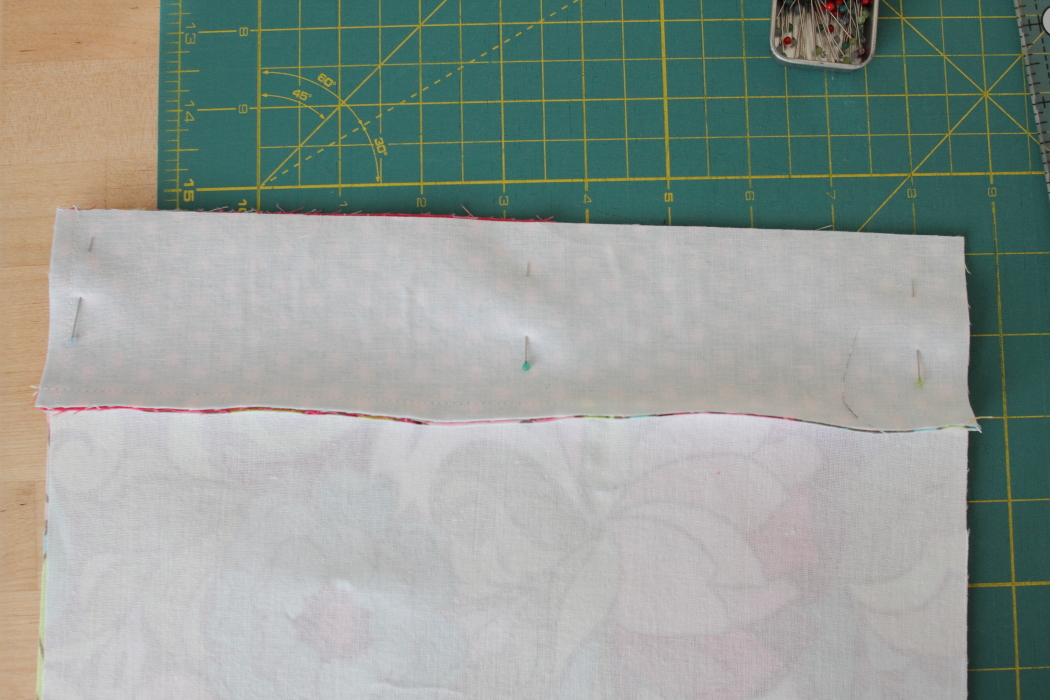
You'll want to be careful to make sure that the pocket opening is up. Press the cover piece with the seams out from the pocket.

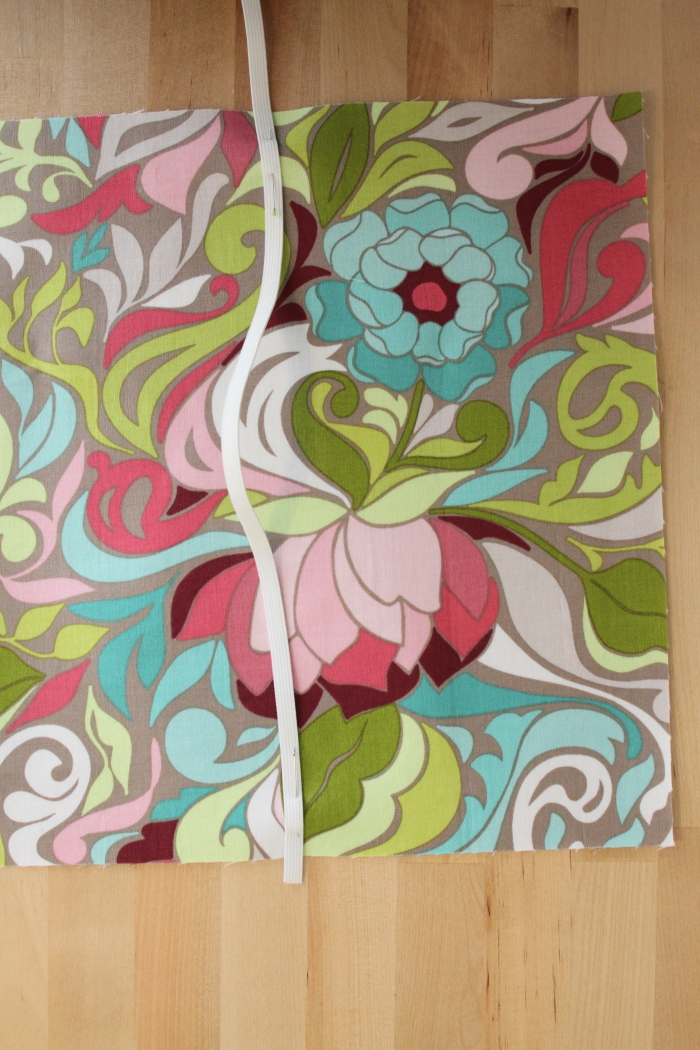
Step four: Pin the covers together and place the elastic. Sandwich the elastic inside the cover and pin it in place with 1/4" extending beyond the edges of the top and bottom of the covers. Pin it 11" away from the inside edge of the pocket.

Step five: Sew the cover together. Using a 3/8" seam allowance and with right sides together, stitch all the way around the outside leaving a 4" opening on one end.

Clip the corners (being careful to not cut the stitches) to reduce bulk.

Turn the cover right side out and push the corners out well. (Note that a 3/8" seam allowance makes for a comfortable cover with a bit of overhang around the notebook. If you would like to fit more snugly, and be more difficult to switch out notebooks, you can use a 1/2" seam allowance but must be careful to make sure it will fit before clipping corners and top-stitching.)

Press the cover well, turning the fabric at the opening in to the same seam allowance. Your cover should be about 10-1/4" tall by 24-1/2" long. If it's shorter than 10-1/8", you won't be able to top-stitch to finish it and have it fit, and 10-1/8" is really pushing it. Ask me how I know.

Step six: Top-stitch the short edges of the cover.
Step seven: Prepare the cover for finishing. Wrap the cover around the notebook you are using and fold the edges over the notebook cover, making sure they are as even as possible. Check on pocket placement and elastic placement. When you are satisfied, pin the edge and remove the cover. Repin the cover through the middle of the cover pockets.

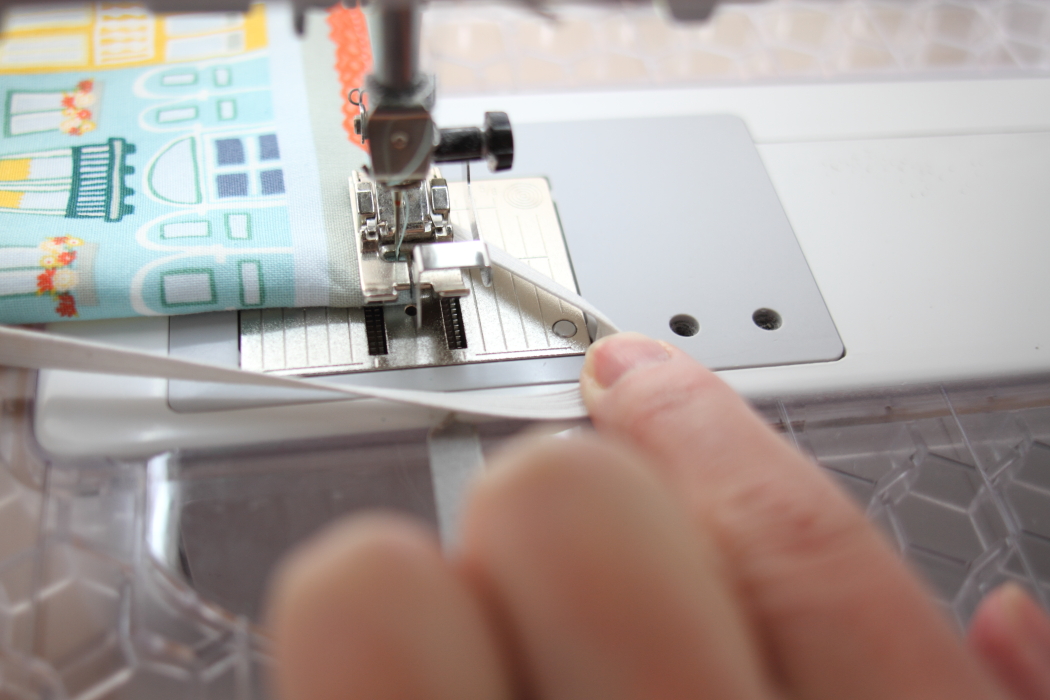
Step eight: Top-stitch the cover closed. Being careful to catch both edges of the cover at the ends, top-stitch along the long edges of the cover only. Do NOT topstitch along the short edges. Carefully sew near the elastic, ensuring that you do not top-stitch through the elastic by holding it out of the way of the needle.

Clip your threads and wrap your notebook with your new cover! The notebooks that I bought were quite flimsy and I found they benefited from slipping in a piece of cardboard cut to size. I slipped mine in right behind the notebook.


These make fantastic and quick gifts. Who couldn't use more notebooks?
I bought a simple composition notebook at Target before school started, and started my journal. But I decided it really needed a cover. I looked around online, especially Pinterest (see note above about internet surfing...) but couldn't find what I was looking for. I wanted it to have a pen pocket and some sort of closure, I was leaning toward an elastic strap rather than a button and loop, but would have taken either. So, I decided to wing it. I measured the book and guessed at a good placement and size for a pen pocket, and went for it. And decided that someone else might like to make one, too, so I thought I'd write up a tutorial. I made my first one out of solids that I had leftover from other projects, as a trial, but I liked it well enough that it's the one I use. I've made one for my sister, one for my mom, one for my daughter, and one for a friend out of cute fabric now that I have the sizing and technique down!
First, you'll need a few materials.
Fabric
- inside cover 11x24-1/2
- front cover 11x6-1/2 and 11x16-1/2
- pocket background 11x2-1/2
- pocket front 12x2-1/2
Pellon SF101 fusible interfacing: enough to fuse to the cover pieces and the pocket background
Step one: Fuse the interfacing to the cover pieces and pocket background. I like to fuse a larger piece of interfacing than I need to an even larger piece of fabric so that I can trim it to size. You could use a heavier weight fabric instead, but I like using my quilting cotton stash, so interfacing helps make it a little sturdier. I know some people complain about rippling from interfacing, but I have found that if I press the front of the fabric well after I fuse it that it looks pretty flat. Trim the pieces to the sizes listed above.
Step two: Prepare the pocket. Press the pocket front fabric in half matching the short ends. Using an 1/8" seam allowance, sew the pocket front to the pocket background along the bottom edge (short end) with the raw edges of the pocket front at the bottom. This is technically unnecessary but will help keep the pocket pieces lined up in the next step. (no photos, sorry!)
Step three: Prepare the front cover piece. Using a 1/4" seam allowance and with right sides together, sew the pocket pieces to the front cover pieces so the pocket is to the right of the longer piece.
You'll want to be careful to make sure that the pocket opening is up. Press the cover piece with the seams out from the pocket.
Step four: Pin the covers together and place the elastic. Sandwich the elastic inside the cover and pin it in place with 1/4" extending beyond the edges of the top and bottom of the covers. Pin it 11" away from the inside edge of the pocket.
Step five: Sew the cover together. Using a 3/8" seam allowance and with right sides together, stitch all the way around the outside leaving a 4" opening on one end.
Clip the corners (being careful to not cut the stitches) to reduce bulk.
Turn the cover right side out and push the corners out well. (Note that a 3/8" seam allowance makes for a comfortable cover with a bit of overhang around the notebook. If you would like to fit more snugly, and be more difficult to switch out notebooks, you can use a 1/2" seam allowance but must be careful to make sure it will fit before clipping corners and top-stitching.)
Press the cover well, turning the fabric at the opening in to the same seam allowance. Your cover should be about 10-1/4" tall by 24-1/2" long. If it's shorter than 10-1/8", you won't be able to top-stitch to finish it and have it fit, and 10-1/8" is really pushing it. Ask me how I know.
Step six: Top-stitch the short edges of the cover.
Step seven: Prepare the cover for finishing. Wrap the cover around the notebook you are using and fold the edges over the notebook cover, making sure they are as even as possible. Check on pocket placement and elastic placement. When you are satisfied, pin the edge and remove the cover. Repin the cover through the middle of the cover pockets.
Step eight: Top-stitch the cover closed. Being careful to catch both edges of the cover at the ends, top-stitch along the long edges of the cover only. Do NOT topstitch along the short edges. Carefully sew near the elastic, ensuring that you do not top-stitch through the elastic by holding it out of the way of the needle.
Clip your threads and wrap your notebook with your new cover! The notebooks that I bought were quite flimsy and I found they benefited from slipping in a piece of cardboard cut to size. I slipped mine in right behind the notebook.
Monday, December 5, 2016
Cutting Up My Kona Color Card {Tutorial}
Over the summer, I bought Amy Ellis' pattern for her Majestic Mountain mini quilt. I HAD to make it, and I'm so pleased with how mine turned out! But picking the colors was no easy task. I had a Kona color card, but it was so difficult to pick colors that would work together from the tiny swatches that were so far apart from each other on the card! If you have a color card, I'm sure you know exactly what I'm talking about. You do your best, but in the end, it's just impossible. This was the first time I was needing to use it to pick solids to go together instead of picking solids to match fabric I already had, and it proved too much.
So, I cut it up.
I know a lot of people have done this, but I was nervous and I wasn't sure how I wanted to store it exactly. I was worried about losing swatches, and I was worried about finding the easiest way to use them. I know lots of people punched holes in them and strung them on a chain, but the swatches are so small already that I didn't want to punch a quarter inch hole through the color. And then I saw a post on the Anything Pretty blog. She cut hers, mounted them on velcro and stuck them on a canvas. I thought it was brilliant! I didn't have to punch a hole in them, and it seemed like a great way to store them: as decor. It would be one less thing I need to find a place for me in my cluttered sewing room.

So, first things, first. I didn't find a whole lot of great tips for how to do this, so I thought I'd really spell it out. After all, "cut it up" seems like directions, but what's the best way to do that, really?
I don't know if the way I did it is the absolute best way, but it worked well for me.
I started with a dull rotary blade and used my rotary cutter and quilting rulers to cut it. It was hard, I'm not going to lie, and I did it over several days because it put a lot of strain on my hands. But, doing it this way meant that I got really straight cuts, and I imagine it was easier on my hands than scissors! Note that because the swatches aren't all the exact same size, you need to do rows individually. No short cut here--every piece has to be cut out. I cut rows the width they would end up (a fraction below the name) and then cut the strips into pieces.
 Next, I bought rolls of velcro with adhesive backs so I wouldn't have to glue. I bought 3/4" wide velcro and I found it at Lowe's. Again, I think "stick velcro on the backs" isn't very helpful, so here's exactly what I did. I tried peeling the velcro and then cutting it, but this gummed up my scissors a lot faster than when I cut the velcro in pieces with the plastic still on. So, do that. I found that it was easier to keep the velcro from tangling up by separating the two sides of velcro, which come next to each other on the same piece of plastic. Cutting it apart was pretty quick, and then you can set aside the half you're not working with. And, I elected, like Anything Pretty, to put the loop side on the back of the color card pieces so that if I put them on fabric I won't risk the hook side snagging my fabric.

Last was the trickiest part for me: applying the velcro strips to the canvas. I cut a tiny bit off and stuck it to the back to test the adhesive, which seemed pretty strong to me while I was putting it on the color swatches, but the next morning, it pulled right off. This very likely might have been due to the face that I used a tiny piece, but I wasn't wiling to risk it after all the work I went to since I reasoned it could be due to the uneven and flexible surface of the canvas. So, even though the velcro had adhesive on it, I used glue, too. I didn't want the strips to peel off when I pulled color chips off.
I bought a 24x36 canvas from Joann's when canvases were 50% off. It still ended up being $25--this is not a cheap project! I used blue painter's tape to create a 1" border around the canvas to keep my strips even, and then I marked my strips with pencil and my 6"x24" quilting ruler to make sure they were evenly spaced and level. Make sure you use a light pencil line--after I glued down a few strips, I went back and erased the lines so they were fainter because you can see the pencil through the velcro. I spaced the lines apart by 2", so the strips are closer than that since the swatches are over an inch tall.
I started by finding the middle line and then measuring out from there--you'll need 13 lines total. And for the glue, I used E600. So far, it's holding well! I found a package of single use tubes at Target of all places, and bought that even though I had a large tube at home. My large tube was several years old and I knew it would be difficult to squeeze it out evenly.


I'm really happy with how this project turned out! I love that it's a prominent piece in my room and that I can see it all the time. I love playing with the color chips and picking out new color combinations. It worked out really well, and if you're looking for a way to cut up your card, I'd definitely recommend it!
So, I cut it up.
I know a lot of people have done this, but I was nervous and I wasn't sure how I wanted to store it exactly. I was worried about losing swatches, and I was worried about finding the easiest way to use them. I know lots of people punched holes in them and strung them on a chain, but the swatches are so small already that I didn't want to punch a quarter inch hole through the color. And then I saw a post on the Anything Pretty blog. She cut hers, mounted them on velcro and stuck them on a canvas. I thought it was brilliant! I didn't have to punch a hole in them, and it seemed like a great way to store them: as decor. It would be one less thing I need to find a place for me in my cluttered sewing room.
So, first things, first. I didn't find a whole lot of great tips for how to do this, so I thought I'd really spell it out. After all, "cut it up" seems like directions, but what's the best way to do that, really?
I don't know if the way I did it is the absolute best way, but it worked well for me.
I started with a dull rotary blade and used my rotary cutter and quilting rulers to cut it. It was hard, I'm not going to lie, and I did it over several days because it put a lot of strain on my hands. But, doing it this way meant that I got really straight cuts, and I imagine it was easier on my hands than scissors! Note that because the swatches aren't all the exact same size, you need to do rows individually. No short cut here--every piece has to be cut out. I cut rows the width they would end up (a fraction below the name) and then cut the strips into pieces.
Last was the trickiest part for me: applying the velcro strips to the canvas. I cut a tiny bit off and stuck it to the back to test the adhesive, which seemed pretty strong to me while I was putting it on the color swatches, but the next morning, it pulled right off. This very likely might have been due to the face that I used a tiny piece, but I wasn't wiling to risk it after all the work I went to since I reasoned it could be due to the uneven and flexible surface of the canvas. So, even though the velcro had adhesive on it, I used glue, too. I didn't want the strips to peel off when I pulled color chips off.
I bought a 24x36 canvas from Joann's when canvases were 50% off. It still ended up being $25--this is not a cheap project! I used blue painter's tape to create a 1" border around the canvas to keep my strips even, and then I marked my strips with pencil and my 6"x24" quilting ruler to make sure they were evenly spaced and level. Make sure you use a light pencil line--after I glued down a few strips, I went back and erased the lines so they were fainter because you can see the pencil through the velcro. I spaced the lines apart by 2", so the strips are closer than that since the swatches are over an inch tall.
I started by finding the middle line and then measuring out from there--you'll need 13 lines total. And for the glue, I used E600. So far, it's holding well! I found a package of single use tubes at Target of all places, and bought that even though I had a large tube at home. My large tube was several years old and I knew it would be difficult to squeeze it out evenly.
After glueing the velcro down, I spent a bunch of time sorting the color swatches, but that part was fun, as I'm sure you can imagine!
I'm really happy with how this project turned out! I love that it's a prominent piece in my room and that I can see it all the time. I love playing with the color chips and picking out new color combinations. It worked out really well, and if you're looking for a way to cut up your card, I'd definitely recommend it!
Monday, September 26, 2016
Holiday Banner {tutorial}

I thought that was good enough.
But, I understand kids like to be festive. I sure did when I was their age. I went fabric shopping last year a few days before Halloween, looking for some very specific charm packs, and while I didn't find them, I did find that my local shop had their Halloween fabric on sale for 40% off. I picked up a couple cuts and planned right then and there to make a Halloween banner, like a birthday banner I made a few years ago.
And, I thought, since it's a really easy project, that I'd share here how I make banners! I know there are faster methods, but I like mine to be really finished. Quick, lightweight banners don't often have finished edges, and I like mine to be durable. It doesn't take that much longer to make them right.
Before I get to that, though, I wanted to point out two tools that I used with my second banner that made it so much easier. They aren't essential, and I certainly wouldn't suggest you go out and buy them for this one project, but I love them and they make a lot of projects I do a lot easier. And, no, this isn't a sponsored post in anyway, nor are any links affiliate. I just wanted to share about my tools.
The first is my Silhouette Cameo. I struggle with it, to be honest, but on the whole, I'm pleased with it. It doesn't always make perfect cuts like some people will have you believe, and I'm sure part of that is me and not understanding the settings. But, it does a pretty darn good job and it's far better (and easier) than anything I could do with a pair of scissors.
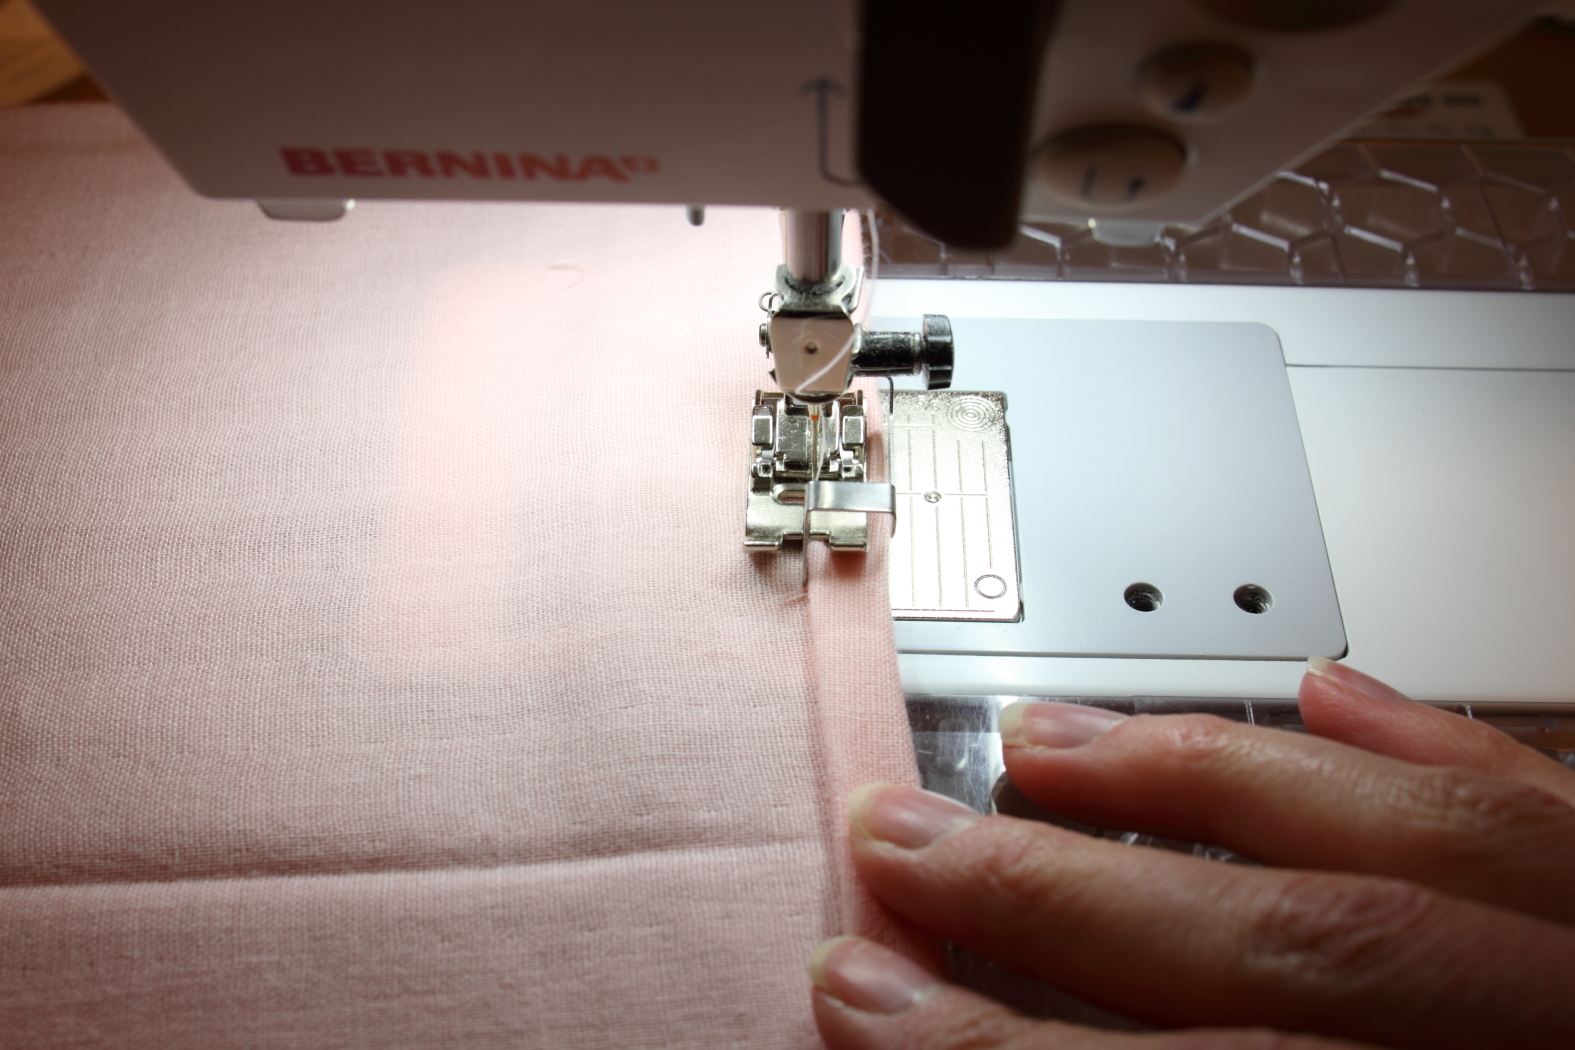
The second is my Bernina Top Stitching Foot, #10. I use this foot so much. I just love it! It helps me keep my stitching close and even. I use it anytime I want to be a little more precise, even if I'm not technically "top-stitching."
Now, onto the banner!
First, decide what style and size you want. My birthday banner uses triangles that are 9 inches tall, and for my Halloween banner, I decided to use 5x7 inch rectangles. Think about your space and where you'll hang it. My birthday banner is probably a little big as it hangs down a little low where we walk. Also make sure to think about what you want it to say. Happy Birthday and Happy Halloween are what I picked, but for Christmas, you could pick a lot of different phrases. Happy Holidays, Merry Christmas, Peace, Ho Ho Ho, Joy (that one would be super quick!), or anything else you could think of.
Second, pick your fabrics. If you have a stash, this is a great way to use it, as you'll only need a little bit of fabric. I opted to get 1/3 yard cuts of the new prints I bought because I wanted to make sure I had at least 9-1/2 inches and sometimes the cuts get wonky. I always buy slightly more fabric than I need, just in case. But really, depending on how many prints you want to use, you really only need around a 6x8 inch piece of each. Perfect scrap buster. Cut out as many as you need, plus a backing for each. The backing can be plain as it shouldn't be seen if you hang it on a wall. I cut out 16 5-1/2x7-1/2 pieces for my Halloween banner and 16 backing pieces.
Third, pick your font and your lettering fabric. When I made my birthday banner, I printed out the letters from my computer and then traced the mirrored image onto fusible interfacing, then cut them out by hand. For my Halloween banner, I used my Silhouette Cameo and cut them out. You'll want to make sure that your lettering fabric has a good contrast to your banner fabrics so that your lettering will be visible (I missed the mark on a couple prints in this banner). Keep in mind a few things when you pick your font. It should be wide enough to top-stitch on, and if you're cutting it out by hand, you'll need something that you actually can cut out. I like to go for chubbier fonts so they are easier to work with, and so that they will be more visible on the banner.
Fourth, fuse the letters to the banner pieces. I measured up from the bottom and tried to center them as best I could, but since it'll be hanging and they won't be lined up and scrutinized, don't fret too much over this.
Fifth, topstitch the letters down. Technically, this is optional, but I like to make sure what I make is durable. If you're going to take the time to hand make something, you should do it right.
Sixth, sew the banner pieces to the backings along two sides and the bottom, right sides together. Leave the top open.
Seventh, clip the corners (but not the stitches!) to reduce bulk. Turn the pieces right side out and press.
Eighth, prepare your bias tape. Determine how long you want your piece(s) to be and cut enough 2-1/2 strips to be that length. I decided mine needed to be 120 inches for the longer one and 110 inches for the shorter one. You can always trim this down if it's too long, but it's more irritating to try to make it longer, and it needs to be long enough to have a couple feet of excess on either side of the banner pieces so you have room to tie it. Sew the strips together, ensuring the right sides are all on the same side of your strip, and press the seams open. press the two short ends in so the raw edges will be enclosed. Press the strip in half length-wise. Open it, and press both long edges in to the center pressed line. Refold the tape and press well so that the raw edges are enclosed.
Ninth, Find the middle of your bias tape strip and the middle of the banner pieces. Working from the middle out, pin the banner pieces into the bias tape. Once you are happy with the position, take the banner over to your sewing machine and top stitch the bias tape closed, making sure you catch all the edges.
And you're done! Not too bad, right? And what you have is a banner that can be used for many, many years to come. I've pulled out my birthday banner for numerous birthdays for the past 4 years, and it looks as good as the day I made it. There won't be any frayed edges to worry about, or fusible peeling off.
Friday, January 15, 2016
Fabric Selection Made Simple: Part 1
I really enjoy doing my Fabric Friday posts. I love going through my stash and I really love seeing how I can use a print in several very different fabric bundles to accomplish different feelings. I feel like I've always been pretty good at picking fabric and colors, but this weekly (or almost...) ritual has given me a lot of practice and I feel like I'm better at it now than I was. I also thought that, while it might be easy for me to do, it might be intimidating for others. I know I've heard people comment that it's easier to stick to a single line, or they wouldn't know how to use more than a single line. My own mother is intimidated by it, to be honest. So, I thought I'd share my process. I hope it's helpful to you! After I started writing this post, it got a little long for a single post, so I've made it into a series. Today, I'll be starting with color inspiration, and the next post will feature tips for fine tuning a color palette, and the last post will focus on some considerations for adding fabric to your palette.

Finding Color Inspiration: There are lots of ways to get started, and I've used all of the following methods at one time or another.


None of these fabrics come from "Christmas" fabric lines, but all would be at home in a Christmas quilt. In fact, I've used the Cotton and Steel and the Reunion print in Christmas quilts, and they look great!

But, it can work in other ways. Pink and aqua are popular, blue and yellow are classic, and blue and gray are calming. You can start off with an idea of what you'd like by using classic pairings and then adding a contrasting color for a pop.


But, pulling the focal fabric out works, too. They look great together.

Here are the fabrics I auditioned that didn't make the cut. The color wasn't quite close enough for me, or they didn't work with the other prints. Lots to consider, and there's no right answer--if you like it, you should use it!

Finding Color Inspiration: There are lots of ways to get started, and I've used all of the following methods at one time or another.
- An inspiring photo. My autumn bundle was inspired by a series of photos, or, rather, by the current weather situation which reminded me of said photos. If you're looking for a specific feeling, this method can be helpful as the photo will have the same feeling.
- A pre-existing color scheme. This one's especially easy for holidays, right? If you're going to make a Christmas quilt, it's easy to start with red and green.
None of these fabrics come from "Christmas" fabric lines, but all would be at home in a Christmas quilt. In fact, I've used the Cotton and Steel and the Reunion print in Christmas quilts, and they look great!
But, it can work in other ways. Pink and aqua are popular, blue and yellow are classic, and blue and gray are calming. You can start off with an idea of what you'd like by using classic pairings and then adding a contrasting color for a pop.
- Another quilt. This doesn't mean you have to use the same pattern or fabric, but if there's a quilt you really admire for the colors, you can use that to inspire a color scheme for your own quilt. This bundle was inspired by a single block from a Saturday Sampler club I participated in several years ago. I altered it a little, but that's where my inspiration came from. And now, it's a current WIP.
- Clothing or home decor. I'm totally into navy and aqua or mint right now. Like, kind of obsessed. And you know what? It all started when I bought my swimming suit a couple of years ago with diagonal navy and mint stripes. Home decor is usually pretty stylish and since your quilt will be located within a decorated space, it's a great place to start so that it will look at home.
- A focal fabric. This one is where most people start when they are first exploring their own ideas. Pick a focal fabric and find coordinating colors. You don't have to use all, or only, colors from the print, but you certainly can if that's where you are comfortable. You also don't have to include the focal print in your bundle, it can be used just as a starting place if you'd like.
But, pulling the focal fabric out works, too. They look great together.
Here are the fabrics I auditioned that didn't make the cut. The color wasn't quite close enough for me, or they didn't work with the other prints. Lots to consider, and there's no right answer--if you like it, you should use it!
- Factor X. I'm not sure what to call this one, because this is where I just kind of pull fabrics. I start with one that I'd like to use, either to challenge myself because I don't know what to do with it, or because I'm finding it really pretty that day. And I pull fabrics to go with it. I'll talk more about that in the next section.
Stay tuned for the next post, where I'll share some more specific ways to fine tune the colors you pick. We'll get in to a little bit of color theory (but I'll keep it accessible!).
Saturday, November 28, 2015
Infinity Scarf {tutorial}
About a month ago, I was in a local quilt shop, and they had double gauze infinity scarf kits. They were only $12, which was a little steep for the fabric itself (Cotton and Steel, retails for $21/yd), but they included instructions, and $12 isn't bad for a scarf, so I bought one. I made it, and it went together pretty quickly, even though I had to alter the directions for my own purposes. First, the directions were serger specific, something the display and packaging did not mention, and I don't have a serger. Second, the instructions were designed for fabric that is reversible, which the one in the kit wasn't, actually. It was one of the darling prints. It worked out, and it really wasn't that hard to alter.


I hope this helps! The first scarf took me close to an hour to make, but I think the second one really only took just over half an hour. Really not bad for a very useful gift!
So, fast-forward a couple weeks and I was back in the same shop, and they were having a pre-Thanksgiving sale. The kits were 50%, which made them $6. Now that I had actually made one, and I knew the kit contained 1/2 yard of fabric, I recognized that $6 wasn't a bad price! So I picked up a couple of kits, in two different solid colors this time, and planned to make one for me and one as a gift for Christmas.
And, since it went together so quickly, I thought you all might like a quick little tutorial in case you are in need of a Christmas gift. One thing I really love about mine is that it's really soft and warm. My neck gets irritated if the scarf isn't super soft, but the double gauze is really great.
Oh, and lest you think I'm ripping off a pattern written by someone else, this is instructions for what I did. On a sewing machine. The instructions really were all for serging, and frankly, I didn't even know what some of the words meant. So, it's based on a kit, but my instructions below in no way resemble the included instructions. :-) Also--please forgive the terrible lighting on the progress photos--I mostly sew at night and the lighting in my sewing room is atrocious. I assure you all the pictures are of the same fabric, however different the colors look. ;-)
So, first things first. For one scarf, you'll need 1/2 yard of double gauze. Cut it into 2 strips, 9" by WOF (width of fabric).
Sew the two pieces together (using a 1/4" seam allowance) on both the short ends to create a tube. If your fabric has a right side, you'll want to do it with the wrong sides together.


We're going to make those two seams French seams. So, turn the tube inside out. Working with one seam at a time, fold the seam so the seam is inside and the sewn edge is nice and flat on the edge. You want to be careful to make sure it's nice and even, or it will end up a little skewed like my first seam. Sew a heavy 1/4" seam allowance so the raw edge is enclosed. Repeat on the other seam.
Next, we want to stitch that seam down so it stays nice and flat when you wear your scarf. If you have a topstitching foot (Bernina #10 or equivalent for your machine), now is a great time to use it.

You'll want to stitch the seam down as close to the edge of the seam as you dare.
You'll want to stitch the seam down as close to the edge of the seam as you dare.
 |
| The stitched down French seam from the wrong side. |
The last step is to hem the edges. If you're fancy, you can measure and press and pin. I'm lazy.

I folded it under as I sewed. You can make this is as narrow as you like, mine is a heavy 1/4" hem.
 |
| The stitched down French seam from the right side of the scarf. |
I folded it under as I sewed. You can make this is as narrow as you like, mine is a heavy 1/4" hem.
That's it! Clip your threads and call it good. Again, if you're fancy, you can iron out any folds, but I figured it's just going to get more fold lines as it waits to be opened. Yep, I'm classy. :-)
I hope this helps! The first scarf took me close to an hour to make, but I think the second one really only took just over half an hour. Really not bad for a very useful gift!
Sunday, October 11, 2015
Swoon! {quilt labeling tutorial}
I finally bound my Swoon quilt! This quilt has been in the works for quite a while; I started planning a year ago. But I finally have it finished, and I'm so pleased.

And actually, this post has been finished for a while, save a full shot of the quilt, so we've been enjoying the quilt for a good couple of months. It's been really hard to get a photo of the full quilt, and even then, I didn't do super well. Cheers to my helpful husband for holding it up as best he could! It's a big quilt, and that means it heavy, and he didn't quite have the arm span to hold it from both corners. That's really saying something as he is 6'6"! But, here we are. Finally.

For my Swoon, I chose some of my favorite fabrics from my stash, and paired them with solids. What's nice about the regular Swoon pattern is that it's designed for fat quarters, so I could easily pull from my stash since everything I buy is either a fat quarter or a half-yard.

I really wanted the prints to stand out, and solids are so in right now I thought they would work well. I also opted to use Kona Ash as my background instead of white. I think it works.

Of course, after I finished binding it, I realized I had forgotten to label it (doh!)...I do that way too frequently. *sigh* so I had to unpick a corner to add it in. Of course, it's worth the extra work to unpick. I think labels are important.

Do you label your quilts?
If not, you should think about it. Especially if you gift a quilt. Here's the information I often include on my labels:

To make a label, I take a square of white fabric, generally 5-6 inches, and fold it in half. I iron it in half diagonally. Occasionally, I'll back it with wonder-under so I can use my Silhouette to "write" the label...but it's a lot trickier to get the pen to sketch the font correctly, so I've kind of given up on that, even though I don't love my handwriting.


That's pretty much it--just make sure to catch it so it's enclosed in the binding. You'll end up with a little pocket, and I think that's fun. It's unobtrusive, and easier for me than applying a patch somewhere on the backing.
And actually, this post has been finished for a while, save a full shot of the quilt, so we've been enjoying the quilt for a good couple of months. It's been really hard to get a photo of the full quilt, and even then, I didn't do super well. Cheers to my helpful husband for holding it up as best he could! It's a big quilt, and that means it heavy, and he didn't quite have the arm span to hold it from both corners. That's really saying something as he is 6'6"! But, here we are. Finally.
For my Swoon, I chose some of my favorite fabrics from my stash, and paired them with solids. What's nice about the regular Swoon pattern is that it's designed for fat quarters, so I could easily pull from my stash since everything I buy is either a fat quarter or a half-yard.
I really wanted the prints to stand out, and solids are so in right now I thought they would work well. I also opted to use Kona Ash as my background instead of white. I think it works.
Of course, after I finished binding it, I realized I had forgotten to label it (doh!)...I do that way too frequently. *sigh* so I had to unpick a corner to add it in. Of course, it's worth the extra work to unpick. I think labels are important.
Do you label your quilts?
If not, you should think about it. Especially if you gift a quilt. Here's the information I often include on my labels:
- The quilt's name. This is hard for me. Often, it's the name of the pattern or a variation on the name.
- Recipient's name (if applicable)
- My name.
- Long-arm quilted by: (if applicable, which it usually is...)
- Name of pattern/designer (if applicable)
- Date completed
- Care instructions
- Special note (i.e. love you!, thanks for being a good friend!, etc)
I don't always include every item on a label, it really depends on the quilt. I think labels are especially important for gifted quilts so that the recipient knows how to care for their precious gift. If you gift it to another quilter, they'll be familiar with the proper care of a quilt, but many people who don't quilt won't know that they need to be washed gently.
To make a label, I take a square of white fabric, generally 5-6 inches, and fold it in half. I iron it in half diagonally. Occasionally, I'll back it with wonder-under so I can use my Silhouette to "write" the label...but it's a lot trickier to get the pen to sketch the font correctly, so I've kind of given up on that, even though I don't love my handwriting.
Once I've pressed it, I write the information on. Sometimes, I'll type the information up in a document and trace it so it will all be evenly spaced (which is a huge struggle for me to freehand...), other times, I'll just go for it. I use either a fine-tip BLACK sharpie (I've read not all sharpies are colorfast) or a Micron pen (which I bought from the quilting notions section in Joann's--I'm figuring it's meant for exactly this purpose). I heat-set the ink and press it back into the triangle.
Next it's time to install it on the quilt. When I'm binding, I'll pin it down to the back on a bottom corner by lining up the raw edges with the raw edges of the quilt corner. I like to pin it in place so I can include it in the first seam, but when I forget to add it all together, that doesn't happen. You can sew it down when you first sew your binding to the quilt (and if you're going to hand-stitch the binding down, you'll want to make sure to do that). You can also add it when you top-stitch the binding down, and if you've neglected to add it altogether like I did, this is how you'll add it after you unpick the top-stitching around one of the corners.
That's pretty much it--just make sure to catch it so it's enclosed in the binding. You'll end up with a little pocket, and I think that's fun. It's unobtrusive, and easier for me than applying a patch somewhere on the backing.
I hope this helps--now get to work and label all those old quilts! :-)
Swooning
quilted by Abby Latimer
Completed July 2015
Swooning
quilted by Abby Latimer
Completed July 2015
Subscribe to:
Posts (Atom)