Showing posts with label stashbusting. Show all posts

Monday, March 18, 2024

Gratitude Quilt

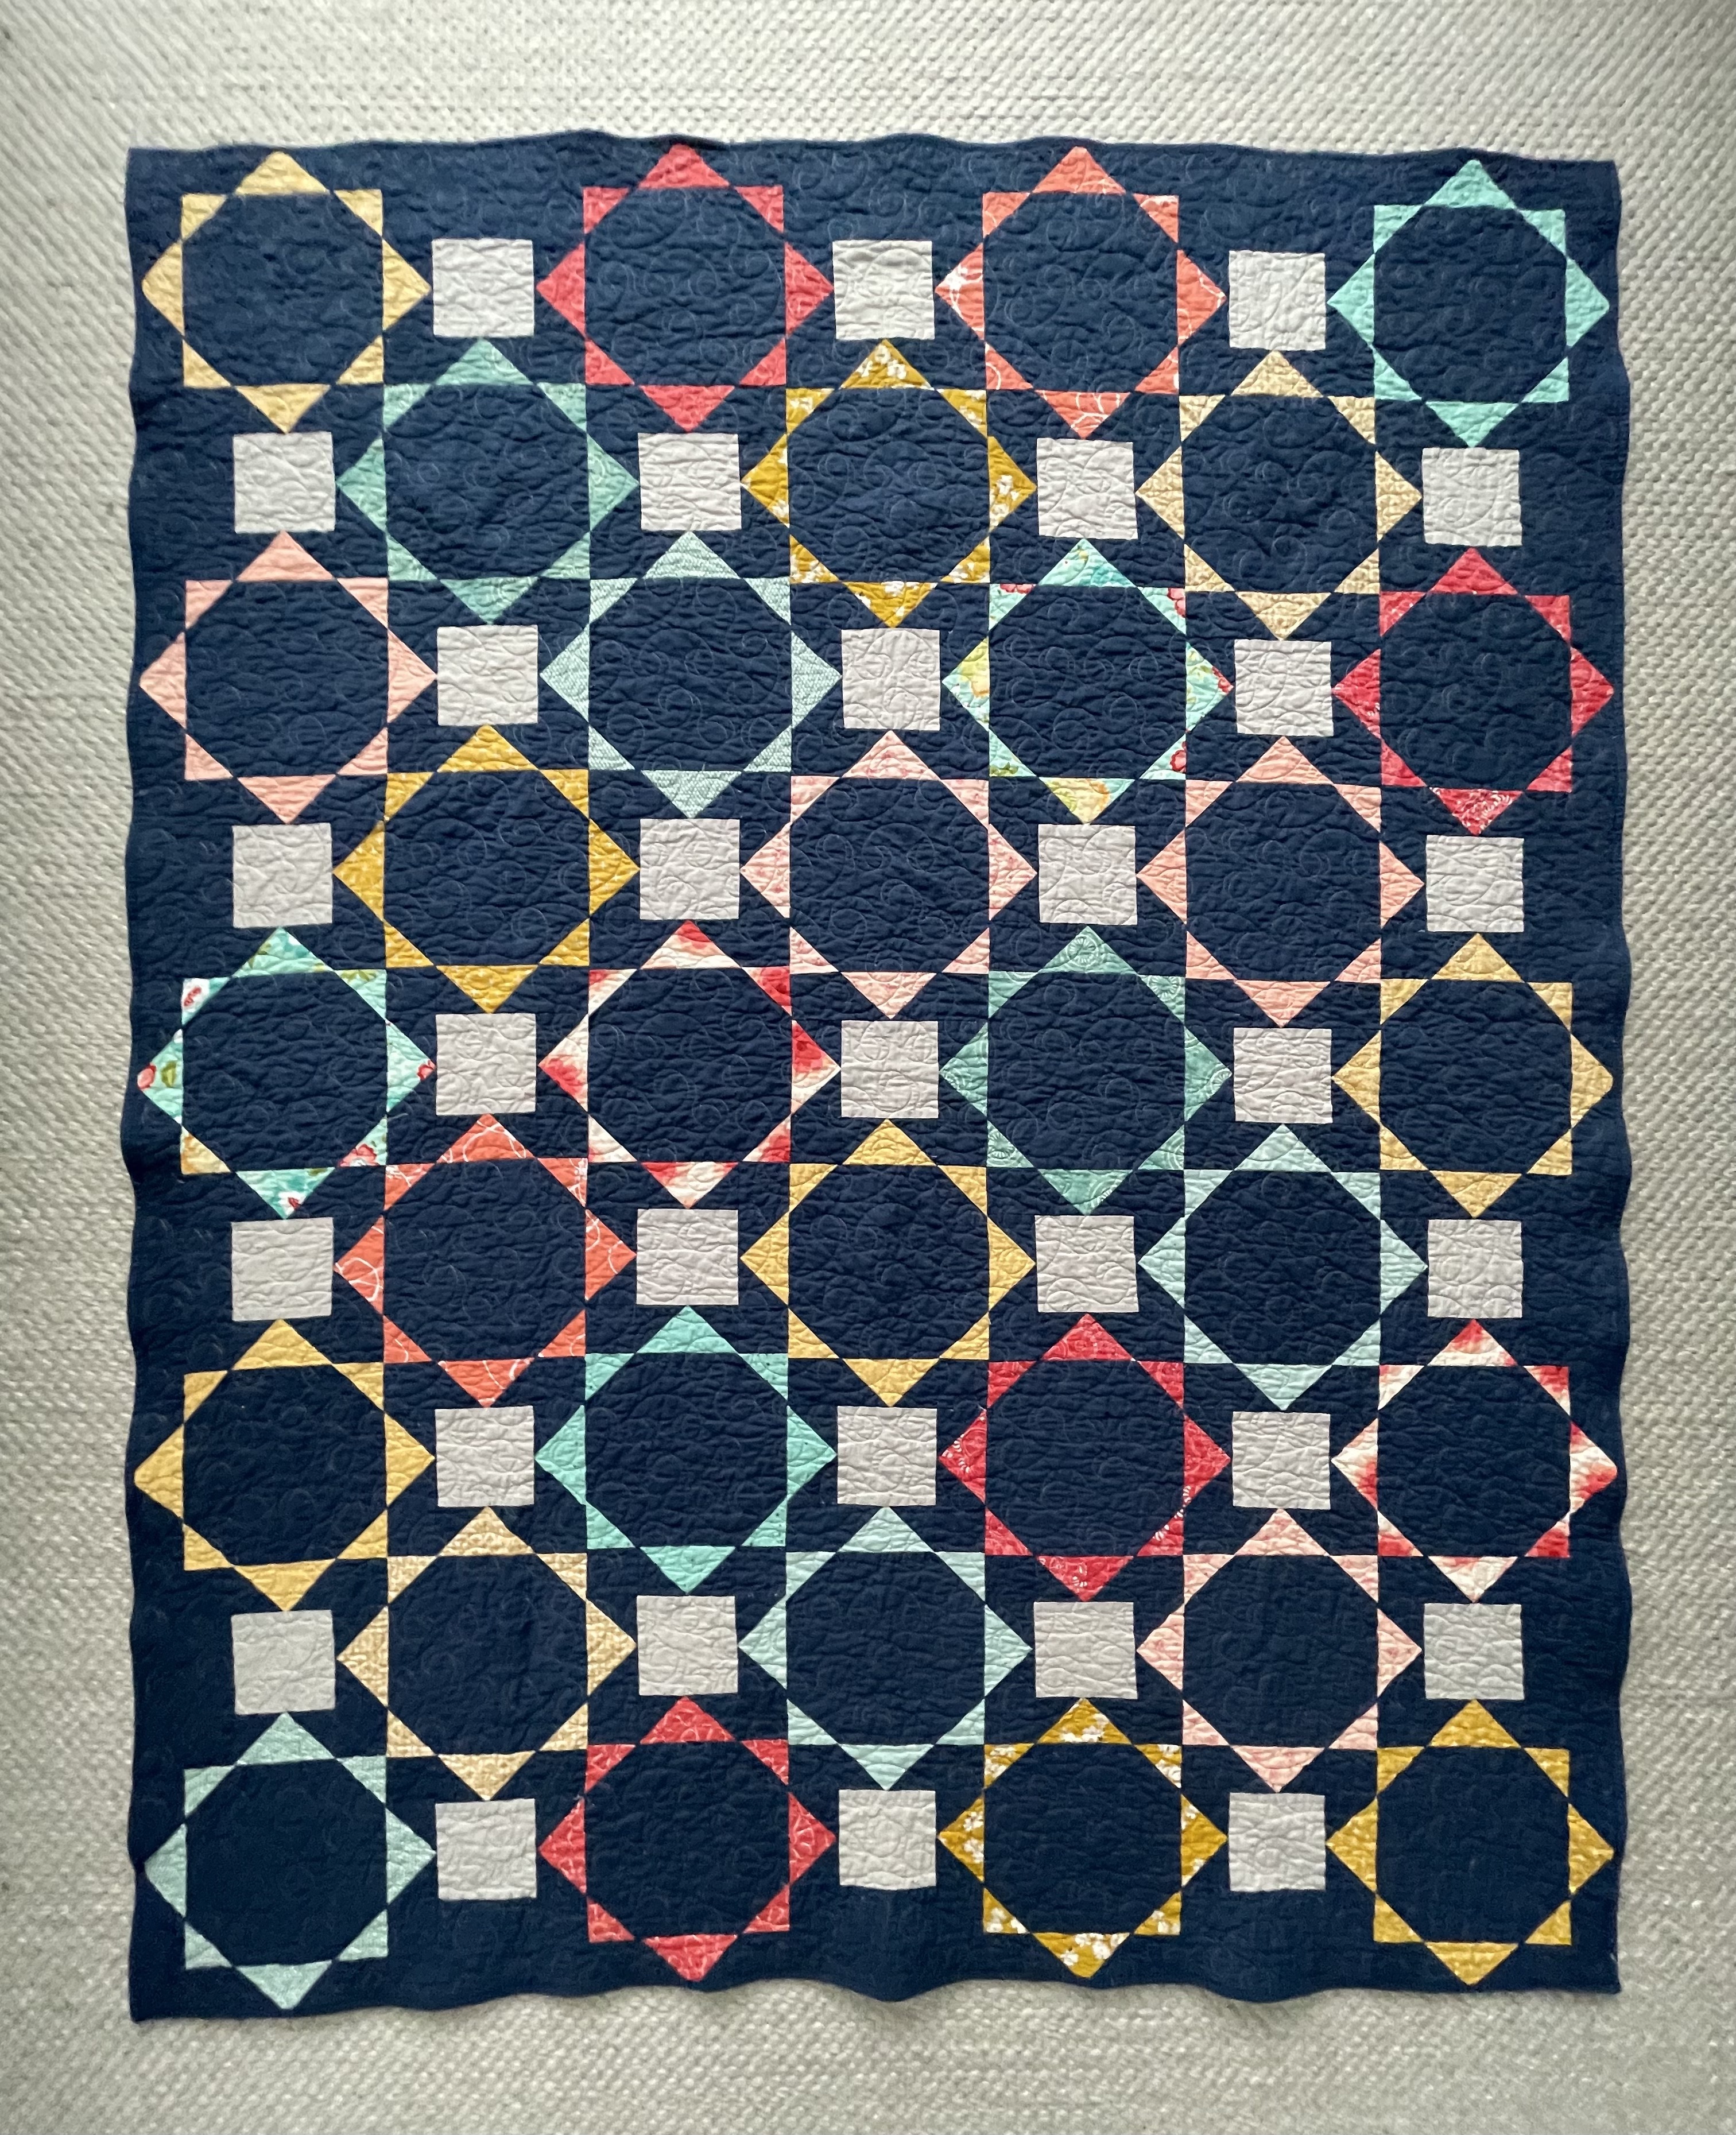
Before Thanksgiving, I had an idea. I had just seen a blogpost by Amy Smart about her gratitude quilt, and it lit a fire in me. The wheels turned quickly, and even though I usually mull things way longer than is necessary, I quickly jumped to work. I pitched it to my kids and they liked the idea too, so we went for it! 

I largely used Amy Smart's pattern for the gratitude quilt, but I made some changes. I think I made more blocks, but I omitted the border. And instead of using a sharpie to write on the blocks, I opted to embroider them. I had my girls all come up with 10 things they were thankful for and then I color coded the blocks and had the girls all sew their own blocks. So, my oldest daughter's blocks are all the same yellow fabric, and my second daughter's are all the same blue. I added their name to one of their blocks so we'd be able to figure it out easily later.


My girls have a whole week off of school for Thanksgiving and we never travel, so this was a great activity for them while they were off of school. I did need to unpick and resew a few blocks, especially for my seven-year-olds, but they mostly did great. And I sewed all my husband's blocks, of course. 

Once they were done, I laid it out quickly and stitched the rows together, and then I had a stroke. I knew it wouldn't be done by Thanksgiving, since we were sewing the blocks the day before Thanksgiving, but I still hoped to finish it before the end of the year just to wrap it up.

That did not happen. But I got it up to my quilter in February (I couldn't easily get down on the floor to pin rows together after I was discharged because I was so stiff), and I got it back this week.

I put it aside while I worked on my Sewtopia challenge quilt (will post on that later!), but once I had sewn the binding down to the front of that quilt, I opted to bind this one. I used the brown fabric that I used for some blocks, and I don't love the print (it was free from a neighbor's destash) but it's a great color, especially for an autumn quilt. I think it's a great binding for this quilt. 

I'm so glad it's finished!

Friday, March 8, 2024

Sandhill Sling

I mentioned last time that in lieu of participating in the Super Secret Swap for Sewtopia, that I wanted to make myself a swap package, so to speak. I wanted to give myself permission to make something hard that I've wanted for a while in the pretty fabric. I intended to justify purchasing fabric if I chose, but in the end, I used fabric from my stash. I did have to buy a couple pieces of hardware, but otherwise, I had everything. I love being able to turn to my stash for most of the things I need. It's really fun to shop your stash and not be limited by what's available at the quilt shop. 


I decided that what I really wanted, what I had taken screenshots of most for a possible mosaic for the swap, was a sling bag. I purchased the Sandhill Sling pattern by Anna Graham of Noodlehead over Black Friday and settled on making it. 


Luckily, I have a nice selection of canvas in my stash, including a lot of Rifle Paper Co, and some Ruby Star. There are some really phenomenal canvas prints out there, and I settled on a floral Rifle Paper. It went great with a large scrap of Essex linen and I opted to line it with a postage stamp print by Rifle Paper, though I didn't have enough. I made the pocket out of a starry print by Rifle Paper, right? I'm pretty sure...


And, I used zipper by the yard for the first time. The pattern uses a double head zipper, and I found some YKK zippers at my favorite Etsy shop, Zipit, but then I realized that a lot of people are using zipper by the yard for their handbags because the manufacturer (not YKK...) are making nylon zippers with metallic painted teeth so you get the benefit of looking like a metal zipper without the difficulty of shortening metal zippers. I found a different seller with a nice variety and ordered a few different tapes with some pulls, but I went with the one I had originally planned, a gray and white striped tape with silver coils. I think it turned out so sharp, and I'm so glad! 


The bag went together pretty quickly and mostly easily, although I did break for a couple of weeks in the middle while I worked on the quilt top for my fabric challenge project. I managed to finish it, and the backing, and had a couple of days before I could get up to a different shop for the Aurifil thread I picked out for quilting (which I ended up going in a different direction, but that's another post...) so I finished up the bag. 

It was mostly easy until the very last finishing step, which is brilliant, in that it allows you to have a fully finished lining without binding or hand-stitching a hold closed, but it was tricky. I can't even describe it easily, but it's brilliant. I found a 505 glue stick at my local shop while I was buying batting for my challenge quilt and it helped a lot with basting for the final step. 

Now my biggest decision is whether I want to start using it now or whether I want to save it like it's a swap package for sewtopia. It's only about 5 weeks away at this point...

Thursday, January 25, 2024

Terra Cotta Mini

After my stroke, I was itching to get back to the sewing room. I had done a little bit of English paper piecing in the hospital, but machine piecing is my preferred sewing method. But, my first week or so back was definitely time of recovery. I was worn out, I was sore, I wasn't walking very well at all. And I wasn't super confident in my fine motor skills needed for cutting and precision sewing. I was no where near confident to work on curves, which was my current WIP. Oh, and I wasn't limber enough to get down on the floor, so finishing the quilt I had in progress was out, too, since I was piecing rows together at this point. 

So, I had to figure out what to sew that I was up for sewing, and also had all the materials I needed...I toyed with a simple charm pack/HST quilt that's on my list, but I didn't want to use white for the background and didn't have enough of any other fabrics for the background, so that was out. I thought about Interwoven, by Lo and Behold Stitchery, but I didn't have solids and wasn't sure if the prints I picked were small-enough scale, and I read a reviewer who said the pattern required a lot of precision, so that was out. 

I had ordered a random sample pack of mini quilt patterns from Modern Makes (by Alderwood Studio) on Black Friday so I looked at the 5 patterns I was sent. To be honest, the set of patterns I got was pretty disappointing and if anything, it confirmed my decision to not participate in the program. I really only liked 2 out of 5, and 1 was excessively disappointing. Oh well, c'est la vie, non? One that I like is called Terra Cotta and I decided to make it as my first post-stroke project. The great thing about mini quilts is they don't take a lot of fabric, the cutting is minimal, and they wrap up quick. Plus, I can quilt mini quilts on my own machine. I'm not confident enough to quilt big quilts myself, so I send them out. But minis can be completely finished in a few hours. 


Luckily, I had some solids that worked great together and I finished it up a couple weeks ago. After I pieced it, it took me a few days to figure out how to quilt it. I didn't want to just quilt along the pieced style, I felt like that was boring. So I looked at my Walk book, by Jacquie Gering, and found a great design I felt like I could do. 

I'm really happy with how it turned out, and the only frustrating part is that I used a Sewline ceramic pencil to mark lines for quilt guides and I didn't actually get it all out. I tried scrubbing it with water with a microfiber cloth and a toothbrush, I even washed it in my washing machine (air-dried it after to avoid the heat of the dryer). They're faint, so I just gave up. Sadly. Lesson learned, don't use the ceramic pencils for quilt marking! At least for me. 

Tuesday, November 21, 2023

Starshine Quilt

A few years ago, I picked up a couple of florals by Rifle Paper Co. that I loved. One had a lovely burgundy background, but I didn't know how to use them. They sat in my drawers waiting for a project. Last fall, I worked on a fabric Friday pull using them and settled on this. Even though I didn't have anything to tie in the burgundy, I thought it was still okay. And I really liked the colors together. So I kept it aside and thought about patterns I could use it for.

And then I remembered a quilt pattern I was given for my birthday from my oldest daughter. She had picked it out when we were at a quilt shop after visiting a quilt show at a nearby museum and had my husband buy it for her. It's called Star Shine by Modernly Morgan and I really like it. It looks like a simple pattern, one I would not buy for myself because I would think I could figure it out on my own, but I'm glad she picked it. Unfortunately, my colors look an awful lot like the cover quilt. I don't like remaking quilts someone else made, I really prefer to put my own spin on it, so this is disappointing, but I do really love the colors and how it turned out, so I don't mind too much.


When I was ready to make it, I had to pick out fewer fabrics than I had in my pull. Some were easy to eliminate because I didn't have a big enough piece. But I made sure to use the two Rifle prints that started it all. I'm really happy with it, I think it's a pretty quilt!

I backed it with a Ruby Star Speckled I picked up on sale, and I bound it with a Ruby Star Sprinkle that I got on the same sale. They don't match together super well, so I'm sure not going to brag about how great the back looks, but they both work with the quilt so I'm happy.

Tuesday, September 26, 2023

Scrappy Chain

I got my Irish chain quilt bound a couple weeks ago and am just now getting around to blogging about it. I did take a bit of time to decide what to bind it with; at first I thought I should use an aqua fabric, and so I decided to pick up a solid because I don't love using prints on bindings (it feels like a waste, same thing with backings...) but in the end, I went with a low volume. I really like the stripe as a binding, and I like that it doesn't stand out the same way a darker binding would. So often I treat them as focal frames, and I think sometimes a quilt doesn't need that. 


My binding is still a tad wavy and I'm getting frustrated by this. The backing is regular quilting cotton, a cut I received from a friend who was destashing. I thought the wavy borders might be due to the minky I typically go for, but this is not minky. It's also not quite as bad as normal...still, I'd like to figure out what I'm doing wrong. 

Tuesday, September 19, 2023

First EPP finish

I have finally finished my English Paper Pieced Medallion quilt! I started this while pregnant with my twins, so 2016. I was too nauseous to sit at my sewing machine, and wanted to get baby quilts made before they arrived, but this project fizzled and I was able to get back at my machine in time to make them both quilts. I couldn't figure out how to get it squared off so it sat. I finally pulled it out when I was cleaning out some drawers and decided to just do it. I had enough of the red fabric to appliqué it on to the top and then added some borders to make it larger. It ended up REALLY large, but I think it worked out well. I do wish that I had trimmed the fabric from behind the EPP because the print shows through the low volume fabrics now that it's quilted. But I was worried about the messy back for the quilter, and figured it would help it be a bit more stable. 


Overall I'm happy with it! I had this blue in my stash and just enough for the binding. I think I had an extra 24" of binding that I cut off. And I used every bit of the fabric I had, even a scrap that wasn't the full WOF. I backed it with a Ruby Star wide backing in sateen that I found on clearance at Backside Fabrics, the colors work well because it's an aqua background with a green and cream floral print. 


Wednesday, July 19, 2023

Scrappy Sampler

I have returned from our long trip across the pond and am still sorting out jet lag, bah. I hate jet lag. This time has been especially rough, for some reason. Not sure why. We had a fantastic time, I got to do just a bit of sewy tourism when I stopped at Frou-frou in Paris and Liberty in London (and took in lots of inspiration in tile floors and colors, etc...) and I picked up a couple of UK sewing mags in the airport before our departure flight. Maybe I'll share more of that later, for now, I have a quilt I finished up a few days after we got home. 

I had picked up two quilts from my quilter a few days before we left, but didn't have time to bind them before our trip. I did have time to pick out binding fabrics, and I thought I needed to buy matching thread for one, but I ended up using some from my thread box luckily. 


The first one I finished is one I've blogged about before, here and here. I started making these sampler blocks way back in 2016, many of them from the Sampler Shuffle that was coordinated by Pat Sloan. I supplemented with some blocks from a Summer Sampler and some other traditional blocks, and then I had plans to try my hand at free motion quilting it on my domestic. I sashed it with a magenta from my stash that wasn't quite the best match but I didn't care because I knew it was a first go at FMQ and didn't expect much. I got the backing ready, and then it just sat. And sat. And sat. For years! I didn't really want to quilt it myself, and so I never made time for it. 

A few months ago, I was clearing out a drawer and found it and decided it was time to make a decision. Finish it or get rid of it. I opted to finish it, but it was really small because I was going to quilt it and wanted to start with a doable project. I'd say, crib size. I don't do crib size. So, I took it apart and then made another few blocks and made a bunch of hourglass blocks to set them with. That made it lap size, and I took it to my quilter, and here we are. The end! 

Haha okay, not really. What else about this quilt...well, I made it from scraps, in a narrow color scheme. I think most turned out pretty decent, some I really love. I'm happy to have this UFO done. I didn't realize it was as old as it is until I went looking for when I started it and realized it was 7 years old. I think I've been in a clean out mode, lately, I'm not sure why. But it's been really gratifying to use up fabrics I don't want anymore for scrappy backings, and to finish off spools of thread from my thread box, Which I did for the binding. And the backing on this quilt, consequently. I just didn't think of it initially because I did the backing months ago when I took it to my quilter. 

Tuesday, June 27, 2023

A New Two Zip Hipster

I wasn't planning on making any bags anytime soon. Bags aren't always my favorite thing to sew; any bag worth it's salt (well, most of them, anyway...) has a zipper and other hardware. I have a lot of zippers and hardware in my stash because I'm picky about them and buy extras whenever I need to buy some to maximize shipping and to make sure I can sew when I want without waiting for hardware. Plus, I tend to make the same patterns, or similar enough patterns, that I know what sizes of hardware I need. I buy my hardware on Etsy from Bag Maker Supply, who has a great selection, great quality, and good pricing. They have really professional looking stuff that makes bags shine. Anyway, the point is, sewing zippers and hardware aren't my favorite part. And, some parts of bags get awfully thick with layers of fabric and interfacing (also not my favorite...).

So, I wasn't planning on making any bags anytime soon. But, I switched out one day to my two zip hipster which I don't use very often because the linen I used is starting to wear on the top (grr...) and I remembered how much I love that size and style. And, then I saw an instagram post (can't remember who, sorry...) and they used a pair of worn out jeans to make a bag. But the real kicker was a few days later when my husband needed to discard a pair of dockers he'd worn holes in. We were rounding up bags of worn clothes to recycle at H&M, and I pulled them out, remembering the IG post. 

I still didn't have any intention of making a bag anytime soon, but then I found myself between projects. I'd finished my trip sewing, and I was waiting for an order of fabric before I washed a bunch for a quilt project. But I didn't want to just...not sew. So I decided a new two zip hipster from old, worn out dockers was just the ticket.


This is the leftover fabric after I harvested all the usable fabric...plus the zip and the buttons which I'll save for other potential projects.


And it was. I opted to use some of a hoarded Alison Glass panel for the front focal print, and then I used Alison Glass fabric I had for the interior as well. I had a hard time deciding on a lining fabric because I sort of wanted to use the pink floral that I used for the interior pocket for the whole interior, but I have already used it as a lining in a bag. The turquoise works great, too, and I really love how it turned out. I think the yellow zips are great, and I think overall, the bag turned out better than I expected. I'm really excited to start using it, and I hope it will be more durable than my beautiful linen one that I'm trying to not overuse. 

The two zip hipster pattern is by Dog Under My Desk and I absolutely love her patterns. They're more like tutorials with all the photos and detailed instructions, they're well-tested, functional, and she takes care to minimize bulk. I highly recommend her patterns. The only change I made was to NOT add as much interfacing. I did not interface the twill fabric, since it's pretty thick as it is (at least where it's not worn thin from years of wear...). I think that's it. I did use the sew in interfacing, because even though it's thick fabric, it's surprisingly flexible. Or whatever the right word is. I wanted just a bit more structure. I'm pleased with the end result, so I think I made the right call. I was really worried about the strap being too thick if I interfaced it, and I think it's just right. 


Tuesday, June 13, 2023

Scrap Quilts: Irish Chain Edition

I have far too many scraps. And I'm not very good at using them, not really. My problem is that I save pieces that are far smaller than I should because I *might* use them. I do, on occasion, use excessively small pieces, but not super often. Another problem I have is hoarding those scraps. If I have a large-ish scrap and I need a smaller piece, I'm loathe to cut it down if I cut off a large but not large enough piece, because then that piece I'm cutting off is wasted.

Yes, I have a problem. 

So, as you can imagine, I have a lot of scraps. I wanted to do a scrap quilt just as a quilt instead of my usual leaders and enders project this year (I have a great one going right now that I think will turn out so good!), and I saw a simple Irish Chain quilt in a monochrome color way with low volume scraps on Instagram somewhere. They're not groundbreaking, of course, so it could have been anywhere, but I think it might have been on A Crafty Fox, she has a lot like that. And I think Diary of a Quilter has a tutorial...

Anyway, I decided to wing it, because I know how to sew nine patches. And  I did it in aqua. I opted to sew with what I had, so some got sewn as strips and then subcut, and others got sewn together as individual squares. 

Against my better judgement, I decided to alternate the nine patches with single squares of fabric. I should have sewn nine patches together with just low volumes for the alternate squares, but in my head I thought that might get too busy. However, I think the way I did it is too plain. It did make it quick, though! 


I don't love this top. (It is fully sewn together, now, I just didn't get a pic of it while it was daylight before I folded it up and delivered it to the quilter...so you'll have to wait until it comes back!) AND, somehow I still manage to get blocks mixed up as I sew rows together. I ended up with a couple of background squares way too close together even though I did lay it out before I started...weird. I mean, weird that I clearly haven't figured out my method for getting rows to my sewing machine in order, even though I totally think I have, and I've been sewing quilts for a lot of years by now. Oh well, that's what seam rippers are for, eh?


I exclusively used scraps for this top, and I decided to use a piece of Anna Maria Horner fabric that I was given for the backing. It's a turquoise and it doesn't really match my aqua tones super well, though there are some that are a fair enough match, and it has yellow and red and pink and citrine flowers in sort of stripes. I didn't think about lining up the stripes before cutting and luckily I was able to flip one piece around and have it work out well enough...sigh. But, the backing was FREE, and I'm all about that for a scrappy project, lol

Tuesday, April 4, 2023

Fira Top

I think it's pretty common to work on clearing things out during the first part of the year. One of the things I decided to work on was clearing out some old linen scraps I have from other projects. I love the linen from fabrics-store.com, but they only sell in full yard cuts, which means that I often have a lot left over, but not quite enough to do a lot with. And, I've also been thinking how nice it would be to use cloth napkins at the dinner table. Jeff's aunt uses them and just has a drawer full of eclectic cloth napkins, and a friend we stayed with in New England last fall also had a drawer full. They were so much nicer than our traditional paper towels, and I figured they'd be a great way to use some of this fabric that is crammed on my shelves.

But, I didn't want to use it for napkins if there was enough to use for something else, AND there were a couple linen items I wanted to make before the summer, so those items shot up the priority list so I could make them first and use any leftovers for napkins. 

First was my Fiore Skirt. I was short even, and had to use some scraps in a slightly different color. But I love how it turned out, and it cleared a piece from my shelf. 

Next up was the Fira Top, a pattern by Liesl and Co. I love that it's casual with interesting details. The cover photo is a top in linen, and it looks perfect. And I thought a linen top might just be the thing for our upcoming summer trip.


I made a muslin first to check the bust since it comes in different cup sizes but I am not at all comfortable measuring my high bust. I tried, again, and I think I'm an A/B cup in most patterns which really surprises me because so often shirts (RTW, mostly, but even some handmade) pull at my bust. What was annoying was that I sewed very quickly and not carefully because I thought I was just checking the bust, so the darts looked HORRIBLE in the muslin and I couldn't tell if it was the stiff cheap muslin fabric, or if it was the careless way I sewed the darts, or if it was the actual dart and I needed to adjust it. I asked a friend, and we decided to leave the dart placement, but shorten them by about an inch. I decided to just go for it since otherwise it fit, and hope for the best, which is not generally a wise strategy, but it worked out this time!

I really love how it fits and I think the color and fabric are great. Because of the nifty assembly, the yoke is double layered, which means it's a bit heavier than the rest of the top and I'm worried that might get a bit hot. Additionally, the neckline facing is lined with interfacing, and I always have problems with interfacing (maybe I should move away from SF101?) after the wash and find it ALWAYS needs pressing. So, we'll see how this one does. If it has to be pressed after washing, it probably will not make it on the trip, since I can't guarantee an iron will be available, and that's disappointing because I think otherwise it's a lovely top. Aside from pulling the dart back an inch, I didn't need to make any other fit adjustments. It's nice and long for me, which is unexpected since I'm so tall, and the neckline didn't plunge too low, which often bothers me on shirts. I find I get cold if the neckline scoops too low. The instructions were great, like all Liesl and Co patterns.

And, I had enough leftover fabric to make one napkin. Slow and steady! 

Tuesday, March 28, 2023

First Quarter Status

I end up hearing a lot about quarters when my husband talks about work. Quarterly goals, statistics, all sorts of things. I'm sure you do, too. And it just kinda bleeds into life, right? Well, I suppose really, it's okay, I mean, we are 1/4 of the way through the year already (Really?!) and I thought it would be a good time to check in with some in progress things. So here's my status.

I have two quilts at the quilter's that I'm expecting back any day now. They've been out for 6 weeks now, so it's about time. They are my All the Good quilt and a Christmas Shimmer quilt. No rush on either of them but I am starting to get antsy!

I just finished my sampler WIP, and I'm excited to have that wrapped up. It's waiting to go to the quilter's when I pick up my other two, along with my Little Women economy block quilt.

I am also working on my EPP WIP, and I've appliquéd (is that the right verb?) the EPP center onto a piece of fabric I've had in my stash for ages. I made a daughter a pair of pajama pants and had just enough left over for the center portion, which is great! I've also pieced the strips of churn dash blocks. Next up, I need to trim the center to size (I cut it large just in case it shrunk down while piecing, or in case I wasn't quite centered with it). That's got me a bit nervous, though, so I've been avoiding it, haha.


And, I'm working on a linen top right now. After I finished the sampler top, I decided to try this Fira top out of linen. I made a muslin to check the fit at the bust, and the darts were not happy (possibly due to the stiff muslin fabric, possibly due to my quick careless sewing since I thought I was checking the bust fit and not the dart placement...). I made a slight adjustment to them and I'm working my way through this pattern with a scrap of linen from fabrics-store.com from a different project. It feels good to use up leftovers! And, as long as I don't need the rest, I'll have enough to make a napkin, which I've also been slowly working on. I thought it would be nice to have some linen napkins, and that I would use up what I have left that isn't large enough for something else. They'll be mismatched, but I think that will just add to the charm. 

(Checking on the fit before I top stitch the yoke down on the shoulder)

So, next up are finishing the Fira top, finishing the EPP medallion quilt top, hopefully binding my quilts when I get them back, and then I want to make a couple of t-shirts for the summer in some specialty knits I bought from Salt Lake Sewciety. One is a merino wool, and the other is an athletic material. 

Tuesday, March 21, 2023

Fiore Skirt

I am really excited about the trip we are planning for the summer. We're going on a bike tour in France! The company we're using makes reservations at the hotels for you and provides all the bikes and routes, and you get to spend a week biking between hotels in France. I'm really excited, I think it'll be really great. But, it's the summer, in France, so it'll be hot, and I'll be wearing bike shorts, which aren't all that attractive, so I thought I'd whip up a linen skirt that I could quickly throw on over my bike shorts, and that would be nice and cool when we weren't on the bikes. I've already made a Fiore Skirt by Closet Core and I love it. I should have made it a tad bigger, as it sits higher on my waist than I like, but it's a great skirt. I made it out of a rifle paper canvas, so it's got good structure and I think it's a great length on me. I made the view with the buttons that hits mid calf (though on me it hits just below my knees, lol). 

This time, I opted for linen, a leftover cut I had in my closet. I traced it at the next size up and treated it like a wearable muslin, since I already knew my size, and went for the wrap version, which hardly needed a muslin anyway because you can adjust the buttons to your waist. I whipped it up pretty quickly, but thought I had placed my buttons well, but they were far too loose and the skirt looked a tad ridiculous. I didn't realize how important it was for skirts to sit at your natural waist.  I've got them sorted now, though, and though they could be a tad tighter, I'm okay with where they are. 


I used leftover linen from Fabrics-Store.com, and I was just shy. I had to use a slightly different purple linen for the the pocket and the facings. I used a couple of mismatched buttons from my jar, and I had thread leftover, so this project effectively didn't cost anything. (obviously I bought the fabric and other supplies, but for projects that have already been made, so it feels free, lol, but I guess a better word might be economical. And who couldn't use some economizing these days, amiright?).

I think it turned out great, and my biggest complaint is that I don't have many tops that look great with purple. Oh well, I've got some light merino wool in gray that I intend to make into a t-shirt, and it should work well. Oh, and somehow, after my first wear, the waistband seam ripped apart in the wash. I was able to handstitch it back together easily, but I thought that was odd. Not sure what happened. I also really love that it's the same pattern as my canvas skirt but looks entirely different because it's a different view and different type of fabric.

Tuesday, January 31, 2023

Hacked Hacci Dress

I made Christmas dresses for my girls and they absolutely love them. Score! The pattern did not include good fabric requirements which I found a tad annoying. Or enraging. Same thing. I found a pretty hacci fabric on Girl Charlee and I was very lucky to find it on a black Friday sale for only $3 a yard, so I was okay with WAY overbuying. I kind of guessed that I'd need 3 yards on average but decided to round up to 4, and also to plan to make one for me. So I bought TWENTY yards. Yeah. Loads of fabric. But the dresses had circle ruffles, which took a lot of fabric, and, to be fair, this means four dress for $60, which is a huge steal anyway. 

As it turns out, I way overestimated on fabric even at 3 yards, so I have SO MUCH leftover. Making myself a dress didn't happen at Christmas because I had so much to do anyway, but I figured I'd get to it eventually.

It jumped up the list when my girls kept asking me to make one for myself so we could all match. I figured, if they want to match, I should make it happen sooner rather than later, especially since they'll eventually outgrow their dresses. 

But...the pattern wasn't available in women's sizing. So, I had to hack it. I used a t-shirt pattern for the bodice, but, like the original pattern, opted to line it instead of binding the neck, so I just cut two. The pattern used straight rectangles for the skirt and gathered them at the waist, so that was simple, and instead of using circle pieces for the flounces on the sleeves and bottom, I just gathered longer rectangles. I made the sleeves twice because I hadn't used long enough pieces to give it a good gather. 

But, since I hacked it, it definitely had tricky parts and it's not perfect. The pockets are WAY too low. I also had to sew the waist band three times. I just kinda guessed how long to make the bodice, and it was way too long. Plus, the fabric is heavy, so it stretches it longer than I expected. And, the t-shirt fits great as a t-shirt but I really needed it a bit more fitted. I didn't want to take it in, but after the second waist, I knew I had to. So I opened it up and took it in on both the front and the lining. That went better than I expected, I think. The third time I sewed it, it still wasn't perfect, but it's definitely wearable. I think it would really benefit from an elastic in the waist band, but it wouldn't be nearly as comfy like that. 


So, here's my hacked dress. Taking it apart and putting it together multiple times was not my favorite, but I'm kinda proud that I could wing a dress like this. 

Thursday, December 22, 2022

Home For the Holidays

 I finished one Christmas quilt this year. I had pulled a stack of fabrics last year when I was considering making a simple Christmas quilt to welcome a new neighbor to the street (I ended up making an embroidered throw pillow instead), and decided to use it to try out the Hurty ruler I bought at Quilt Con. I have tried to make half-rectangle triangles in the past, and it's hard. I hadn't seen HRT rulers before, and clearly they exist, but this was the first one I had seen and bought it along with the clammy rulers I chose. I was pretty nervous to use it, since unlike HSTs, you have to make sure they're angled the right way...so it took some courage to start, and that's one reason I wanted to use this stack of fabrics. They were fabrics I loved, but wouldn't feel bad if I used them on a project that didn't work. 

The assembly went pretty well and it didn't take long to get a stack of blocks ready. When I laid it out, I thought it would end up bigger than it did, but it is really only throw size. Which is fine, but, as you've probably noticed, I like big quilts. :)


I played around with layout a bit, and tried to add a couple of focal points by alternating the brights and low volumes. It's fun to experiment sometimes. Even if it's not super successful. This one I think works but isn't Ah-Mazing. 

When I got it back from the quilter, I decided pretty quickly to bind it with some of the white snowflake print I'd used. I had (and still have) plenty and it's a great print. It's backed with minky, of course. Naming it was tricky, it's always something I struggle with. I settled on Home for the Holidays because it felt right. I'm not sure why. Sometimes you just have to pick something, haha. 

Home For the Holidays, quilted by Abby Latimer, completed November 2022

Tuesday, November 29, 2022

Solar Eclipse quilt

One of my favorite types of quilt designs are patterns that create secondary designs. I love how the blocks work together to create a pattern and visual interest. It's something I like to incorporate into my own designs, even though it can be trickier. I think that's half the fun. 

When I saw this quilt pattern in a book by Vanessa Goertzen of Lella Boutique, I really wanted to make it. The secondary pattern is fun and the dark background was really striking. Of course I had to mimic her quilt. I didn't want to completely copy her color scheme and so instead of an aqua print for the squares, I used a gray solid, and I omitted green. It's possibly more similar to the original than I usually like to go for, but that's alright. I think it turned out beautifully. 

I did have to make a couple of adjustments; I didn't have any charm packs and didn't intend to buy any for this project, so I needed to figure out the cutting from yardage. It's been too long; I might also have taken the opportunity to do some more efficient piecing, like flying geese four at a time, and multiple HSTs at a time. I like to do that when I can, it makes it go so much faster. And of course I backed it with minky. I opted for silver, and then bound it with the same blue as the background to give it a bindingless feel. 

Solar Eclipse, designed by Vanessa Goertzen, quilted by Abby Latimer, completed 2021

Tuesday, November 8, 2022

Florentine Sunset

 I loved Quiltcon earlier this year. It was such a fun, but exhausting day. So inspiring. The quilts were just amazing, and I loved browsing the vendors area. It was so large! I was hoping I would be able to get a Clammy ruler, and I was happy that I could. Sewtopia had them for sale and I bought two sizes, plus a Hurty ruler. I can't remember where I had seen a clammy ruler quilt, but I knew I really wanted one, and that Latifah Saafir, the designer behind the clammy ruler, was a MQG darling. 

I bought a bunch of other things too...it was fun. I did try to restrain myself, but it was just all so inspiring! 

I came home and was promptly very intimidated by the Clammys AND the Hurty. So I "brainstormed" color schemes and designs so I could avoid them for a bit. I really wanted to try them, but I was so intimidated!

I finally got the courage after coming up with a fun color scheme (and testing out the sewing method with some scraps) and I went for it! I was inspired by this watercolor that inspired my mini quilt I blogged about here. I referenced this quilt in that post too, but I hadn't started yet. I couldn't decide if I liked the more visual bridge idea that I used in the mini, or this clamshell color scheme better. So I just made both.

Unfortunately, these pieces are a bit off a fabric hog and so I really went through a lot of fabric. It doesn't create useful scraps either, with the shape...and the pieces are so large that some fabrics I wanted to use weren't large enough. Everything was from my stash, I don't think I bought anything specifically for this quilt...pretty sure. That's my favorite way of quilting--I keep a large stash and then sew from it instead of purchasing fabric by the project. I feel like it gives my projects a uniquely me look.

The assembly was tricky, and I bet it was a bit wonky for my quilter. She is a good sport and doesn't complain. Hopefully most of my work is flat and straight enough that once in a while she's willing to tolerate it, haha. About half way through, I realized I really should have starched my fabric. But I never starch, so it didn't occur to me before it was too late. 

We backed it with a mustard yellow minky. I love the ombre effect this quilt has as they blend together and I'm proud of myself for making something hard! Maybe I'll even make another clammy quilt sometime. With starch, though. 

Friday, October 14, 2022

Housewarming Quilt

My brother moved from Utah to Kentucky about six years ago. I can't remember exactly...it's been a while, and I feel like it was around the time my twins were born. They rented a home for a while and then were able to build a new home because they hadn't found anything they liked well enough to buy. It wasn't their first home purchase; they had owned a home in Utah. Still, we had just finished building our own home and I was excited for them to have a new place of their own. They came out to visit shortly after moving in, and I decided it would be perfect to send a housewarming quilt back with them. I wanted it to be a simple design, but I love big quilts and so I aimed to make it a large throw. It ended up closer to twin, but that's okay. 

I decided a simple house block would be perfect. I picked a neutral palate of colors, and, I'm a bit embarrassed to say, used it as an excuse to use a lot of prints I liked, but didn't love or want in my stash any longer. I like them all, I promise! Some I like very much, like the navy floral, that's a favorite. Some I love but I can't seem to figure out how to use them. Maybe because I don't usually make large blocks like this. And I do like them all together. It feels very primary color to me, even though I used green instead of yellow. 

I had recently reconnected with a former neighbor who also happened to move to Utah County (I grew up in Salt Lake County), and who I hadn't known was a sewist and quilter. She now works at a sewing machine/quilt shop near my new home, and I bumped into her there. She does long-arm quilting and so I thought I would try her services out. She did a great job and finished it more quickly than my usual long armer, who is quite busy now (because she's good!), but it was more expensive than I hoped for and I wasn't overly thrilled with it. Nothing set it apart from my go-to quilter. I don't go to that quilt shop often, mostly just for thread (they carry Mettler and a good variety of serger cones) and Tula Pink fabric occasionally. They have eclectic fabric: lots of traditional and juvenile, and then Tula and Kaffe. It's very odd. And it always takes FOREVER to check out. Their computer system is ancient. And slow. And doesn't always work. So I avoid it. And she is getting ready to retire so I think she has scaled back her hours. I actually haven't seen her there in a year or so, now that I think about it...maybe she's already quit. In any case, I still continue to use my go-to quilter.


So, here's the large quilt I made for my brother! He said they loved it, I gave it them in person when they visited since they drove, and that save me massive amounts on shipping. I backed it with minky because, minky. But that made it HUGE and heavy. I'm so glad I didn't have to ship it. 

Housewarming, quilted by Ruth Ann LeBaron, completed February 2021, gifted July 2021.

Tuesday, October 4, 2022

Travel Scraps

 My Patchwork City Sampler was such an undertaking. I did a fair amount of fussy cutting, which can leave your fabric just in shreds. Or rather, holey. As I got ready to reintegrate the fabric I had set aside for the quilt back into my stash, I decided to clean it up a bit and also opted to see about making a quick scrap quilt from the cleaned up bits. I chose a scrap pattern I've had on my list for a while. It's from Scraps Inc, volume 1 and it was designed by Camille Roskelley. It's called Delightful. I loved how she offset the blocks and I love the simple block construction. With the larger centers (I think they're 4 1/2" to accommodate leftover charm squares if I remember correctly...) I thought it would be perfect to use up some of the novelty prints I had fussy cut from. 

I pulled out a bunch of the prints that needed to be trimmed up and then I had to pick a background fabric. This was really tricky and I opted to go bold for a couple reasons. First, there were enough prints that  Was using that had white or light backgrounds that I knew I needed something for them to stand up against. Second, I figured I could experiment with something bright and bold on a scrap quilt that I didn't necessarily care about, something that was extra. 

I went with Kona in curry, one of my favorite yellows. I figured, it wasn't too bright since it's a muted yellow, and it was more fun than a blue or a gray. I tried to audition it next to some of the prints, but it was really difficult to tell. It looked like it would work, so I went for it.


But it did NOT turn out awesome. I really thought about not having it quilted even. In the end, I hoped that quilting and binding would help finish it up and I would like it better. The picture here actually doesn't look as terrible as it does in real life, haha. 

It helped only a little. It's definitely not a great quilt. You know it's bad when your quilter tells you when you pick it up that the back is really fun, haha. But I am proud of myself for trying something out of my comfort zone.

I used some leftovers for the backing that I didn't anticipate wanting to use in the future and the backing turned out okay. Maybe better than the front, lol. 

It's okay. It really is. It was good practice and I think it's nice to remember that everything doesn't have to be perfect. That not every time we set about to create something, it will work. And now it sits in my closet. It can come out if we needed a quilt for warmth, or for some other utilitarian purpose, but I doubt it will come out to decorate. And that's okay.

Remnants of Dreams, pattern by Camille Roskelley, long arm quilted by Abby Latimer, completed 2021

Thursday, September 15, 2022

Swoon Sixteen 2.0

My second daughter had been patiently asking for a minky-backed bed quilt longer than my oldest daughter and as most middle children, she gets overlooked more than is fair and often very patiently waits. I couldn't keep pushing her quilt request off when I had just made a quilt for my oldest, so luckily for her, her quilt request shot to the top of the list. I got the top done shortly after my oldest daughter's, and they went to the quilter together and were finished together. I might have finished hers first, just to make sure she got looked after. 

I picked out a stack of fabric I thought she'd love, and she did. I thought Swoon 16 by Camille Roskelley would be the perfect pattern, and I do enjoy piecing quilts in this style. Camille Roskelley and Allison Harris are among my favorites, even still, and they have patterns I'm most willing to resew. I'm contemplating another Shimmer quilt (I've made two already, plus a Wallflower, which is nearly the same pattern), and it's similar to the Swoon in construction and look, and it's just a pattern I enjoy sewing. I was glad when she said she'd like it.

I think it turned out really great. I used some leftover Ruby Star Society lawn (a major sacrifice!) and some others that I'd been holding onto for a while. We backed it with aqua minky, and that gave us a hard time. Apparently, aqua is a color that has been hard to restock, and since it's popular, Abby Latimer had been out for a while. I went on a search of local quilt shops and found it after checking a couple, and they had *just* enough. Like, I texted Abby after they measured it to make sure it would be okay. She said she could make it work and I was so so glad. My daughter really wanted aqua, and I didn't want to let her down. 

She doesn't really sleep with hers, either. But that's okay. I'm pretty sure she loves it too.

Long arm quilted by Abby Latimer, completed March 2022

Thursday, September 1, 2022

Threads of Memories and Dreams

 I might do a bit of catch up posting to get some the quilts I've finished recently but haven't posted about, even on Instagram. This is one of those, though I have posted about this quilt project. Several years ago, I started a Patchwork City Sampler, designed by Elizabeth Hartman. The book has 75 blocks, 25 each in three different sizes, and includes several layout suggestions. Naturally, I decided to take on the largest one, using every single block, and I determined to make it a travel-themed quilt. When I started, my goal was to make each block represent a specific travel memory. And many do. But, finding travel-themed fabric and making each block look distinct while still maintaining that goal proved really difficult, so I expanded it to include travel dreams as well as a few more generic travel themed blocks. 

I worked on this quilt for years. I started blocks in late 2016 and finally finished it up during the pandemic in 2021. The final stitches in the binding were put on in January of 2022


There was probably at least a year in there where I didn't work on it at all. I amassed loads of travel prints and more memories to include along the way, even a few pieces of fabric I bought while traveling. I was always searching online for great travel prints and looking in every quilt shop I visited for themed fabric. Which means this is probably one of the most expensive quilts I've ever made, as well, since I would buy a fat quarter or a half yard for just a few small pieces of fabric. Honestly, I still catch myself looking because it was such a long project that it became a pretty entrenched habit. I tried to make up for all the fabric purchases by using other prints from my scrap bins and was mostly successful. I worried a bit that the blocks would be too eclectic to look good once I tried to put them all together, but it actually turned out pretty great. I remember reading somewhere, maybe on Amanda Jean Nyberg's blog, that kitchen sink quilts, where you put in any fabric you have, actually often work out just fine because your scrap collection has one common denominator: you. And if you like it, it probably fits in with your style. I think there's probably some truth to that, as long as you stick with fabrics you purchased or you are more judicious with the scraps you accept from friends. ;)

When I pulled it out during the pandemic, determined to finish this long haul quilt, I started thinking about sashing and binding and backing, and of course, quilting. I decided early on I wanted to have it custom quilted and I took it to Marion McClellan. She's just amazing. We decided this would be a great quilt for graffiti quilting and she even added a nod to covid since I had a couple of covid-interrupted trip blocks in there. I attempted to up the contrast and stuff to make it easier to see, quilting is hard to photograph!


I used an amazing metallic essex linen for the sashing and a light blue essex for the binding. I wish you could see the sparkle in the linen, it's perfection, I backed it with a wide-backed Ruby Star sateen and it drapes beautifully. 

This quilt was a major labor of love. Over 75 blocks, because, I learned my lesson from a previous sampler quilt, and I remade a couple of the blocks I didn't love. I am so happy I did. There are still blocks that aren't my favorite (they can't all be favorites, though, right?), but I know I would have kicked myself if I hadn't replaced the blocks that were not square and that I didn't even really like. Here's a few I love, including a couple with the covid fabric.


I was really ready to be done with this project. After so long, I was ready to see the finished product, what I had worked so hard on and spent so much time and money on. But now that it's done, I almost want another long-term quilt project to work on. 

Threads of Memories and Dreams

quilted by Marion McClellan

completed January 2022