Showing posts with label Christmas sewing. Show all posts

Saturday, December 14, 2024

Christmas Sewing and Updates

I love the Christmas season. It's so full of hope because of our glorious Savior and busyness in the best way. And it's a time for making a creating. 

I made this pillow a few years ago and I love it.

I spend most of my time working towards things for others, like most of you. Selecting gifts, sewing gifts, and making sweet treats. Each year, I make homemade marshmallows and dip them in chocolate. It's one of my favorite traditions, and it's one I missed out on last year while I spend the month in the hospital recovering from my stroke. This week, I've been busy making hundreds of marshmallows. And it brings me joy. We bag them up by the dozen and deliver them to neighbors and friends. I will admit that when someone asks in anticipation if we are doing marshmallows again, or a friend grins wide and squeals when they see the bag, it makes me so proud. 

Tuesday, December 12, 2023

Christmas Shimmer

Do you have any patterns you just make repeatedly? I have a few clothing patterns I do this with, but only a couple of quilt patterns I've made more than once. This is one of them. It's Shimmer by Cluck Cluck Sew and it's a really fun sew. I like how it comes together, and it's a style I really enjoy sewing and think looks good. It's not too quick, but it doesn't take a long time and it shows off fabric well. The piece sizes are a good fit for the type of fabrics I usually purchase.


And, if you want, you can fussy cut. This is the first one I've made with fussy cut centers but I picked the pattern for this quilt specifically because the centers were a good size for fussy cutting the fabric I had chosen. 

See, I picked up a cut of a super cute retro style Christmas print at Garden of Quilts in 2022. I just couldn't resist it, even though it's completely NOT my normal style. And then I supplemented it with a few other focal prints...and set out looking for a pattern that would enable me to really show them off. 


Shimmer has centers that are a great size for the scale of these prints. The center is large enough there's a good amount of space so the entire selection can usually fit, but not so large that there's a lot of extra space around it. 

This is decidedly unlike my other Christmas quilts.

But I don't care, I love how it turned out. And I have a bit more of the focal prints so maybe I'll be making another quilt sometime in the future so it has a buddy...hmm...

Tuesday, January 31, 2023

Hacked Hacci Dress

I made Christmas dresses for my girls and they absolutely love them. Score! The pattern did not include good fabric requirements which I found a tad annoying. Or enraging. Same thing. I found a pretty hacci fabric on Girl Charlee and I was very lucky to find it on a black Friday sale for only $3 a yard, so I was okay with WAY overbuying. I kind of guessed that I'd need 3 yards on average but decided to round up to 4, and also to plan to make one for me. So I bought TWENTY yards. Yeah. Loads of fabric. But the dresses had circle ruffles, which took a lot of fabric, and, to be fair, this means four dress for $60, which is a huge steal anyway. 

As it turns out, I way overestimated on fabric even at 3 yards, so I have SO MUCH leftover. Making myself a dress didn't happen at Christmas because I had so much to do anyway, but I figured I'd get to it eventually.

It jumped up the list when my girls kept asking me to make one for myself so we could all match. I figured, if they want to match, I should make it happen sooner rather than later, especially since they'll eventually outgrow their dresses. 

But...the pattern wasn't available in women's sizing. So, I had to hack it. I used a t-shirt pattern for the bodice, but, like the original pattern, opted to line it instead of binding the neck, so I just cut two. The pattern used straight rectangles for the skirt and gathered them at the waist, so that was simple, and instead of using circle pieces for the flounces on the sleeves and bottom, I just gathered longer rectangles. I made the sleeves twice because I hadn't used long enough pieces to give it a good gather. 

But, since I hacked it, it definitely had tricky parts and it's not perfect. The pockets are WAY too low. I also had to sew the waist band three times. I just kinda guessed how long to make the bodice, and it was way too long. Plus, the fabric is heavy, so it stretches it longer than I expected. And, the t-shirt fits great as a t-shirt but I really needed it a bit more fitted. I didn't want to take it in, but after the second waist, I knew I had to. So I opened it up and took it in on both the front and the lining. That went better than I expected, I think. The third time I sewed it, it still wasn't perfect, but it's definitely wearable. I think it would really benefit from an elastic in the waist band, but it wouldn't be nearly as comfy like that. 


So, here's my hacked dress. Taking it apart and putting it together multiple times was not my favorite, but I'm kinda proud that I could wing a dress like this. 

Monday, December 26, 2022

Christmas Sewing

I did a lot of Christmas sewing this year! I made Christmas pajamas for the girls (and for me, because, why not?) and I made them all dresses. The pajamas were "from Santa" and the dresses were my gift to them. We let them open them first before church (our church meeting started at 9am this year, so we opted to do Christmas morning after church) so they could wear them to church. I was worried because they don't always love the clothes I make for them, but I ran the pattern and the fabric by my oldest daughter before I ordered them (pattern from Vintage Little Lady, not sure I recommend, and hacci knit fabric from Girl Charlee Fabric, which I highly recommend), and she seemed happy with both, so I went for it. 

I ordered WAY more fabric than I needed, partially because I couldn't figure out how much I actually needed. When you make multiple of one pattern from one fabric, you usually don't need to just add the yardage up, but the pattern didn't even have efficient cutting directions for one dress OR total yardage requirements. Instead, it broke it down by pattern piece and never totaled them up. For instance, 1/2 yard for the bodice, 1/3 yard for the sleeve, etc. It was pretty pathetic. And irritating. So, I just wildly guessed at how much I needed, added a little extra, and then added a little extra on top of that because I bought it on a FANTASTIC black friday sale. Like, it was $3/yard. 


So now I have loads of fabric left and I could make myself a dress if I could figure out a way to hack it to my size. It was a basic pattern, I think I probably could. But I have so many other things on my list I'm not sure how soon I'll get to it. 

Anyway, when they opened them on Christmas morning, they were all absolutely thrilled. Like, beyond thrilled, they just grinned, they all rushed to put them on, and they all told me throughout the day how much they adored them. I felt so pleased! They did turn out pretty cute, and I'm happy with them. They did find a couple of holes of places I missed when I was serging it together, which is understandable because they have pockets, which are always tricky on a serger, and I was just doing so many. Assembly line often leads to slight misses like that for me. But, I'll get them all straightened out soon enough. 

Hope you had a lovely Christmas too, and if you sewed for you family, it was as well received as mine was! 

Thursday, December 22, 2022

Home For the Holidays

 I finished one Christmas quilt this year. I had pulled a stack of fabrics last year when I was considering making a simple Christmas quilt to welcome a new neighbor to the street (I ended up making an embroidered throw pillow instead), and decided to use it to try out the Hurty ruler I bought at Quilt Con. I have tried to make half-rectangle triangles in the past, and it's hard. I hadn't seen HRT rulers before, and clearly they exist, but this was the first one I had seen and bought it along with the clammy rulers I chose. I was pretty nervous to use it, since unlike HSTs, you have to make sure they're angled the right way...so it took some courage to start, and that's one reason I wanted to use this stack of fabrics. They were fabrics I loved, but wouldn't feel bad if I used them on a project that didn't work. 

The assembly went pretty well and it didn't take long to get a stack of blocks ready. When I laid it out, I thought it would end up bigger than it did, but it is really only throw size. Which is fine, but, as you've probably noticed, I like big quilts. :)


I played around with layout a bit, and tried to add a couple of focal points by alternating the brights and low volumes. It's fun to experiment sometimes. Even if it's not super successful. This one I think works but isn't Ah-Mazing. 

When I got it back from the quilter, I decided pretty quickly to bind it with some of the white snowflake print I'd used. I had (and still have) plenty and it's a great print. It's backed with minky, of course. Naming it was tricky, it's always something I struggle with. I settled on Home for the Holidays because it felt right. I'm not sure why. Sometimes you just have to pick something, haha. 

Home For the Holidays, quilted by Abby Latimer, completed November 2022

Tuesday, December 20, 2022

Snowflake Quilt

 One last flashback Christmas quilt to squeeze in before Christmas. I also made this one last year, it was a big year for Christmas quilts, haha. (I also bought and had quilted one of those Lella Boutique Christmas panels that everyone has...I won't blog about that though because I didn't do anything except bind it, lol). 


I loved this snowflake quilt when I saw it social media, and bought the pattern and fabric on black friday sales. The pattern is by Modern Handcraft and I love it. It has 3 variations, so it's like 3 for the price of 1. You could do a scrappy background, a striped background, or a solid. I loved her black background in one of her quilts and decided to use a metallic black Essex linen. I love it! I had to copy her straight-line quilting as well...shrug.

It's not as cuddly soft as my others because I backed it with essex linen as well. But I love it anyway.

Snowflake Quilt, pattern by Modern Handcraft, long arm quilted by Abby Latimer, completed 2021

Tuesday, December 13, 2022

Pine Hollow Quilt

I've been busy with so many things and plenty of sewing, but finishing quilts has not been one of them. And neither has taking pictures of what I've been working on. 

But, it's December, so it's a great time to post this flashback quilt! I made this just last year, which means it's one that fell through the cracks between when I stopped posting on Instagram and started blogging again. 


As I was saying...I made this last year. The pattern is called Pine Hollow by Amy Smart. I had seen some of these quilts around social media and thought they were fun! So many different color schemes, I especially liked one that had been done in Alison Glass Christmas fabric. I can't remember who made it, maybe Angela Pingel? I can't remember. It was so fun. I wasn't ready to embrace butterscotch and pink and aqua in my Christmas quilts at the time (stay tuned, lol) but I thought it was just too fun to not make. And, I had made a bunch of the improv trees for my memorial quilt from Amy Smart's tutorial and thought it was fun, so figured it would be a great project.


 I used some favorite prints from years ago and some newer prints and I think it's a great blend. I do regret using the low volume Sweetwater Noel print, because everything else is just so saturated, but that's okay. What's a quilt without at least one regret, right? 

I backed it with minky and my kids just love it. It's pulling ahead with an early lead for being fought over come Christmas Eve...we'll see who the lucky kid is who sleeps with it! 

Tuesday, November 22, 2022

Christmas Banner

 I finished up my Christmas banner I mentioned last week just the other day and I love how it turned out! It was pretty quick, and I guess I was just nervous because of placing the embroidery, and then trimming them after to a uniform size...and not really knowing how long to make the binding...I do much better with patterns with measurements, haha. Flying by the seat of my pants is not my specialty!

But, it turned out great and I didn't need to trim too much. I did end up redoing a few as I mentioned, and instead of wasting the squares, I used them as backings for the blocks. This may not have been the best choice...I hang my banners in my stairwell in front of windows, and so during the day, especially the afternoon with the strong western sun coming in, you can see the outline of the embroidery. At the very least, I should have matched up the replaced blocks to their replacements so it would be less obvious...but it's okay. The color doesn't show through, just the outline of the letter, and its mostly not too noticeable. I was glad to not waste fabric. 


I used a gray stripe from Camille Roskelley's Christmas line and I think it turned out really great.

Now if only the rest of my Christmas projects can go as quickly and as smoothly as this one...

*fingers crossed*

Monday, November 14, 2022

Christmas Sewing

The craziness that is Christmas sewing has commenced. And it snuck up really fast. I planned last year to make Christmas pajamas for my girls because they're just so tall and it's disheartening to hear the cries and complaints on Christmas Eve that the pajamas that Santa delivered don't fit. I've tried numerous solutions over the past few years, and this is the final attempt. If this doesn't go over well...I'll probably ditch the Christmas pajamas altogether. As it is, I've been planning on making them all year, and I bought fabric over a month ago, but wanted to finish a few things before I pulled it out and got started. Now's the time!

In addition, I've been wanting to make a Christmas banner and decided that would be the project I work on when I'm visible, since the pajamas need to be a surprise. So that's what I started this week and here's the progress! 


I decided I needed to remake the aqua and cream letters, which made me sad, but I'm glad I just redid them instead of regretting later that I hadn't.

I'm using a linen from fabric-store.com and some fun Christmas prints. The black and red are by Lella Boutique and the green is by Sweetwater. The embroidery design is by meringuedesigns.net. Looking at it again, I might do two more redos, and make the I red and the s on the end black. Sigh...


As if that wasn't enough, I also decided to make another Christmas quilt. I blogged about the fabric here, and I decided to make another Shimmer quilt (pattern by Cluck Cluck Sew)

And, this probably won't get done, but I bought the panel by Sweetwater for a new advent calendar. It was too cute to pass up, what can I say?

Finally, my girls all said they wanted me to make them Christmas dresses this year. *sigh* Christmas does fall on a Sunday this year, so it's actually a good year to do it...but man, I'm feeling overwhelmed right now. However, I found a knit pattern on Vintage Little Lady, and a black and white polka dot hacci knit on Girl Charlee, so I might just cave in. I couldn't think of anything to make them this year as a gift anyway, so maybe this is a good idea. We'll see...

All the sudden I'm pretty overwhelmed by Christmas sewing. At least, the banner, quilt, and advent calendar are all things that can be ditched. But the clothes for the girls need to happen when they're not around, which is trickier, especially since my oldest likes to stay up late and often finds herself in my sewing room while I'm sewing. 

Saturday, December 30, 2017

Christmas Sewing

I haven't posted a lot on Instagram of what I've been sewing lately because I was mostly sewing Christmas gifts. And, while my kids don't check Instagram (my oldest, after all, is only 7!), I still felt weird about posting pictures of gifts. But, I did a lot of sewing for Christmas. I give my girls a sewn gift every year for Christmas; it's a tradition I really love.

So, for my older girls, I made matching aprons. A while ago, they were fighting over the one too-small apron that matched one I have, so I decided to make new aprons for them and one for me that matched. I picked up some fabric at a local quilt shop's sidewalk sale. I totally scored: I got some Art Gallery Fabric yardage for $5 or $6 a yard. I bought enough for a quilt back, too. Anytime I can get a beautiful print for around the same price as Kona solids or less, I like to buy a backing. The girls' aprons were quick to whip up (although I still need to adjust the neck strap to be a little smaller for them). Mine took a bit longer, because I wanted to do a different style than I what I used to sew. I looked around for a pattern, but aprons are kinda out of style right now. Their popularity really peaked a few years back. And I really didn't want a pattern that sewed the skirt separately from the bib (bodice piece?). I think they look weird. So, in the end, I decided to trace an apron that fits well that looked like I could easily sew it. It was bound with bias tape, it really couldn't be that hard. It wasn't, and even though I wish the fabric were a little heavier (the apron I love is made of canvas not quilting cotton...), it's comfortable and the pockets are great. And it matches my daughters' and they're thrilled about that. :-)


I really considered making teeny tiny aprons for my twins (because everything small is adorable!), but I really felt that was a waste of time. And fabric. I mean, really. So instead, I made them shirts. I bought the Pippa pattern from Sew Kate Sew.


It's a quick sew and I'm pretty pleased with them! The neck line is a little gapey, so I tried to make it smaller on the second, but I think I made them one size too big. I went by the measurements, but the measurements put it at the top end of the 18 month size (my girls are currently 15 months...) and I'm not about to spend a bunch of time sewing them something that won't fit for more than a few weeks. So I made the 2T size...at least, since it's too big, they'll grow into them...and they're still wearable. Just a bit big. Bonus: I sewed these shirts from leftover knit from other projects, and I still have enough to make another shirt out of the tulip print. Yay!


The last gift I made was a last minute addition to the line up. I decided to make a wallet for my husband. After I made my own wallet (from the Dog Under My Desk Get Carded wallet pattern), my husband mentioned that he wanted one of his own. That was a while ago, and I didn't think he was serious, but when I found that I had time, I went for it. This pattern isn't too time-consuming, and since I've already sewn it, I knew I could do it fairly quickly. I picked out a black print and a turquoise print for the lining, and I had a turquoise zipper that just so happened to be a perfect match for the lining. I finished it up in an afternoon, and he was definitely surprised.


We'll see if he uses it. :-)

Christmas sewing can be stressful, but this year, it really wasn't. I picked doable projects, which had a lot to do with it, of course. I love this tradition. It's a way I can really give to my girls.

Wednesday, August 9, 2017

Vintage Holiday Quilt

Last year, I joined a quilt along that Chrissy at Sew Lux hosted on Instagram for the Vintage Holiday pattern. I think I was one of the only ones to jump in, but I'm glad I did! The pattern goes together really quickly, which was just what I needed with two babies!


I knew I wouldn't have it ready for Christmas because I do NOT quilt my own quilts unless they're mini quilts. So I wasn't really stressed about it, and it was a fun pattern to put together. I pulled out my cherished Sweetwater Christmas stash (I even have a few pieces left from the first line, Countdown to Christmas!) and mixed in a few scraps from Kate Spain's Christmas lines and a Cotton and Steel print, and I had a great time picking fabrics for individual ornaments. 


I thought about using a low volume snowflake print for the background, but was concerned it would be too busy and opted instead to use just white. And I luckily had enough yardage from the first Sweetwater line for sashing and the outside border. I wasn't trying to use it up, per se, but, in some ways I regret buying so much (even though I was glad to have it available for this project!). I tend to buy just half yards now which are just perfect for most of my needs, except for sashing/borders. I was glad to be able to use my stash, and I was glad to have a purpose for the yardage I have. So, I didn't have to buy any fabric for this project. I even managed to get the backing out of my yardage. I had a piece of brushed cotton that I had purchased years ago for a Christmas quilt I had started but had never finished. I didn't purchase much because I didn't know how much you needed for backings, but I was able to get it to work with a whopping 12"x2" piece left. Yay!


I'm also glad to have gotten it bound (FINALLY) at our neighborhood quilt retreat last weekend. Hooray for friends who sew!

Saturday, July 23, 2016

Christmas in July

Last year, I started a Christmas quilt and I used a bunch of fabrics from my stash, including several lines from Kate Spain. I picked the Seaside quilt pattern from Vintage Quilt Revival. Have I mentioned how much I loved that book?


When I finished it, I started trying to figure out a backing. I had some Christmas flannel I'd purchased years ago, but it wasn't enough, and honestly, none of the larger cuts I had were enough. So, I needed to figure out a pieced back or buy a bunch of yardage...I'd spent a lot on fabric around that time and decided I'd better just use what I had. And then I realized that I could make another quilt top to use as the back...and I picked another one from Vintage Quilt Revival. The Star Bright quilt finished up at the same size, so I just needed to add two extra blocks and extend the side panels. It was a great way to use up more yardage I'd purchased, including a couple of yards of a Kate Spain print.


Of course, I started the first top back in August, but I didn't get around to starting the backing until October...and with Christmas gift sewing, there was no way I was going to get it done in time for Christmas. I finally got it to Abby Latimer for quilting in January.


And then when I got it back, I was in my first trimester so it sat...and sat...and is finally bound now in July. I probably shouldn't have recounted that long history...it makes me sound so pathetic! But, it's more a matter of priorities, right? I've been sewing, but Christmas sewing wasn't my top priority in May, if you can believe it. But now that I'm trying to clear out my WIPs before the babies arrive, it finally made it back to the top of my list.


Anyway, a huge goal in making this quilt was to use up a bunch of my Christmas stash, and I was semi-successful...I still have a bunch, but I've gotten it a bit more under control. :-) Really, I've been trying to sew from my stash, not just use it up. I don't have a HUGE stash, but when I look at it, and see how many quilts I could make completely from my stash without buying more fabric, I feel like I really should use what I have before shopping when possible. After all, I bought it originally because I loved it! Of course, then I went out and bought a bunch of yardage of The Cookie Exchange by Sweetwater...I'm a sucker for Sweetwater Christmas fabric.


I love how this turned out. It's really different than my other two Christmas quilts, and I love it. I have plans to get a Sweetwater Christmas quilt made eventually...we'll see. Now that we'll have 4 kids instead of just 2, I'll need another Christmas quilt. :-)

Modern Christmas
completed July 2016
quilted by Abby Latimer

Saturday, November 28, 2015

Infinity Scarf {tutorial}

About a month ago, I was in a local quilt shop, and they had double gauze infinity scarf kits. They were only $12, which was a little steep for the fabric itself (Cotton and Steel, retails for $21/yd), but they included instructions, and $12 isn't bad for a scarf, so I bought one. I made it, and it went together pretty quickly, even though I had to alter the directions for my own purposes. First, the directions were serger specific, something the display and packaging did not mention, and I don't have a serger. Second, the instructions were designed for fabric that is reversible, which the one in the kit wasn't, actually. It was one of the darling prints. It worked out, and it really wasn't that hard to alter.

So, fast-forward a couple weeks and I was back in the same shop, and they were having a pre-Thanksgiving sale. The kits were 50%, which made them $6. Now that I had actually made one, and I knew the kit contained 1/2 yard of fabric, I recognized that $6 wasn't a bad price! So I picked up a couple of kits, in two different solid colors this time, and planned to make one for me and one as a gift for Christmas.
 

And, since it went together so quickly, I thought you all might like a quick little tutorial in case you are in need of a Christmas gift. One thing I really love about mine is that it's really soft and warm. My neck gets irritated if the scarf isn't super soft, but the double gauze is really great. 

Oh, and lest you think I'm ripping off a pattern written by someone else, this is instructions for what I did. On a sewing machine. The instructions really were all for serging, and frankly, I didn't even know what some of the words meant. So, it's based on a kit, but my instructions below in no way resemble the included instructions. :-) Also--please forgive the terrible lighting on the progress photos--I mostly sew at night and the lighting in my sewing room is atrocious. I assure you all the pictures are of the same fabric, however different the colors look. ;-)

So, first things first. For one scarf, you'll need 1/2 yard of double gauze. Cut it into 2 strips, 9" by WOF (width of fabric).

Sew the two pieces together (using a 1/4" seam allowance) on both the short ends to create a tube. If your fabric has a right side, you'll want to do it with the wrong sides together.


We're going to make those two seams French seams. So, turn the tube inside out. Working with one seam at a time, fold the seam so the seam is inside and the sewn edge is nice and flat on the edge. You want to be careful to make sure it's nice and even, or it will end up a little skewed like my first seam. Sew a heavy 1/4" seam allowance so the raw edge is enclosed. Repeat on the other seam. 


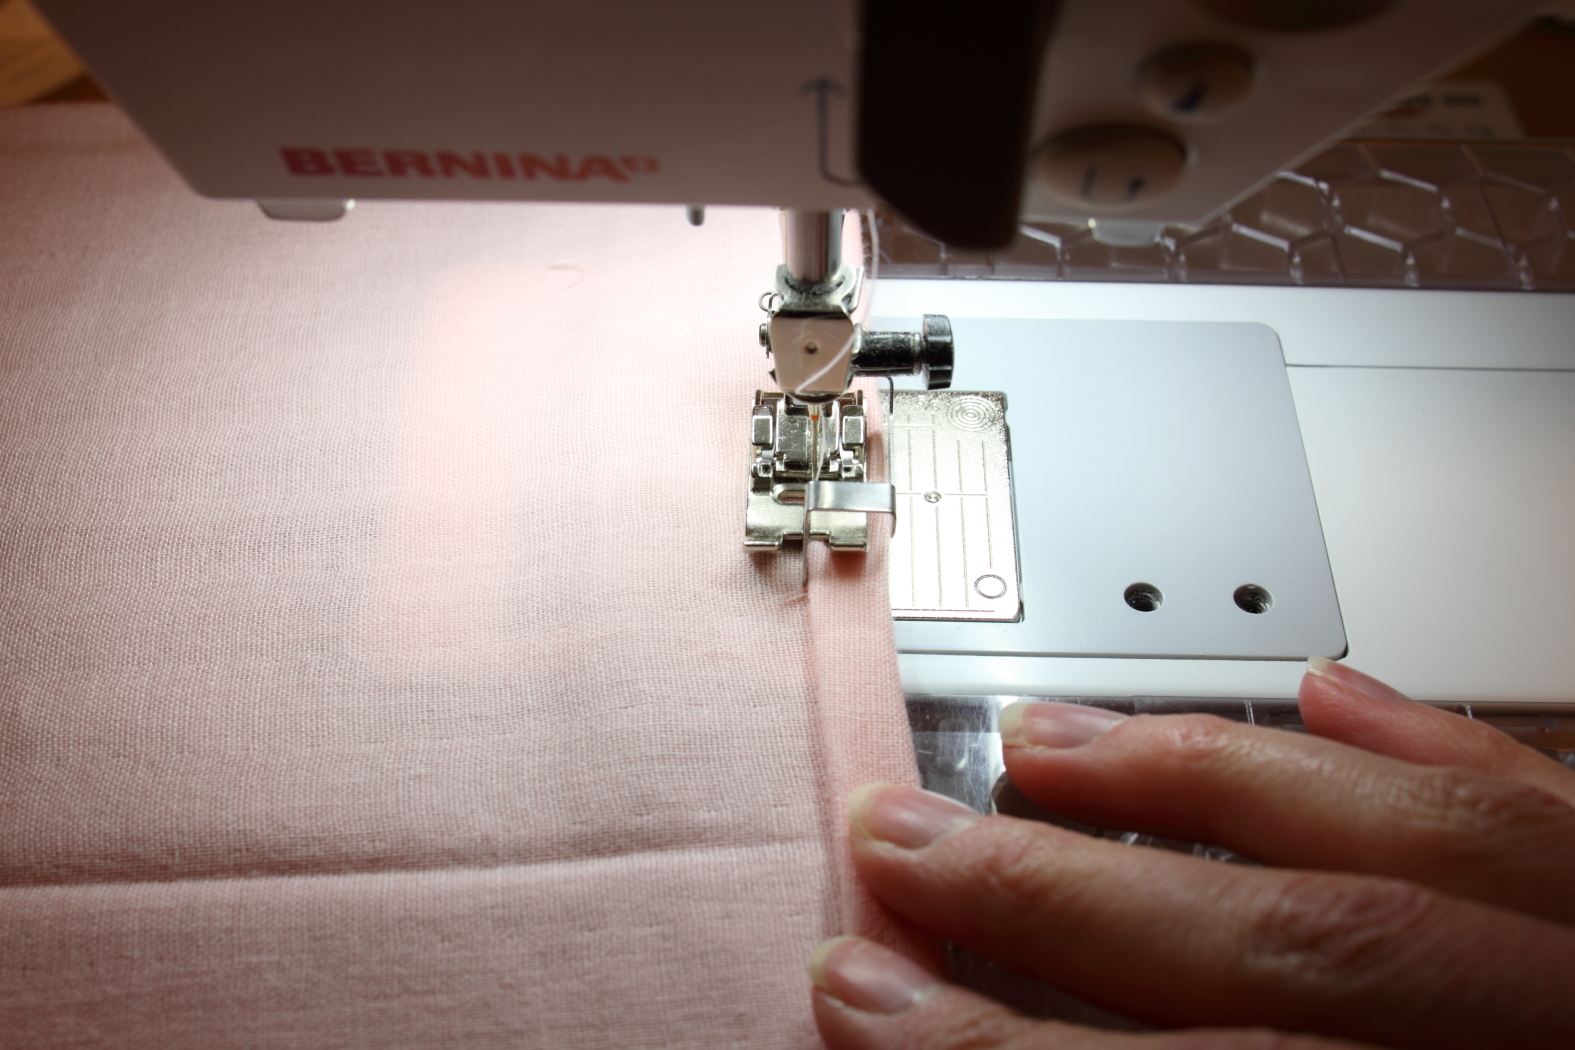
Next, we want to stitch that seam down so it stays nice and flat when you wear your scarf. If you have a topstitching foot (Bernina #10 or equivalent for your machine), now is a great time to use it.


You'll want to stitch the seam down as close to the edge of the seam as you dare.
 

The stitched down French seam from the wrong side.


The stitched down French seam from the right side of the scarf.
The last step is to hem the edges. If you're fancy, you can measure and press and pin. I'm lazy.


I folded it under as I sewed. You can make this is as narrow as you like, mine is a heavy 1/4" hem.
 

That's it! Clip your threads and call it good. Again, if you're fancy, you can iron out any folds, but I figured it's just going to get more fold lines as it waits to be opened. Yep, I'm classy. :-)


I hope this helps! The first scarf took me close to an hour to make, but I think the second one really only took just over half an hour. Really not bad for a very useful gift!

Monday, December 29, 2014

A playhouse for the girls

My biggest Christmas project was a playhouse for my girls. I've been wanting to make them a playhouse for a while, but didn't want to do the traditional card table variety you see all over Pinterest. My husband and I are both quite tall, and so are our girls, so I wanted something to last a little longer. I also wanted something I could sit in without breaking my back!

Sorry this one got blown out on the right side; I guess my window gives more light than I think it does!

I had seen several pins about PVC frame playhouses, and thought that was the way to go, but wasn't thrilled with any of the designs I saw until I found one on Etsy. Now, I'm not linking to the one I found on Etsy because I feel like it was overpriced and not very good. If you really want it, leave a comment or email me and I'll get you the information. The PVC frame pattern was excellent, but following the sewing pattern was terribly difficult. I felt so lucky to have friends with more sewing experience than I have to help me; otherwise, I wouldn't have been able to finish it!


The mailbox has a slot so they can deliver mail to each other; I knew I really wanted a mail box because my almost-five year old is pretty into mail. She's made her own "mail boxes" and delivers notes under our bedroom door at night. It was a must! :-)


I really loved the way the pennants turned out!


I spent a good two months working on it, and I'm so happy with the results. I made some improvements, the best of which was adding velcro to flaps around the door to hold the house in place around the frame. This made it so much easier to attach the back panel during assembly!


My girls love it, and I have to admit, it's very open and airy inside. It's easy for me to sit in there with my girls reading books or doing puzzles. I hope it becomes a cherished toy.

Saturday, December 27, 2014

Union Jack

So many of the things I've been working on, or just finished, were for Christmas gifts and so I didn't dare take photos or post about them.  One I've been really excited about was a quilt I made for my sister.


Union Jacks are so trendy right now that I've seen a lot of Union Jack sewing projects floating around Pinterest, and I decided it would be really cool to make my sister a Union Jack throw quilt. She is a certifiable Anglophile, and I say that in the most loving way possible. Because as much as she loves England and all things British, I feel the same way about France. :-) She TA'ed for a professor through her (American) university for a study abroad in London, and absolutely loved it.


When I stumbled across Lynn's Jack Attack quilt along (months afterward...), I knew I had to make it for her. Lynn took care of all the measurements, and her diagrams were clear and easy to follow. It was by far the best tutorial I found, and it was exactly what I wanted for my sister. I did stumble just once while I was trying to orient the strips in the right direction, but figured out what I was doing wrong before stitching, which is obviously so nice. I don't think I had to unpick anything on this quilt (go me!).

Of course, I didn't do it exactly the same as the QAL...I decided to make one block in the traditional colors rather than three in diverse fabrics. I used beautiful kona cotton for the top. I increased the borders as large as I could to accommodate a minky backing without a seam and to even out the quilt to a more usable throw size. And with the changes, it went together really fast! I quickly had it off to Abby Latimer for quilting.

I had her quilt it with wind swirls; it's a penny-incher panto, and it's a great texture. It worked out beautifully.

I was really nervous about binding it because of the minky, but the clerk at the store I bought the minky at promised that once it had been quilted, it wouldn't be as stretchy, and she was so right. I'm really glad I didn't have to piece the back, but I'll definitely use minky again in the future. I'm still not ready to piece it together, but maybe for something not too wide like another lap quilt. I couldn't believe how soft it made the quilt. So much softer and less stiff than a quilt even with flannel.

My sister loved it, of course. And I decided I need a throw quilt backed with minky for me, too!

Completion Date: December 17, 2014