Showing posts with label 2022 finishes. Show all posts

Monday, December 26, 2022

Christmas Sewing

I did a lot of Christmas sewing this year! I made Christmas pajamas for the girls (and for me, because, why not?) and I made them all dresses. The pajamas were "from Santa" and the dresses were my gift to them. We let them open them first before church (our church meeting started at 9am this year, so we opted to do Christmas morning after church) so they could wear them to church. I was worried because they don't always love the clothes I make for them, but I ran the pattern and the fabric by my oldest daughter before I ordered them (pattern from Vintage Little Lady, not sure I recommend, and hacci knit fabric from Girl Charlee Fabric, which I highly recommend), and she seemed happy with both, so I went for it. 

I ordered WAY more fabric than I needed, partially because I couldn't figure out how much I actually needed. When you make multiple of one pattern from one fabric, you usually don't need to just add the yardage up, but the pattern didn't even have efficient cutting directions for one dress OR total yardage requirements. Instead, it broke it down by pattern piece and never totaled them up. For instance, 1/2 yard for the bodice, 1/3 yard for the sleeve, etc. It was pretty pathetic. And irritating. So, I just wildly guessed at how much I needed, added a little extra, and then added a little extra on top of that because I bought it on a FANTASTIC black friday sale. Like, it was $3/yard. 


So now I have loads of fabric left and I could make myself a dress if I could figure out a way to hack it to my size. It was a basic pattern, I think I probably could. But I have so many other things on my list I'm not sure how soon I'll get to it. 

Anyway, when they opened them on Christmas morning, they were all absolutely thrilled. Like, beyond thrilled, they just grinned, they all rushed to put them on, and they all told me throughout the day how much they adored them. I felt so pleased! They did turn out pretty cute, and I'm happy with them. They did find a couple of holes of places I missed when I was serging it together, which is understandable because they have pockets, which are always tricky on a serger, and I was just doing so many. Assembly line often leads to slight misses like that for me. But, I'll get them all straightened out soon enough. 

Hope you had a lovely Christmas too, and if you sewed for you family, it was as well received as mine was! 

Thursday, December 22, 2022

Home For the Holidays

 I finished one Christmas quilt this year. I had pulled a stack of fabrics last year when I was considering making a simple Christmas quilt to welcome a new neighbor to the street (I ended up making an embroidered throw pillow instead), and decided to use it to try out the Hurty ruler I bought at Quilt Con. I have tried to make half-rectangle triangles in the past, and it's hard. I hadn't seen HRT rulers before, and clearly they exist, but this was the first one I had seen and bought it along with the clammy rulers I chose. I was pretty nervous to use it, since unlike HSTs, you have to make sure they're angled the right way...so it took some courage to start, and that's one reason I wanted to use this stack of fabrics. They were fabrics I loved, but wouldn't feel bad if I used them on a project that didn't work. 

The assembly went pretty well and it didn't take long to get a stack of blocks ready. When I laid it out, I thought it would end up bigger than it did, but it is really only throw size. Which is fine, but, as you've probably noticed, I like big quilts. :)


I played around with layout a bit, and tried to add a couple of focal points by alternating the brights and low volumes. It's fun to experiment sometimes. Even if it's not super successful. This one I think works but isn't Ah-Mazing. 

When I got it back from the quilter, I decided pretty quickly to bind it with some of the white snowflake print I'd used. I had (and still have) plenty and it's a great print. It's backed with minky, of course. Naming it was tricky, it's always something I struggle with. I settled on Home for the Holidays because it felt right. I'm not sure why. Sometimes you just have to pick something, haha. 

Home For the Holidays, quilted by Abby Latimer, completed November 2022

Tuesday, November 22, 2022

Christmas Banner

 I finished up my Christmas banner I mentioned last week just the other day and I love how it turned out! It was pretty quick, and I guess I was just nervous because of placing the embroidery, and then trimming them after to a uniform size...and not really knowing how long to make the binding...I do much better with patterns with measurements, haha. Flying by the seat of my pants is not my specialty!

But, it turned out great and I didn't need to trim too much. I did end up redoing a few as I mentioned, and instead of wasting the squares, I used them as backings for the blocks. This may not have been the best choice...I hang my banners in my stairwell in front of windows, and so during the day, especially the afternoon with the strong western sun coming in, you can see the outline of the embroidery. At the very least, I should have matched up the replaced blocks to their replacements so it would be less obvious...but it's okay. The color doesn't show through, just the outline of the letter, and its mostly not too noticeable. I was glad to not waste fabric. 


I used a gray stripe from Camille Roskelley's Christmas line and I think it turned out really great.

Now if only the rest of my Christmas projects can go as quickly and as smoothly as this one...

*fingers crossed*

Tuesday, November 8, 2022

Florentine Sunset

 I loved Quiltcon earlier this year. It was such a fun, but exhausting day. So inspiring. The quilts were just amazing, and I loved browsing the vendors area. It was so large! I was hoping I would be able to get a Clammy ruler, and I was happy that I could. Sewtopia had them for sale and I bought two sizes, plus a Hurty ruler. I can't remember where I had seen a clammy ruler quilt, but I knew I really wanted one, and that Latifah Saafir, the designer behind the clammy ruler, was a MQG darling. 

I bought a bunch of other things too...it was fun. I did try to restrain myself, but it was just all so inspiring! 

I came home and was promptly very intimidated by the Clammys AND the Hurty. So I "brainstormed" color schemes and designs so I could avoid them for a bit. I really wanted to try them, but I was so intimidated!

I finally got the courage after coming up with a fun color scheme (and testing out the sewing method with some scraps) and I went for it! I was inspired by this watercolor that inspired my mini quilt I blogged about here. I referenced this quilt in that post too, but I hadn't started yet. I couldn't decide if I liked the more visual bridge idea that I used in the mini, or this clamshell color scheme better. So I just made both.

Unfortunately, these pieces are a bit off a fabric hog and so I really went through a lot of fabric. It doesn't create useful scraps either, with the shape...and the pieces are so large that some fabrics I wanted to use weren't large enough. Everything was from my stash, I don't think I bought anything specifically for this quilt...pretty sure. That's my favorite way of quilting--I keep a large stash and then sew from it instead of purchasing fabric by the project. I feel like it gives my projects a uniquely me look.

The assembly was tricky, and I bet it was a bit wonky for my quilter. She is a good sport and doesn't complain. Hopefully most of my work is flat and straight enough that once in a while she's willing to tolerate it, haha. About half way through, I realized I really should have starched my fabric. But I never starch, so it didn't occur to me before it was too late. 

We backed it with a mustard yellow minky. I love the ombre effect this quilt has as they blend together and I'm proud of myself for making something hard! Maybe I'll even make another clammy quilt sometime. With starch, though. 

Tuesday, November 1, 2022

Following the Leader

I love using leaders and enders. I see so many benefits, and very few drawbacks. It "saves" thread (although, does it? *shrug*), it DOES help fabric not get sucked down into the stitch plate, especially when you're sewing triangles, and it's like getting a bonus project without a lot of extra work. Additionally, with the way I use leaders and enders, I get to use up scraps. It's pretty much my main scrap quilting method. I should maybe sew more scrappy quilts, but...not right now. 

Some drawbacks I can see are that I tend to feel guilty if I DON'T use an ender for some reason, and it does rather clutter up my sewing desk, because I keep my pieces all ready to go behind my machine. 

Nevertheless, I find leaders and enders exciting, even though I've been making them for many years at this point. I love when I get close to finishing and seeing what I've worked so long on come together. I love how interesting scrappy quilts are to look at. And I get excited to start a new one. The excitement has not worn off yet, haha. 

This is my fourth completed leaders and enders and this one is entirely from scraps. My others have been *mostly* scraps, but this one is completely scraps, which makes me pretty proud. I opted to use this one for another picnic blanket, so I backed it with some denim. 


I was inspired for this one by this quilt by Crazy Mom Quilts. And interestingly, she was inspired by a vintage quilt, so apparently, it's an inspiring design. She provided a tutorial, but I did not follow it. I did use the final block size, and these are TINY. But, I love that I got to use up a lot of smallish scraps, and it also gave me a good opportunity to weed out a lot of scraps that are tinier and I really should let go of. These pieces are all 1x3 finished, so they started out at 1-1/2" by 3-1/2". In my opinion, 1-1/2" is pretty small, so if something was narrower than that and not a good length, I tried to let them go. I still have pieces way to small in there, and maybe someday I'll use them to create some fabric slabs or something. We'll see. 

Anyway, another departure from her tutorial is that I chose to make them into 9 patches instead of piecing long rows. This made more sense to me, and I think it made handling a little easier. Pressing wasn't always perfect, but that's okay. I also made it a lot larger than hers. By the end, I was pretty tired of piecing little rail fences, but I think it was worth it. It's a great size for a picnic blanket. 


I did try to follow her color scheme, which was brights on the outside and low volume on the inside, and I treated this like a kitchen sink quilt--any color was okay. For the most part, I think that aspect was okay. I regret using the black solids, and the ones that are more mid-toned that don't read well enough as a light or a dark. I feel like there are far more of those than there should be and it disrupts the design that the rail fence should produce. But that's okay. I did manage to use a lot of scraps that I knew I could use somehow, these border pieces from doll panels. I used more than I think I should have, but they were the perfect width and the colors are perfect. These are just three of the different borders I used (the two horseshoe colors and the aqua arch/rainbow. The lavender strip and the red with pink and white arches strip in the photo above are also border pieces from panels; there are a lot in this quilt!).


Of course, Halloween costumes got in the way of binding it and now it's too cold to actually use it, so we'll have to wait until next summer. *sigh*

Oh, and I did the math. There are 1,728 individual scraps in this quilt. Whew! No wonder it took YEARS. It's a 72" square quilt. 

Following the Leader, quilted by Abby Latimer, completed Oct 2022

Monday, October 24, 2022

Seattle Quilt

 I’ve been admiring scrappy quilts lately, especially the work of Amanda Jean Nyberg. I’m still sad, years later, that she discontinued her blog but I’m glad she maintains her instagram for now. And with all that scrappy goodness, I’ve felt inspired to just sew. 

After finishing a more finicky pattern, especially, I was tired and really wanted to just sew. And I have loads of solid scraps that seem to multiply and never get touched. I decided to try out some improv scrap quilting and opted for a log cabin. Not very imaginative, I know this has historically been a staple of modern improv. But I’m still pretty new to improv and it’s a staple because it’s effective. So I went for it. I chose a color scheme of mostly blues and grays with accents in pink and yellow. 


I tried to be judicious on my scrap usage because I hate wasting fabric and didn’t want to cut pieces down by less than I could use elsewhere and that really drove a lot of the design decisions, which means some blocks aren’t necessarily very sound color-wise. That’s okay. I’m pretty pleased with my first go, even though there are blocks that aren’t effective. 

I was surprised it felt smaller than I expected. It’s 60x70, with 10” blocks. It’s a reasonable size, but it still felt small. It’s okay. I was really running out of scraps anyway. Rather, I was running out of different appropriately-sized scraps. My solids box is still overflowing, haha. 

As I was getting ready to make this quilt, I sorted out my solid scraps. I had them in a cardboard box because they outgrew my plastic scrap box they had been in. They’re still in the cardboard box, but I separated them into a few different groups and use bags to keep them separated. I have grays and blacks, warm neutrals and browns, blues, greens, and yellows, reds, oranges, pinks and purples. I struggle with solids storage. I also have some solid cuts in my stash drawers, but some are so small they’re barely big enough for a binding. But they’re mostly still intact so they don’t really seem to fit in scrap storage…it’s a problem. I’m trying to reevaluate how I store them, so I might switch things up. We’ll see. 

I pieced the backing from some of those larger small cuts that I don’t want anymore. Colors purchased for specific purposes that are now finished, and pieces that are too small to be usable. It’s not pretty. But it’s the back of a scrap quilt and I think that’s fine. I’d rather use it than have it languish in the drawer, and using it on a backing feels less wasteful than donating it or discarding it. 


I got it back from my quilter and had to wait to bind it because I had other pressing things. I was finishing up piecing the block components of the All the Good quilt and didn’t want to put on my walking foot, and then I had to dive into Halloween costumes. With those finished, I was finally able to bind it. Yay! The binding is scrappy from leftover bits of bindings from other quilts, in the colors of this quilt, so I thought it turned out great. And, it means that this entire quilt (save the batting...) is made from scraps. I think that's pretty great. What is not so great is the wavy binding. When this has happened in the past, I thought it might be that I was pulling the quilt and the binding unevenly, and I guess I must have been doing that this time. This time, I was too lazy to move my serger that sits next to my sewing machine, because this quilt isn't *that* big, but it looks like I needed the space. Oh well...done is better than perfect...

I thought about a possible name while I was binding, and it was hard. I thought about the colors...the wonkiness, the log cabin block...I felt stumped. And then I thought about Seattle, which often has such dreary weather, and gray and blue seem very Northwest to me. But when I've visited, we've always managed to get a few days of sun, like the bright pops of yellow. And Seattle, like the Northwest in general, is a little wonky and weird, which we love, right? Plus, I asked for a wavy quilting design, which kinda looks like waves, an Seattle is on the Sound...So, Seattle. *shrug*

Friday, October 7, 2022

Magic Squared

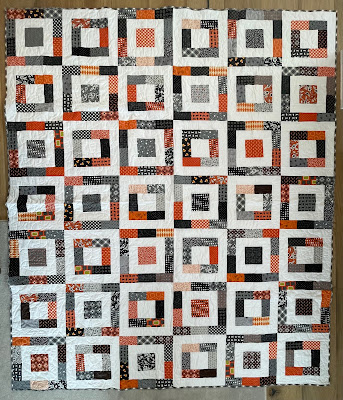
During the pandemic, April Rosenthal designed a follow up collection to her very adorable Midnight Magic Halloween collection from a year or two earlier. I'm not generally a big Halloween fan, but I really loved (a lot of) that line, especially the florals. It was Halloween, but not overly cutesy, not overly Halloween-esque, and just really nice. However, the fabric faced major delays, and apparently, a lot of shops cancelled their orders. When I saw Abby Latimer had precuts, I ordered a jelly roll and a charm pack to make sure I had at least some of the fabric, and luckily, a local quilt shop got most of the line in yardage so I was able to buy some cuts of the best prints, especially the florals. 

But, what to do with the precuts? I don't usually use precuts. I feel wasteful if I don't use the entire piece of fabric, so trimming a charm square down to 3 or 4 inches is out of the question. I thought about a simple star block, using the charm squares as centers and the jelly roll to make flying geese for the points, but I didn't love the math. And then I saw a quilt on the cover of a book, and realized it would be perfect. I had seen the book at my mom's, but it was simple enough I was able to do the math myself. 

I cut some 2-1/2" strips from some of my Halloween fabric to mix in because I don't love quilts made from just one line of fabric, and got to work. It came together really quickly and I love it!

Apparently, other people loved it too. My quilter, Abby Latimer, posted a picture of it on Instagram and lots of people asked what the pattern was. Abby didn't know, I responded to one person who tagged me and gave the details, but I couldn't believe how rude some people were. "Why post a quilt without posting the pattern information??" or some such variation. Berating a longarm quilter for not providing detailed information she didn't have just seemed very rude. I hopped back onto the post to check out the comment section when I received a DM from someone I don't know who asked if I sold patterns because Abby wouldn't respond to her questions. I was appalled at how she had berated Abby, telling her she was so unprofessional and how could she possibly run a quilting business like this...Abby was more patient than I would have been, and I didn't dare respond because I didn't think I could without being rude back. However, a simple glance through the comments would have revealed my source for the design, and if she'd spent as much time scrolling through comments as she did berating Abby, she would have seen the answer to her question. Sigh. The internet has killed civility. 


I backed it with an amazing Halloween print I found on Hawthorne Supply Co on clearance. Love that! I think it's Art Gallery, but I'm not totally sure...

Magic Squared, long arm quilted by Abby Latimer, completed 2022

Monday, September 26, 2022

Around the World BOM

When Whole Circle Studio announced an Around the World monthly sampler, I knew I had to sign up. The quilt is stunning, and I couldn't pass it up, I think I signed up the first day and got to take advantage of the early bird pricing.

I was not excited to sew more paper pieced blocks, I had just finished a bunch for a memorial project I'll post later, but I thought it would be worth it. I think it was. Originally, I figured with only one block per month, it wouldn't be too tiring, but by the end, I was so done with paper piecing. I wouldn't mind never paper piecing ever again. I know I will. But I'm sure not antsy to do it. :)

I chose really similar colors to the original, subbing in some for others I didn't love. They're all Kona cottons. And I redid completely one of the blocks because I wasn't happy with how it looked, especially with all the other blocks around it. I originally made Dubai with an orange background, and it ended up being too similar to the Cairo. I redid it in pink instead and had just enough to complete it. 


One change I made was using letter patterns I already owned instead of the one designed by WCS. I didn't love some of her letter shapes, and I already had one I really liked, by From Blank Pages. So I did a little math and increased the size of the pattern so it would fit better into the blocks. It also meant I had to be flexible and measure to get the piece the right size and shape to fit into the block. It was difficult, and I think it was worth it. I love it with the letters!

I also decided to add a nice, wide border to it. When the top was completed, I was underwhelmed by the size. If you've been around my blog much, you know I like BIG quilts. Oversized lap quilts are my preferred size, and by oversized, I mean practically twin. Or, if it's square, practically queen. ;-) And after all the work of the paper piecing, I just wanted the finished product to be larger. So I added a nice wide border in a light gray. I love how it turned out, and the size is much more me. 

I knew, after all the work, I had to send it to Marion McClellan for custom quilting and she did a stellar job. I love the winding road in the border with the pebbling, it's perfection. I am never disappointed with her quilting. 

Before I took it to her, I consulted her on the backing; I had purchased more fabric than I needed intentionally because paper piecing is such a fabric hog, and I had lots leftover. I asked her if it would be awful to pair pretty dense paper piecing with a pieced backing and described what I was thinking and she was supportive! Of course she acknowledged normal backings are easier but also said she thought it would look amazing and that if it were her, she'd definitely consider it. So I went for it; I figured how large the back needed to be and then divided that evenly and cut a bunch of squares to make a pieced back. I do like it; it's different than I pictured, and I might like it more if I hadn't tried to use up my least favorite colors, haha. But, in the interest in not wasting fabric, I went with what I'd like most to get rid of. 

I really love how it turned out, and I love having it in our living room!

Come Fly With Me, designed by Whole Circle Studio, long arm quilted by Marion McClellan, completed March 2022

Monday, September 19, 2022

Scrap Stash Plus

When I saw Emily Dennis's Scrap Stash Plus tutorial, I immediately wanted to make one. I recognized in it the Inside Out pattern designed by Allison Harris of Cluck Cluck Sew, which I own already, but loved the alternating background Emily used. And the rainbow. So good. 

It took me a while to get around to actually making it, though not too long. And as it happened, I didn't expect to finish it as quickly as I did. I brainstormed a color scheme (I opted to go for a partial rainbow, just pink to green), and then, because I was working on some pretty big and demanding projects, I decided to just make a couple blocks to give myself a break from the tough stuff. 

But, when does a couple of blocks ever stay a couple of blocks? I continued on with my harder project (I think it was the Patchwork City sampler...) but I added in a few of these blocks a day and became thoroughly enamored with them. I made it a bit bigger than the throw size, but a few rows shorter than the twin size, and it's the perfect oversized throw for our family. I love the scrap variety, I didn't reuse a single colored scrap (though I had to reuse a lot of the low volume scraps because I just didn't have enough). And I love the rainbow/ombre effect. 


I backed it with a navy blue minky and it's lovely. I bound it with Kona Curry, even though there isn't any yellow in it, and I think it's the perfect bright-but-not-too-bright complement. 


Also, side note, as I cut out the background, I realized that for one block, I had miscalculated with my scrap and I was one 2-1/2" square shy. It happened to be a print from April Rosenthal's Midnight Magic, and I just happen to live in the same city she does. I reached out to ask if she had any scraps of the print and she graciously gave me a whole fat quarter! Quilters are the best people. I was so grateful. 

Scrap Stash Plus, quilted by Abby Latimer, completed May 2022

Thursday, September 15, 2022

Swoon Sixteen 2.0

My second daughter had been patiently asking for a minky-backed bed quilt longer than my oldest daughter and as most middle children, she gets overlooked more than is fair and often very patiently waits. I couldn't keep pushing her quilt request off when I had just made a quilt for my oldest, so luckily for her, her quilt request shot to the top of the list. I got the top done shortly after my oldest daughter's, and they went to the quilter together and were finished together. I might have finished hers first, just to make sure she got looked after. 

I picked out a stack of fabric I thought she'd love, and she did. I thought Swoon 16 by Camille Roskelley would be the perfect pattern, and I do enjoy piecing quilts in this style. Camille Roskelley and Allison Harris are among my favorites, even still, and they have patterns I'm most willing to resew. I'm contemplating another Shimmer quilt (I've made two already, plus a Wallflower, which is nearly the same pattern), and it's similar to the Swoon in construction and look, and it's just a pattern I enjoy sewing. I was glad when she said she'd like it.

I think it turned out really great. I used some leftover Ruby Star Society lawn (a major sacrifice!) and some others that I'd been holding onto for a while. We backed it with aqua minky, and that gave us a hard time. Apparently, aqua is a color that has been hard to restock, and since it's popular, Abby Latimer had been out for a while. I went on a search of local quilt shops and found it after checking a couple, and they had *just* enough. Like, I texted Abby after they measured it to make sure it would be okay. She said she could make it work and I was so so glad. My daughter really wanted aqua, and I didn't want to let her down. 

She doesn't really sleep with hers, either. But that's okay. I'm pretty sure she loves it too.

Long arm quilted by Abby Latimer, completed March 2022

Monday, September 12, 2022

Hidden Stars

My older girls have been asking me to make them new bed quilts for a while. They've been jealous that the twins have minky-backed bed quilts, and theirs have boring-and-not-as-soft flannel. Even though they still share a room, I think they were also tired of having coordinated quilts and wanted something more personal.

It was on my list, but low. I have so many other projects that I'm more excited about, and they HAVE bed quilts. 

Then, I ordered a Florida jelly roll by Ruby Star Society when it was on sale and my oldest daughter fell in love with it when I opened it up to brainstorm. I don't usually buy precuts or sew with them because I've always found it easier to use yardage, and I don't typically sew quilts from just one line. Sometimes there's a dominant line, but I rarely use exclusively one line. 


This quilt is no exception. I used the whole jelly roll because it was a half-sized roll anyway, but I added a bunch of strips from my yardage too. And I copied a pattern I had seen online somewhere, doing the math myself  (not sure it was jelly roll friendly anyway). I love the secondary pattern it creates with the stars in the middle between the blocks and she was excited about it too. 


We backed it with dark gray minky and she loves it. At least, I think she does...she still mostly sleeps under her comforter. *shrug*

Long arm quilted by Abby Latimer, completed March 2022

Monday, September 5, 2022

Library Dress

I've been working on making all my girls dresses. Once you make one for one, if she loves it, all the rest of them want one, too. It a good problem, I suppose. As long as they actually like them. They all have been growing anyway, and have needed new dresses. 

Right around the time I was dealing with loads of requests, Oliver and S had their annual summer sale, where patterns were half off. I love to stock up when they have good sales, so I asked the girls for their opinions on patterns, and two of them jumped at this library dress, which I just think is the cutest. I love the collar, the contrasting waist band, everything. It's been on my wishlist for a few years, but I wasn't sure if they would go for it. Luckily they did, and I bought it, along with the Terrace dress pattern and the simple shorts pattern, since I didn't have one and it's such a basic. 


ANYWAY, once my large format printings had arrived (PDF Plotting is fantastic; fast and very affordable), I got to making it. I let my daughter pick fabric from my closet, from a selection I was willing to use, and she picked the pretty blue linen and this adorable plaid. I believe it's a Kaffe Fassett plaid, but I'm not sure since I've had it for several years and, as a woven, it doesn't have info on the selvage. The linen came from Fabrics-store.com. I thought it was a perfect pairing and I absolutely love how it turned out. 

I also managed to find enough buttons leftover from something else, or rather, something that must not have gotten made, since I had so many, and I love the contrast. They're actually really obnoxiously cheap buttons from Joanns and I'm glad to be rid of them; I used some on a different project for my girls and one of the buttons on that project broke in half. And they don't have rounded edges, they just generally feel cheap. (Lesson learned: don't buy cheap buttons from Joanns, they'll definitely feel cheap!) However, they were perfect for this project.

This dress is currently my make that I'm most proud of. I just love how it turned out! 

Thursday, September 1, 2022

Threads of Memories and Dreams

 I might do a bit of catch up posting to get some the quilts I've finished recently but haven't posted about, even on Instagram. This is one of those, though I have posted about this quilt project. Several years ago, I started a Patchwork City Sampler, designed by Elizabeth Hartman. The book has 75 blocks, 25 each in three different sizes, and includes several layout suggestions. Naturally, I decided to take on the largest one, using every single block, and I determined to make it a travel-themed quilt. When I started, my goal was to make each block represent a specific travel memory. And many do. But, finding travel-themed fabric and making each block look distinct while still maintaining that goal proved really difficult, so I expanded it to include travel dreams as well as a few more generic travel themed blocks. 

I worked on this quilt for years. I started blocks in late 2016 and finally finished it up during the pandemic in 2021. The final stitches in the binding were put on in January of 2022


There was probably at least a year in there where I didn't work on it at all. I amassed loads of travel prints and more memories to include along the way, even a few pieces of fabric I bought while traveling. I was always searching online for great travel prints and looking in every quilt shop I visited for themed fabric. Which means this is probably one of the most expensive quilts I've ever made, as well, since I would buy a fat quarter or a half yard for just a few small pieces of fabric. Honestly, I still catch myself looking because it was such a long project that it became a pretty entrenched habit. I tried to make up for all the fabric purchases by using other prints from my scrap bins and was mostly successful. I worried a bit that the blocks would be too eclectic to look good once I tried to put them all together, but it actually turned out pretty great. I remember reading somewhere, maybe on Amanda Jean Nyberg's blog, that kitchen sink quilts, where you put in any fabric you have, actually often work out just fine because your scrap collection has one common denominator: you. And if you like it, it probably fits in with your style. I think there's probably some truth to that, as long as you stick with fabrics you purchased or you are more judicious with the scraps you accept from friends. ;)

When I pulled it out during the pandemic, determined to finish this long haul quilt, I started thinking about sashing and binding and backing, and of course, quilting. I decided early on I wanted to have it custom quilted and I took it to Marion McClellan. She's just amazing. We decided this would be a great quilt for graffiti quilting and she even added a nod to covid since I had a couple of covid-interrupted trip blocks in there. I attempted to up the contrast and stuff to make it easier to see, quilting is hard to photograph!


I used an amazing metallic essex linen for the sashing and a light blue essex for the binding. I wish you could see the sparkle in the linen, it's perfection, I backed it with a wide-backed Ruby Star sateen and it drapes beautifully. 

This quilt was a major labor of love. Over 75 blocks, because, I learned my lesson from a previous sampler quilt, and I remade a couple of the blocks I didn't love. I am so happy I did. There are still blocks that aren't my favorite (they can't all be favorites, though, right?), but I know I would have kicked myself if I hadn't replaced the blocks that were not square and that I didn't even really like. Here's a few I love, including a couple with the covid fabric.


I was really ready to be done with this project. After so long, I was ready to see the finished product, what I had worked so hard on and spent so much time and money on. But now that it's done, I almost want another long-term quilt project to work on. 

Threads of Memories and Dreams

quilted by Marion McClellan

completed January 2022

Wednesday, August 31, 2022

Terrace Dress

I've been sewing a lot more clothing lately. Loads of quilts, still, of course. Maybe I'm sewing more than is good for me, haha. I've been doing a lot of apparel though, for me and for my girls. We're all tall, so it can be difficult to find clothing that fits. It seems especially hard for tall, thin little girls. Dresses and tops are just not made for tall girls and it seems to make such a big difference when you're small. 

My twelve year old is starting to wear more women's clothing, but of course, it doesn't fit a tween's body correctly, either. Finding patterns for tween bodies is tricky, too, apparently! It's been rough. I made her this dress recently, and figured since it's meant to be belted and to be flowy, maybe the fit would work better. 


I used the Terrace dress pattern from Liesl and Co, and I found a picture on Instagram of the pattern sewn up in some Rifle Paper rayon that I already had. I asked if she would like that exact dress and she said yes! Of course, with my girls now, I have to drill them. Will you wear it? Do you really want it? Too often, I make them clothes and then they decide they don't actually like it and it breaks my heart. Of course it hurts my self esteem a bit that they don't like what I made, but I'm also disgruntled that I spent 5-10 hours sewing, and used fabric ranging in price from $30-75 depending on how expensive and how many yards I needed. It's discouraging.

And truthfully, the same thing STILL happened. 

I had her try it on before I hemmed it, and she said right then that she didn't actually like it. 

Grr. 

Apparently, she didn't love that the neckline was fairly wide and open. But it needed to be because it doesn't have any button closures or zippers, so it has to fit over the head. I tried explaining this, and she was still very torn. 

I finished it anyway, and hung it up in her room, and she put it on on Sunday, but complained, once again. She ended up changing into a dress I had just purchased for her, and I was so disappointed. Then she changed back. I try really hard to not emotionally manipulate them, and I tried to not act disappointed, but I'm sure she knew. Sigh.

But, I think she came around to the dress after she'd worn it for a bit. I think it's super cute, and the rayon is soft and flowy, and I'm sure it's comfy. Hopefully she'll like it enough to continue wearing it. And if not...at least this pattern is a relatively quick sew. 

Monday, August 29, 2022

Parisian Summer Blooms

 I often struggle with naming quilts. It's hard enough to come up with a name that suits the quilt, and then I worry I'll feel self conscious if someone looks at the label and notices the name, and then thinks it's silly.

I shouldn't care so much about what other people think of me. If I like the name, that's all that matters, right? But I do care. I think it's human nature and it takes a lot of discipline and confidence to not care too much. We should care at least a little, I think, otherwise, we'd be psychopaths. But not too much.

I fretted as I named this quilt. It is a pattern from Angela Pingel's excellent book, A Quilter's Mixology, which I love. I've made several quilts from this book, and it's one I keep returning to. She has excellent instructions for piecing curves and interesting modern designs. This pattern has been on my list for a while. In the book, the name is simply Curved Nine Patch. Simple. Descriptive. No frills. 

But I think it lacks personality, too. Which is fine, because then a maker doesn't need to feel influenced by the name when they're naming their own quilt. 

In the end, I named it Parisian Summer Blooms. The curves form flower blocks together, the colors seem summery to me with bold bright colors leaning into autumn, and there are a few Paris themed prints. I'm not sure it has the right feel, but I think it works. 


This quilt was quick to put together, which is always nice. It did take some thinking during assembly, and I didn't have quite the variety of fabrics that maybe would have made that easier. I tried hard to not have the same fabric in the same groupings, but with so many blocks coming together to form the pattern, it was pretty impossible and I settled for the few I ended up with. 

I almost regret not making it a little larger, and I have to keep reminding myself that it's a completely acceptable size for a lap quilt. I tend to make my quilts large. But, we are all tall people, so we like our quilts big! :-)

Saturday, August 20, 2022

Arno

 I like picking up small pieces of artwork when I travel. We bought a small watercolor in Florence of the Arno River from the view of Piazzale Michelangelo. It's a classic view of Florence and the painting we bought was done at sunset, so the colors are just lovely and perfectly Florentine with the terra-cotta roof tiles. The painting lives in our bathroom now so I get to see it every day. 


Recently, I started thinking about how the colors would be perfect for a quilt. I pulled a bunch of fabrics out and decided to use the Clammy ruler I had just picked up from QuiltCon. 

I got cold feet for a while, though, and in the meantime, decided that I really wanted to make a wall hanging to replace a piece of art that I've always hated. Why is it even in my house? Long story, don't ask...lol

So, instead, I pulled some solids that worked together and created a bridge design that reminded me of the view of the bridges in Florence. I made an extra one or two curved block pieces for each row so that I could stagger them and I added sashing strips between the rows so they looked more like bridges and I absolutely love how it turned out!

I wasn't sure how I wanted to quilt it, so I waited for a few weeks and brainstormed. I ended up with a design meant to mimic the Arno River running horizontally through the middle, as it appears on maps of Florence, and then added perpendicular lines to it. I used a walking foot, which is by far the most comfortable way for me to quilt, and I'm pleased with it. Even though the tribute is subtle, I still appreciate it and I like the softness the curved lines add to it. 

Some of the blocks aren't pieced super well, and that's okay. They don't all line up perfectly. I still like it and it turned out better than I expected. And the best part is that they were all scraps/leftovers from other projects! I find that extra solids tend to languish in my drawer so I'm trying to use them up.

PS I also did manage to get the clamshell quilt top made and just dropped it off to the quilter's. I LOVE it and I'm excited to get it back!