Showing posts with label mini quilt. Show all posts

Thursday, January 25, 2024

Terra Cotta Mini

After my stroke, I was itching to get back to the sewing room. I had done a little bit of English paper piecing in the hospital, but machine piecing is my preferred sewing method. But, my first week or so back was definitely time of recovery. I was worn out, I was sore, I wasn't walking very well at all. And I wasn't super confident in my fine motor skills needed for cutting and precision sewing. I was no where near confident to work on curves, which was my current WIP. Oh, and I wasn't limber enough to get down on the floor, so finishing the quilt I had in progress was out, too, since I was piecing rows together at this point. 

So, I had to figure out what to sew that I was up for sewing, and also had all the materials I needed...I toyed with a simple charm pack/HST quilt that's on my list, but I didn't want to use white for the background and didn't have enough of any other fabrics for the background, so that was out. I thought about Interwoven, by Lo and Behold Stitchery, but I didn't have solids and wasn't sure if the prints I picked were small-enough scale, and I read a reviewer who said the pattern required a lot of precision, so that was out. 

I had ordered a random sample pack of mini quilt patterns from Modern Makes (by Alderwood Studio) on Black Friday so I looked at the 5 patterns I was sent. To be honest, the set of patterns I got was pretty disappointing and if anything, it confirmed my decision to not participate in the program. I really only liked 2 out of 5, and 1 was excessively disappointing. Oh well, c'est la vie, non? One that I like is called Terra Cotta and I decided to make it as my first post-stroke project. The great thing about mini quilts is they don't take a lot of fabric, the cutting is minimal, and they wrap up quick. Plus, I can quilt mini quilts on my own machine. I'm not confident enough to quilt big quilts myself, so I send them out. But minis can be completely finished in a few hours. 


Luckily, I had some solids that worked great together and I finished it up a couple weeks ago. After I pieced it, it took me a few days to figure out how to quilt it. I didn't want to just quilt along the pieced style, I felt like that was boring. So I looked at my Walk book, by Jacquie Gering, and found a great design I felt like I could do. 

I'm really happy with how it turned out, and the only frustrating part is that I used a Sewline ceramic pencil to mark lines for quilt guides and I didn't actually get it all out. I tried scrubbing it with water with a microfiber cloth and a toothbrush, I even washed it in my washing machine (air-dried it after to avoid the heat of the dryer). They're faint, so I just gave up. Sadly. Lesson learned, don't use the ceramic pencils for quilt marking! At least for me. 

Saturday, August 20, 2022

Arno

 I like picking up small pieces of artwork when I travel. We bought a small watercolor in Florence of the Arno River from the view of Piazzale Michelangelo. It's a classic view of Florence and the painting we bought was done at sunset, so the colors are just lovely and perfectly Florentine with the terra-cotta roof tiles. The painting lives in our bathroom now so I get to see it every day. 


Recently, I started thinking about how the colors would be perfect for a quilt. I pulled a bunch of fabrics out and decided to use the Clammy ruler I had just picked up from QuiltCon. 

I got cold feet for a while, though, and in the meantime, decided that I really wanted to make a wall hanging to replace a piece of art that I've always hated. Why is it even in my house? Long story, don't ask...lol

So, instead, I pulled some solids that worked together and created a bridge design that reminded me of the view of the bridges in Florence. I made an extra one or two curved block pieces for each row so that I could stagger them and I added sashing strips between the rows so they looked more like bridges and I absolutely love how it turned out!

I wasn't sure how I wanted to quilt it, so I waited for a few weeks and brainstormed. I ended up with a design meant to mimic the Arno River running horizontally through the middle, as it appears on maps of Florence, and then added perpendicular lines to it. I used a walking foot, which is by far the most comfortable way for me to quilt, and I'm pleased with it. Even though the tribute is subtle, I still appreciate it and I like the softness the curved lines add to it. 

Some of the blocks aren't pieced super well, and that's okay. They don't all line up perfectly. I still like it and it turned out better than I expected. And the best part is that they were all scraps/leftovers from other projects! I find that extra solids tend to languish in my drawer so I'm trying to use them up.

PS I also did manage to get the clamshell quilt top made and just dropped it off to the quilter's. I LOVE it and I'm excited to get it back!

Tuesday, November 21, 2017

Christmas Table Runner

I wasn't planning on doing any Christmas sewing this year. Sewing gifts, sure. I sew each of my daughters a gift every year. But I didn't plan any Christmas quilts or decor. I have so many other things to sew. And then I was thinking about my brother who moved across the country earlier this year, and how it will be the first year he and his wife will be away from family.

So, of course, I decided to make them a gift. I thought they might appreciate having a table runner, to use all season long. I settled on making the same pattern I had made for my friend, a modified Seaside Quilt from Vintage Quilt Revival. I love that book.


Luckily, I had all the materials I needed, including enough white batting scraps (my big roll is cream) to piece together. It was the first time I've used frankenbatting, and I was pleased that it worked! I wouldn't want to do it for a large quilt, but this small quilt was fine. 

One thing I love about this quilt pattern is the center the four blocks form. Wish I'd gotten those top green corners to line up better, but the others look good! 


Here's a picture of the individual blocks. There are four for this mini quilt, and they go together really quickly.


I used a quilting pattern from Jacquie Gering's book Walk. I LOVE how it turned out and added movement. You can see a little bit of it on the back. The backing I used was this awesome woven green fabric that has woven ovals. It's pretty cool.


Anyway, it's on its way to them now, and I hope they love it!

Christmas Seaside Table Runner
Pieced and quilted by me
Completed November 2017

Friday, November 17, 2017

Beauty and the Beast mini quilt

Many moons ago, I was excited about mini quilt swaps. It took me a while to get the courage to sign up, and then I waited for a swap I was excited about, and over the course of several months, I signed up for three swaps. The first was an Around the World craft swap, and I got a beautiful mini with a bicycle. After how well that one went, I signed up for Kate Basti's rainbow swap round 2, and then couldn't resist signing up for the second round of the Disney quilt swap.

And then I got pregnant with twins.

I was far enough along on the rainbow swap that I was able to finish that one, but while I had started the Disney mini, I wasn't clear enough on my direction, so I dropped out. I was heartbroken, but mostly I was nauseous and exhausted. Exhausted.

My partner was a librarian who loved Beauty and the Beast, among other things. I wasn't familiar with Mary Blair, who she noted she liked, but I had a great idea for Beauty and the Beast. I found a paper-pieced pattern for Chip, and decided to put him on a pile of books. Perfect, right?


I was certain that my partner would love it. Alas, she never got it because I had to drop out and she received a Mary Blair inspired mini that she loved.

Of course, it is perfect for me, too. :-) I have an MA in English literature, so a Beauty and the Beast book-inspired mini is just right.


I wanted to receive a beautiful, perfect, Disney-inspired mini.

And in a way, I did.

I clipped off one corner of a book, which bums me out, but it's not too noticeable. I had a hard time figuring out how to quilt it, but I like what I did, and it was pretty simple. I used one inch painter's tape to mark off columns and then marked the tape with a pen at even intervals to make sure the lines lined up evenly.

Chip
completed March 2017

Saturday, January 28, 2017

January...

So...January, huh? I haven't posted since December and don't even have morning sickness to blame. I guess twins are a good excuse...but really, I have been sewing, and I've actually sewed a lot, but haven't had a lot of finishes to post.

Still, since it's been SO long, I figured I'd post a few work in progress shots I took today.

Here's a quick shot of my design wall. I have a mini quilt top I started for the Disney Quilt Swap, but I had to drop out because my pregnancy was killer. My partner was a librarian who (among other things) liked Beauty and the Beast. I had to make a book-inspired mini. Lucky for me, I dig books and Beauty and the Beast, too. I swore I'd finish it up at some point, and now I'm trying to decide how to quilt it. I'm leaning towards just simple straight line quilting. Not quite matchstick, but lots of close lines.


I also have my first seven blocks in the Patchwork City Sampler book. I'm using it to feature travel-related prints. Of course, they aren't all destination specific--I've got some food prints and the camera prints. I decided to also include prints that include things that are important to me in traveling. :-)

I also have two quilt tops and backs ready to deliver to my favorite long arm quilter...but I'm waiting until my big roll of batting arrives. I ordered a roll of Pellon batting off Overstock.com after reading about it from Allison Harris, and since I paid $4 a yard for it (YEP.) I thought I'd take some with my quilts since she charges more. Hopefully the batting is nice!!


I also have been working on this English Paper Piecing project. I started it while I was on bed rest. I didn't work on it a ton, but I did a bunch. And I've worked on it periodically while I pump breastmilk. Because pumping is officially one of the most boring ways of spending time ever.


And, I'm working on a new bag. It's a diaper bag pattern from Dog Under My Desk, and while I get nervous sewing three dimensionally, her patterns are extremely thorough. I'm pretty excited about it, and hope it doesn't take too long. The one change I am making is adding this strip of fabric to the front zipper panel.


I've got lots of things going on...and lots to get started on, too. :-)

Thursday, November 10, 2016

Majestic Mountains Mini Quilt

I grew up here in Utah surrounded by beautiful mountains. I went to Olympus High, named not after the Greek Olympus, but after Mount Olympus on the Wasatch Front (okay, okay, so our mountain was named after the Greek one...). We had a great view of it from our front yard, and it's a central feature of the landscape of my childhood. No doubt this was due to my dad's love of the mountains. He loved the mountains. For him, it wasn't only that he appreciated the beauty of the mountains, but also that he felt God in the quiet of the mountains and appreciated the beauty of God's creations most while he was there.
This summer, my dad died. He had suffered for 9 long years from a neurological degenerative disorder and he finally died two weeks after having a mild stroke. It was heartbreaking, of course, and made even more difficult by the fact that I was pregnant with twins. I was a hormonal, emotional wreck. I was around 25 weeks when everything happened, and by that time, I was already struggling to get around. I yearned to mourn by retreating to the mountains, to honor his memory by hiking in his beloved mountains where I knew I would feel close to God and to him. But, my body wasn't in any shape to allow that. I was able to drive up the mountains a few times for picnics, but it was painful physically and just wasn't exactly what I had hoped for.


Around that time, Amy Ellis posted about her Majestic Mountains mini quilt and was in the process of developing the pattern. I had, for years, been searching and planning various ways to make a quilt to honor my dad and everything he gave me, and had never settled on what I wanted. I had wanted to make it before his death, but couldn't settle on a design. When I saw Amy's design, I knew it was what I wanted. It was modern enough to hang in my living space. It looked enough like mountains without being too pictorial. It was perfect. I ordered the pattern as soon as the sale went live and turned to my Kona color card to pick colors, hoping that sewing something in his memory would provide a way for me to properly grieve.
It was so much harder than I expected to pick colors from the color card, and I determined to cut up my card before I picked colors, which helped a lot. Maybe someday I'll get around to posting about that. I got my yardage ordered and set about sewing it. The pattern is paper pieced, and my only gripe with it is that she didn't specify any cutting instructions. I found this difficult to work with and ended up just cutting tremendously oversized pieces because of the sharp angles. I used my scraps to piece an improve backing. The top went together pretty quickly because there aren't very many pieces, and I loved it. But I couldn't figure out how to quilt it, and by that time, about 30 weeks, I wasn't even able to get to the store to pick thread. I was really in bad shape, and basically on bed rest (self-imposed). But, the whole process had really been therapeutic. I set it aside while I considered quilting, not really in a rush to decide because I didn't have any thread nor way to get any.

I delivered my babies the day before my birthday (yep, I got to spend my birthday in a hospital bed, hobbling around from my recent surgery), and my husband surprised me with an Aurifil color card! I'd never even sewn with Aurifil before, but I was pretty happy. It was a pretty thoughtful gift; he knew the only thing holding me up from quilting this mini was my inability to go buy thread.


A few weeks later, I had selected thread colors and finally settled on a quilting idea, and once it came, I got to quilting. It's funny that the actual sewing of this project was really so fast, but I spent months on the project due to my inability to make decisions. I decided to quilt the sky with horizontal wavy lines with swirls and loops to represent wind, I quilted pebbles on the rocky mountain side, and I quilted vertical lines (really long vertical zig zags) for the grass.


I bound it up and hope to get it hanging on my wall soon. I like to think that my dad would like it; in any case, I think he would appreciate the tribute. He was always a creative person and I think he'd appreciate that I used my creativity to create a mountain design in his honor. Truth is, I miss him terribly, even though he hadn't been himself for quite some time. He was a great man. And his death brought back all the grief we had experienced over the course of his illness.

Until we meet again, Dad. All my love.

Thursday, October 20, 2016

Double Windmill Table Runner

So, in case you didn't know, I had twins! They arrived a tad early in mid-September. Towards the end of the pregnancy, I was increasingly sore and fatigued--imagine that! It was hard for me to do anything besides sit in bed all day. As you can imagine, I wasn't sewing much toward the end. I did a few things, here and there...sewing really is therapeutic for me. But, I just didn't have the stamina or strength to sew for more than a few minutes at a time.
After I delivered, I felt so much better and was itching to get back at the machine. And I realized that I had really made a mistake before delivering. I was determined to leave my sewing room in as good a shape as possible, and in my mind, that meant leaving as few WIPs as possible. What I didn't count on, though, was that without WIPs, I didn't have projects to jump right back into when I was ready. I did have a couple: my sampler project being a big one. I also had plans for a fall-colored version of Allison Harris's Shimmer quilt, but my progress on that was limited to picking fabric and sewing one practice block. I had nothing cut out. I had a Majestic Mountain mini quilt (designed by Amy Ellis) pieced and waiting to be quilted, but I couldn't get to the store to select thread (my sweet husband fixed that by buying me an Aurifil color card for my birthday).


I didn't have anything prepped to jump right into. Which proved to be a major bummer because I didn't have a ton of time to escape to my sewing room, I really only get 20 minutes or so at a time. One day, while flipping through some of my favorite quilt books, I came across a pattern in Vintage Quilt Revival that has been on my list for a long time. It's a cool table runner, but I've never been able to figure out what colors I wanted to use. Looking at it that day, though, I realized how great it would be as a Halloween table runner.


That afternoon, I auditioned some fabrics and printed the paper piecing pieces. The next day, I sewed the paper piecing together, and got the blocks sewn together the day after that. It went together so quickly, which is a huge benefit of sewing table runners! I elected to do wavy lines for the quilting, and that took a few days, but I had the table runner totally finished, including binding, just over a week after I started. I love the quick return on investment you get with mini quilts and table runners.


I really love how it turned out, even though there are few things I would have done differently. And it matches the Halloween banner I made last year. :-)


Saturday, July 30, 2016

Sunny's Table Runner

While my blog and IG have been pretty quiet, I have gotten a bit of sewing done. Not a lot, but a bit. I've been wrapping up loose ends that have been started at various stages, and have even done a few more Sampler Shuffle blocks. But today, I'm going to share this table runner I just finished for my friend Sunny. I made her a table runner two years ago for her birthday, and she just loves it, which makes me so happy! There's nothing like having your handmade gifts appreciated and valued. But, she moved. Boo! She still uses the table runner, but not on her main dining table like she did when she lived here. She requested another one, and I can't say no to a friend like Sunny, so I set about choosing fabrics.

Her new house is in a snowbird town, and for years, that's how they treated it. They would winter there and summer here. But it got to be too much for them and they decided to permanently relocate. So, I've visited their house, but couldn't compare colors quite as easily...so I took over a stack of fabric in the colors she requested (lipstick red, black, and cream) to let her pick and all my reds were way wrong. So when I visited her new home a couple months later, I took my color card with me and she picked Kona Crimson. Not exactly lipstick red, but that's okay. ;-) She picked out a fabric I had that had black and gold, and since I didn't have enough of anything for the designs I was considering, I picked up a black and a cream that had gold in them.


I chose a drunkard's path design, and I think she'll really like it! When it came to quilting, I was lost. So I did some simple echo quilting in the crimson section. I kept it nice and simple. 

What's great about this layout is that precision isn't super important in the curved piecing--there aren't  any points to line up. And since it's a table runner, I only needed 24 blocks, so it went together pretty fast! I used templates in the size I needed from Angela Pingel's A Quilter's Mixology.


This is way not my style, the colors definitely aren't what I would pick, but I really hope she loves it. Sometimes, making a quilt for someone else means working with things you wouldn't ever pick for yourself.

Sunny's Runner
pieced and quilted by me
Completed July 2016

Sunday, June 26, 2016

Rainbow Dash Mini Quilt

Last year, I signed up for the Rainbow Mini Quilt Swap Round 2 run by Kate Basti. She runs a tight ship and I remembered seeing so many beautiful minis during the first round, so I was thrilled to be able to participate! I got a really lovely mini from Leah.


And for my partner, I made a rainbow churn dash mini. I wanted to use different fabrics for every patch, and that meant that, because of how I would sew the half square triangles, that I would have twice as many as I needed for her mini. I decided to use extra long pieces and make double the other blocks as well so I could have a mini of my own.

And then I got pregnant. I hurried and finished up the mini for my partner and sent it off, but the other blocks waited and waited until I felt up to sewing again.


I finished it a week ago or so. I did have to cut new center squares because apparently, I neglected to do that. Instead of fishing out the same fabrics and cutting new squares, I used some extra mini charm squares from V&Co's two lines Simply Colorful and Simply Colorful 2 I had in my bin. They were just the size I needed and the colors were spot on for the blocks. Yay! The only other difference between my new mini and the original for the swap is the binding; I bound the original in white and bound mine is gray. I think they're both good binding colors for this.

I love it. I don't know if my partner loves hers, I hope she does, but I love it and I'm looking forward to getting it up on my wall.

Wednesday, February 10, 2016

It's a Small World Mini

I'm relatively new to the whole mini quilt bandwagon, but I am addicted! I think they're awesome for so many reasons: they're pretty quick and can be finished in a couple days if you're under pressure, but a few weeks at the most, they require very little fabric investment, they don't add to the ever accumulating pile of throw and bed quilts in the house, they don't require a longarmer...and that's just the practical stuff. I also love that I can try out free motion quilting without having to wrestle a huge quilt, and I love that they make great gifts that aren't overly extravagant. I also love that you can get pretty creative with the subject of the quilt, moreso than you can with throw quilts. I'm not one for cutesy and themed things in big quilts, but minis work.


So last year, when the hype around Jen Kingwell's My Small World quilt was circulating and everyone was DYING to get their hands on a copy of the French publication the pattern appeared in, I wanted to get one too. As photos of different versions floated around Instagram, I realized it would make a perfect gift for my friend, Julie. We've been to Disneyland with Julie twice; both times we had our oldest daughter, and the second time Julie had her 4 girls with us. It was so fun, and I know It's a Small World is one of Julie's very favorite rides. I immediately started scheming, but felt the Jen Kingwell version was a little abstract for my purpose. I started brainstorming...and found Leasa's pattern that she designed after the one she made for her Disney Quilt swap partner. I almost bought it, but realized her pattern made a pretty big quilt--I think it's almost 48 inches in one direction. Yikes! So, I started sketching from photos and images I found online...and then when I got EQ7 for Christmas, it was one of the first things I designed in the program. It was actually a little clunky, but I'm still learning how to use EQ7, and eventually I got what I needed (a bunch of paper piecing templates).

I did mess up on the math for some of the cutting, but since I'd taken the care to design it on a very easy grid, it was easy to fix. And I messed up on the paper piecing pieces for the tops--I'd totally spaced the fact that since they were "turrets" and roof pieces, I should be using the "sky" fabric for the background...so I got to redo every single one. *sigh* But it worked out fine and didn't add too much extra work.


I stitched the face on in gold embroidery floss (I used DMC brand). It was awful to work with, but I think it turned out fine. I thought the gold was just perfect. I would have been willing to redo it in gray or something, but, I really wanted the gold to work.


When it came to quilting, I felt rushed because I had only about 5 days before her birthday and I was at a complete loss for ideas. I considered pebbling the sky, but what to do with the main part? In the end, I did a simple cross-hatching. I didn't want anything to distract from all the fun fabrics or the embroidered face.

I hope she loves it, I had a fun time planning it for her and thinking about her while I schemed. I love a good mini quilt for a birthday gift!

Sunday, January 31, 2016

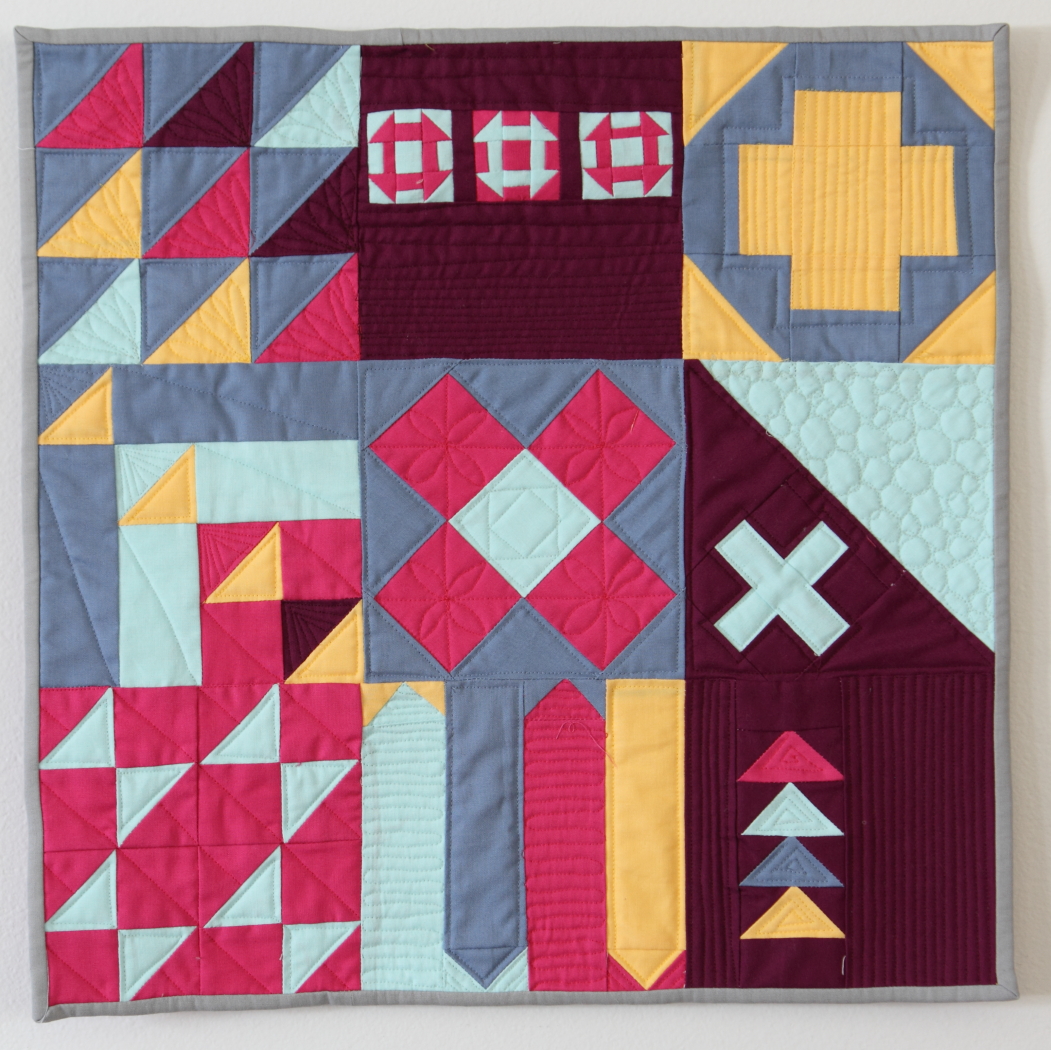
Mini Mania Challenge: Sampler Time!

For the Mini Mania Challenge group on Flickr, we combined December and January for a super challenge (and a break for the holidays...): a sampler! I loved this challenge because there were so many directions to go, and so many online resources right now. With the Moda Block Shuffle and the Janome modern block 100 blocks in 50 days thing, there were a lot of options to pick from that didn't need resizing. Wahoo! Resizing is not my thing...I also got EQ7 for Christmas, so between those and EQ7, I knew I'd be able to do something fun.


Picking fabric stumped me, though. Despite by scraps organization, I was flummoxed, and decided, instead, to stick with a few solids from my stash. I think this was largely inspired by the Janome blocks, which were done in conjunction with Michael Miller solids. They were so bold and graphic, I just loved them. So, I brought out a few of my favorite solids and got to work!

At first, I thought it'd be cool to stick with a theme--like, all plus/x block styles, or all churn dash variants, or something...but in the end, the blocks I wanted to make weren't all the same type, so there's a few themes. Which means there's no theme, really.


When it came time to quilt it, I tried to figure out a color for doing an all-over pattern, but, really, this demanded switching colors. So that took a while, but I think it was worth it. And I quilted it a ton. Which I like to look at even if I don't like to snuggle under it, so it's perfect for a wall quilt. :-) I really like what I thought of for this block, and I'm pleased it mostly turned out!


I don't always like how samplers look to be honest...they can often feel disjointed, which is why I wanted to stick with a theme. But I enjoy making them. Selecting fabric for each block is fun! And seeing each new block is like a surprise. And I do like the way this one turned out. I got Elizabeth Hartman's Patchwork City for Christmas, so I think more samplers are in my future!

Thursday, December 10, 2015

Improv Pods: Flashback Quilt

A few years ago, a friend was moving away, so I decided to make her a table runner. It was the first small quilt I'd ever made. I decided to make a table runner from Jacquie Gering's and Katie Pederson's book, Quilting Modern. I picked the improv pod runner, and I loved their color choices so much, I elected to use them in my runner, too. Yellow and gray. I bought fabric for it, and because it's such a small piece, I had enough fabric to make two, so I made myself one, too. I was pretty excited about the pattern and feared I would have separation anxiety. Also, and most importantly--it was a very new technique for me, and I figured I should have enough to make two so that I could pick and choose which blocks to use in hers.


I was really nervous, but didn't know how nervous I should be because I didn't know curves were supposed to be scary. The curves were a little intimidating to me, but I went for it, and I'm glad I didn't know to be really terrified of them, because they went great, and were pretty easy once I'd done a couple! I loved the technique so much I used it when I pieced my Jesus quilt.

The one thing I noticed when I was almost done (I'm a tad embarrassed it took me that long! ;-)) was that longer pods with more gentle curves were far easier to ease together than short ones. Of course, once I noticed this, I realized immediately why: the gentler curve is closer to a straight line.


This was also the first improv project I made, and while I made it, it was outside my comfort zone to improv too much, so I kept the sizing consistent and trimmed the pod blocks to square, consistent sizes. It worked really well for me.


I really love this runner, and I use it on my dining table even still. I don't know if my friend uses hers, but I often remember her when I look at it, which is good enough for me. ;-)

Improv Pod Table Runner
Pieced and quilted by me!
Completed December 2012

Monday, November 30, 2015

Mini Mania November Challenge: Churn Dash

I missed out on the Mini Mania challenge last month for a couple of semi-decent reasons, so I was really glad to be able to get back to the challenge! The challenge this month was churn dash blocks. Nine specifically, with a produced mini no larger than 20 inches. I spent a couple days thinking of some fresh modern ways I could do this great block and had settled on a multi-colored scrappy arrangement until I remembered I had some half-square-triangles already stitched together that I had cut off from a different project, and they ended up being just the right size.


As a side note, do you ever take the time to do the extra stitches when you sew corners so you end up with pre-sewn HSTs? I often forget, but I feel less wasteful when I remember. Since triangles/snowball corners are often made with squares, and then trimming the squares down to triangles after diagonal sewing lines are sewn, I like to save the scraps by sewing a second line 1/2" away from my stitched line. It takes a good bit of time, to be sure, but at least those cut offs don't end up in the trash (since I've found triangles are much harder scraps to use). And now I can say I've actually used some!


These HSTs came from a secret sewing project that I'm really excited about. It just might be appearing in a publication in coming months. *squee!* {Hopefully} more on that in a few months.

While it did take longer to use scraps for this project than to just cut from larger leftover cuts in my scrap bags (including the white!!), I am glad I could use up some smaller pieces. And once I'd found everything, the blocks and mini went together so fast.

For the quilting, I tested out a few different colors, but because there is a variety of blues, white worked the best. Even though I didn't actually do any quilting on any of the white pieces. I didn't quilt on the white pieces deliberately, anyway... :-)


I really love how it turned out with just the navy prints.

Tuesday, November 3, 2015

Harry Potter Mini Quilt

I've been wanting to make my good friend, who has a fun etsy shop called Odds n Evens, a Harry Potter quilt for a long time. She was a school teacher before she had her son, she's an avid reader, plus she loves Harry Potter. She has even made her cute origami stars out of pages from Harry Potter just for books lovers like herself! So cute.

But it took me a few months to find just the right design. I wanted something subtle and modern. Maybe simple is a better word. Not easy, necessarily, but simple in design.


When I saw this post by @this_chick_quilts on Instagram, I knew almost immediately that it was the one. I elected to switch out the colors and use more traditional Hogwarts colors. Kona Charcoal was the perfect background! I had all the fabric already in my stash, so I don't know what the other colors are, but I'd bet almost anything they are also Konas.


I used my Silhouette Cameo to cut out all the appliqué pieces, and just top stitched them down. It shouldn't need to be washed. The font is a free font I found by googling Harry Potter fonts, and it's called Lumos. It's pretty easy to find. I created a simple polygon lightning bolt in the Silhouette software, and downloaded a file from the Silhouette store for Harry's glasses. It took me a little bit to figure out the quilting; I'm not very good at free motion, and without many seams to help act as guides, I was worried. But I really like the diagonal lines. I think it works really well with the design.


I really love how it turned out! And if I didn't love my friend so much, it might have been harder to give up. I might have to make myself one.

Harry Potter Mini Quilt
Completed October 2015

Wednesday, September 30, 2015

Mini Mania: Log Cabins

September has been busy at our house! We went to southern California for a week (and took our girls to Disneyland), and we celebrated my youngest's birthday and my birthday. Couple all those things with my oldest starting kindergarten, and, well, it's been hectic. I've still sewn a bit. But I don't have much to show for it. I got the paper pieced blocks sewn together for my Christmas Seaside quilt (pattern from Vintage Quilt Revival), I've been sewing my curved blocks together for my Arabian Nights quilt (pattern from A Quilter's Mixology), I bound a baby quilt my friend made for her new baby boy and then just didn't have the energy to bind, and I got my cherry mini bound. It doesn't feel very productive, and it wasn't, but it was productive enough. I need to remember I'm not in a race. I'm a mom first and foremost, and any time I get to sew is a bonus. One thing I've liked about the mini quilts I've been making lately is that they help me feel like I'm getting stuff done. :-) Always a good thing.


I also finished a mini for the Flickr Mini Mania Challenge group. With my busy month, I wasn't sure  I was going to be able to, and I struggled with figuring out a plan for a couple of weeks. Color schemes, layouts, log cabin vs. courthouse steps...but I finally came up with a plan that I was excited to try. I didn't know how I would lay it out, but I was excited to try log cabins in an ombre effect in a couple color ways, all with solids.


Luckily, they went together quickly, you gotta love chain piecing, right?, and I got them up on my design wall so they could sit for a few days while I played around with block placement. While I thought I would do more of a gradient thing, from yellow to blue with the colors lined up, I ended up going with a pattern that isn't terribly apparent at first glance, But I really like it. And I have to admit that I fell more in love with this mini the more I worked on it, and it's one I'm really excited about. I've even toyed with the idea of making a larger quilt. We'll see...


I also really like the quilting! I saw a sample quilt with some log cabins with diagonal straight lines and knew it was going to be perfect for my mini. Thread color was tricky, but I think the gray I picked worked really well.


Anyway, I'm pleased with it! And looking forward to next month. Hopefully I'll get to it...amid the Halloween costumes and a gift for my niece who is turning 8 in December (got to get started early...so it doesn't get lost with all the Christmas prep). We'll see. We always see, don't we?

Monday, September 14, 2015

Cherry Pie Mini Quilt

While I was shopping at a quilt shop that was closing, I picked up a copy of Fig Tree's Cherry Pie Mini Quilt. I really love the simplicity of it, and I quickly determined to make it. I pulled out fabrics from my scrap bins, and got them cut out. One of the best parts of a mini (for me...) is that there are generally not very many pieces to cut. Cutting is not my favorite part of quilting, though now that I have a better cutting table set up, it's not quite the arduous task it was.

I ended up making it during cherry season, though I failed to finish it before the cherries ended for the year (cherry season is only 3 weeks long, after all...). At least I'll have to remind me of what I have to look forward to next year!


The top went together really quickly. One thing I found confusing was the border cutting instructions. It looks square, but it's not to start with and the way she has you add borders on is very smart. However, they're not labeled on the diagram, so I ended up not cutting them in the beginning and waiting until it was time to sew them on, and then cut them to size. I believe the cutting instructions were accurate, but when I read through them, I just couldn't imagine how they could be correct.

I also made the mistake of not carefully sewing my stem pieces together, and had to unpick a few. I think she notes to do so carefully, but it was unclear as to why until I began to press them and discovered my error. Not a terrible mistake...and easily fixed.


And then the binding...I'm sure you notice the binding...which I did a terrible job on. I cut my strips more narrow than usual, but then didn't adjust my seam allowance enough, so I didn't have much to turn to the back. I hand bound it, in the car during a roadtrip, and the back truly looks horrible. Live and learn, right? Someday, I will be better at binding! :-)


Other than that minor hiccup, the pattern was a real joy to sew and I love the look of it. And it reminds me of Seattle, which we visited 3 years ago during July, and were treated to pounds and pounds of fresh cherries. Such great memories.