Showing posts with label non-quilt. Show all posts

Tuesday, September 3, 2024

Fringe Dress

I want to like sewing clothes more than I do. I'm so tall it's hard to find things that fit properly, and it's nice to be able to make something you want instead of trying to find it. But, quilting really has my heart. Still, I sew clothes somewhat regularly, and this is my most recent make. 


I bought the Fringe dress pattern (finally hopping on that train, it's such a popular pattern!) during a sale at Chalk and Notch. I was specifically looking for a pattern to use for a cut of linen I was given by Harmony Fabric in Provo for winning a giveaway! I won 3 yards, and it's such a lovely light blue linen. Since I'm tall, I had to be careful about pattern selection, since I need to add so much length generally, I couldn't risk running out of fabric. The fringe dress was well within the fabric requirements, I think it specifies only 2-1/2 yards or so, so I felt like I'd have plenty. Plus, there are so many fringe dress pictures on the internet in all sorts of different fabric selections, and I felt confident it would look great in my linen. I snagged a paper copy during a sale they had, and eventually got around to sewing it. 

Honestly, I think this is among the quickest I've ever sewn up a planned project, haha. I got the fabric in April, and I sewed up the dress a few weeks ago, in August. I tend to stock up on fabric and/or patterns when they're on sale and then sew them when I'm feeling inspired or need it for a specific reason.

Maybe my reason just came up quicker than usual; I made it for family pictures, which we just did a few days ago. 

Part of the reason I dawdle is I dislike making muslins. I know it's so important and definitely not wasted time, but it feels like it. And, half the reason I like to make clothes is so they fit me, but what that means is often I don't fit in a straight size, so then I have to decide which size to start with, etc etc. And then tracing the pattern...I don't love prep work. 

Still, I persevered, and added the length I thought I'd need to check, and was pleasantly surprised it fit pretty well straight out of the envelope. So, I set about making it in the linen. 

Overall, I'm pretty pleased with it. I opted to straighten the hem out, and I made the v-neck with buttons and added the sleeve tabs. I love that I didn't have to adjust the neckline at all for good coverage (I'm not into showing off cleavage, sorry! I get cold, what can I say?), and I love the ties detail. I opted to add mine to the back darts because it seems like such an interesting detail. However, now that I've made it, I think I probably should have made it a size larger. I was really thrown off because the muslin (and the dress) genuinely look like the right size. It doesn't feel too snug when I wear it, except for perhaps across my arm, but that's easily explained by the drop sleeve construction. HOWEVER--because the buttons only extend to the waist, which is flatteringly situated just a bit above your true waist, the opening isn't *quite* big enough to comfortably put on and take off. I kinda feel like a gymnast every time I wear it, and I'm always worried I'm going to pull something (I am 40, after all...) or rip it. It might be my fault--I left in the basting stitches from gathering the skirt. But, I don't logically think it would do that. If I could take them out easily now and check, I would, but I serged the seam so it's nice and finished. I don't think those stitches are coming out, haha. Once I really struggled, I realized that most dresses take the opening down past the waist, so I feel like it's a slight design flaw and I'm surprised no one else has complained. 

The other disappointing thing about this dress is actually the fabric. When I got it, it was so soft, I was so excited to wear it. And it IS very soft. But, it is a deadstock linen and I'm learning that you just need to be careful with deadstocks. This one had some really thin spots where the weave was uneven and just thin. So I carefully cut around it as best I could. But it just seems like kinda shoddy fabric, which I find really disappointing. I'm really glad I won it in a giveaway and didn't purchase it, because I would have been upset at the quality. I don't know how long it will last with the quality of the fabric, but I really like the dress even still and will probably make another. It wasn't a difficult sew at all, and again I love the neckline and the ties detail. 

Friday, April 5, 2024

Luisa Crossbody Bag

So…I was really happy with the pouch I made for the sewtopia blind swap. I thought it turned out great and I felt like I had a good amount of extras in it. I even kinda felt like I didn’t want to give it away. 


Then, I watched the replay of the question and answer zoom call. And they talked about the swap and about the projects they were making for it…and my pouch seemed too simple. And I reread the swap instructions in the attendee packet and they have changed the wording from a small item such as a mini or pillow or pouch, to a medium item such as a tool organizer or favorite bag. 


Yeah. My pouch was not good enough. 


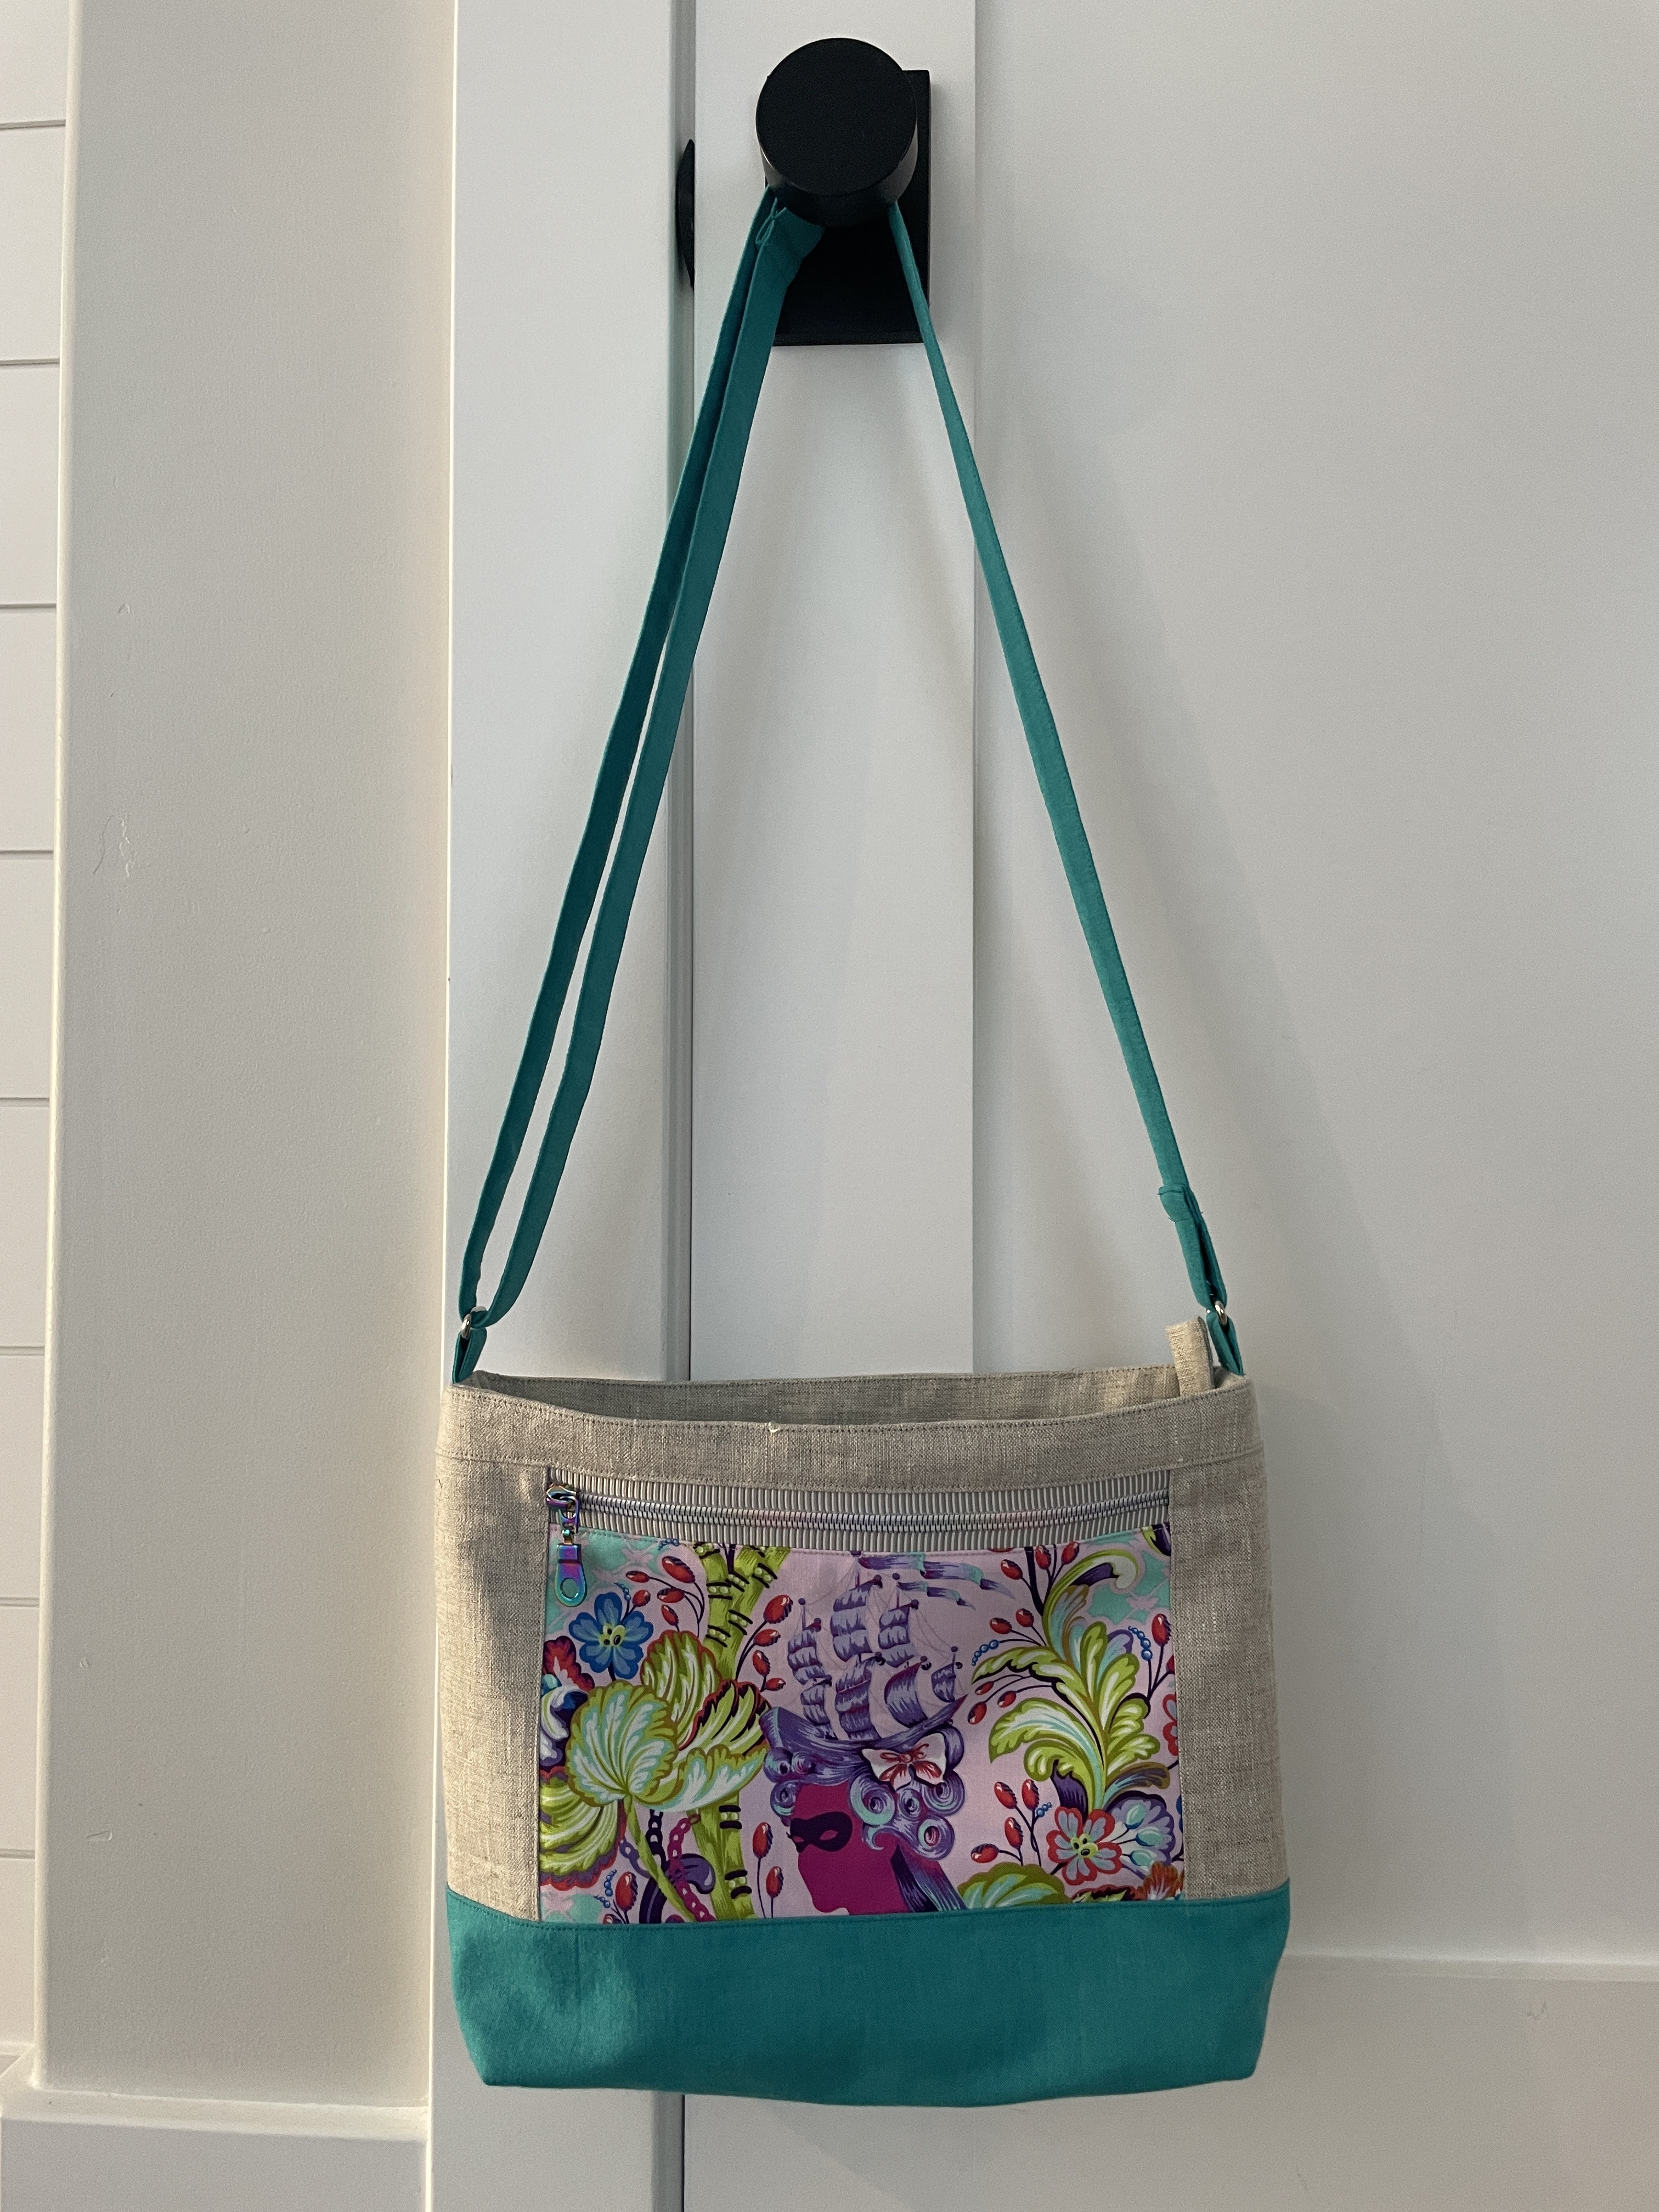
So, I started brainstorming because sewtopia is less than a month away now, and settled on making a Luisa crossbody bag by Sotak Handmade. I haven’t made it yet, but I thought it would be simple enough to try and would be a good pattern for a focal print. I chose a Tula Pink cameo from the Parisville deja vu line. Luckily, I found fabrics to go with it for the rest of the bag and I think it turned out great! 


I’m really pleased with how the zippers turned out. This rainbow zipper tape by the yard was an impulse purchase while I bought some other zippers by the yard on Etsy and I think it’s perfect for this bag. 


I did have to adjust how I inserted the zipper for the main compartment because I couldn’t figure out how to close it as written for a regular zipper, so I added another tab to the open end. I also think it could use a slightly wider strap, it’s a pretty big bag for only 1” wide. I also should have used a stiffer denim for the interlining, I think it’s a bit slouchy on the bottom contrast part. Otherwise, I think it’s a great bag, and once again, I’ll be sad to give it up. Hopefully the recipient loves it too, and I get something amazing myself!

Friday, March 8, 2024

Sandhill Sling

I mentioned last time that in lieu of participating in the Super Secret Swap for Sewtopia, that I wanted to make myself a swap package, so to speak. I wanted to give myself permission to make something hard that I've wanted for a while in the pretty fabric. I intended to justify purchasing fabric if I chose, but in the end, I used fabric from my stash. I did have to buy a couple pieces of hardware, but otherwise, I had everything. I love being able to turn to my stash for most of the things I need. It's really fun to shop your stash and not be limited by what's available at the quilt shop. 


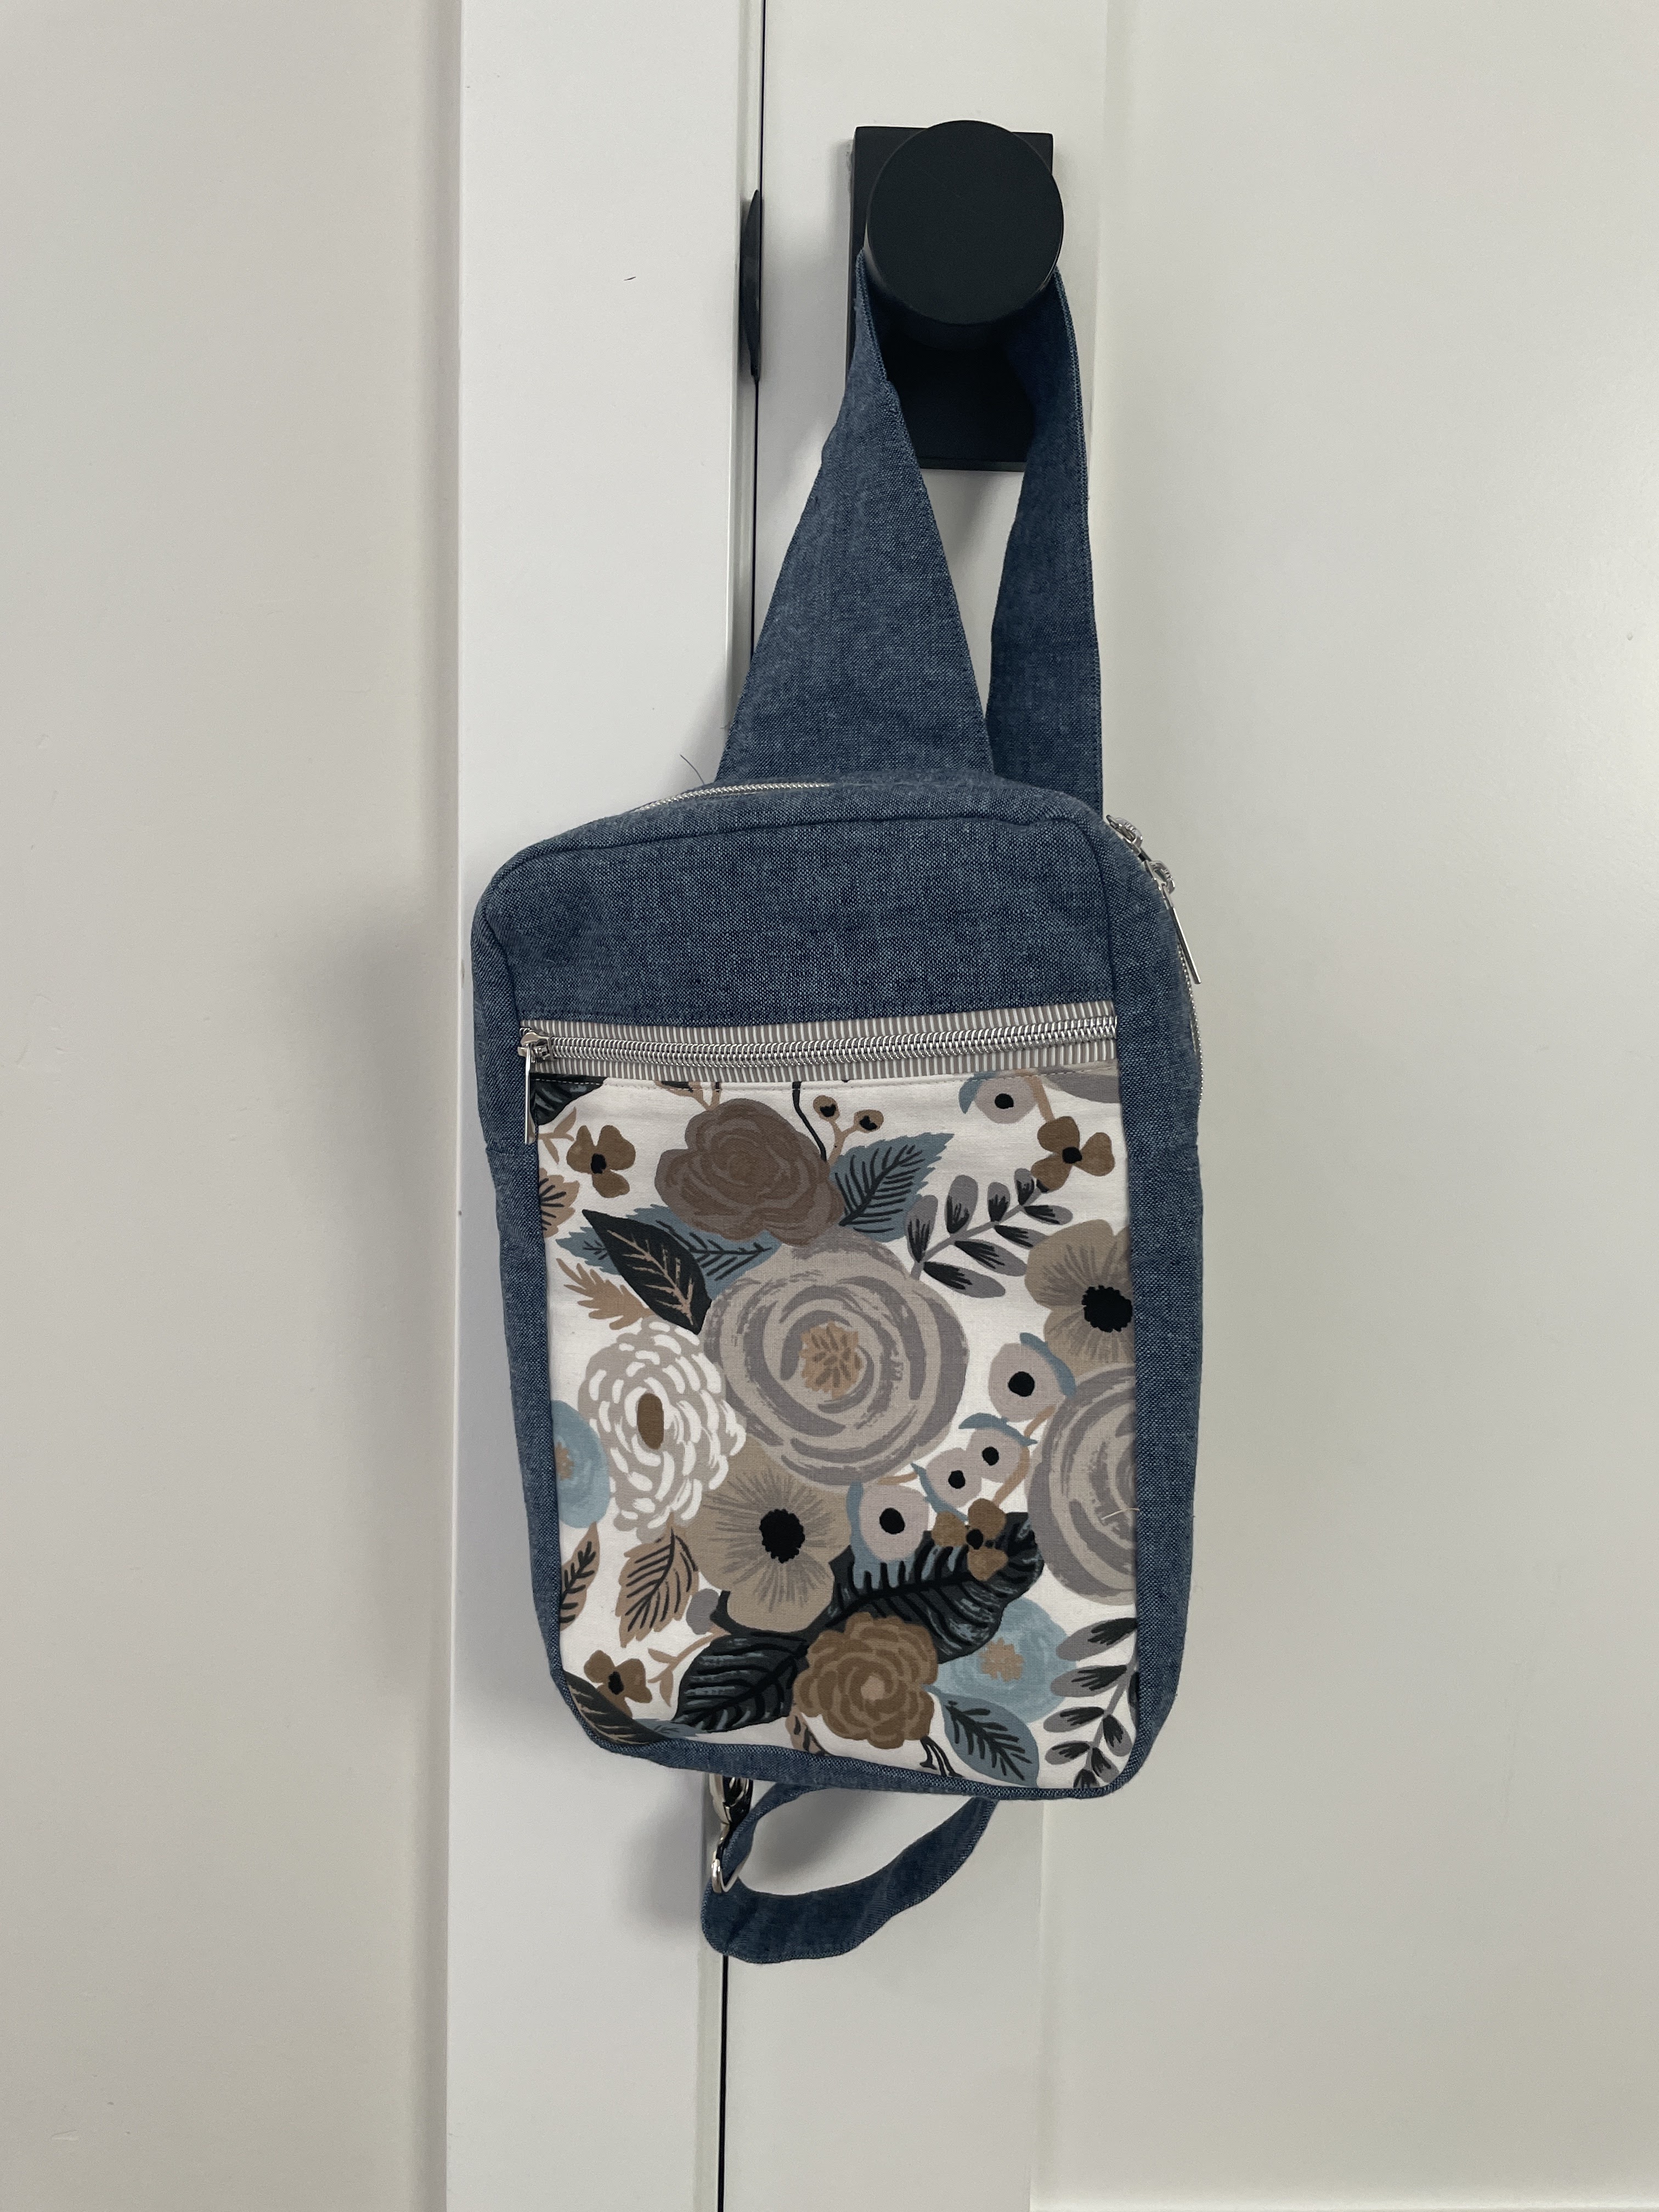
I decided that what I really wanted, what I had taken screenshots of most for a possible mosaic for the swap, was a sling bag. I purchased the Sandhill Sling pattern by Anna Graham of Noodlehead over Black Friday and settled on making it. 


Luckily, I have a nice selection of canvas in my stash, including a lot of Rifle Paper Co, and some Ruby Star. There are some really phenomenal canvas prints out there, and I settled on a floral Rifle Paper. It went great with a large scrap of Essex linen and I opted to line it with a postage stamp print by Rifle Paper, though I didn't have enough. I made the pocket out of a starry print by Rifle Paper, right? I'm pretty sure...


And, I used zipper by the yard for the first time. The pattern uses a double head zipper, and I found some YKK zippers at my favorite Etsy shop, Zipit, but then I realized that a lot of people are using zipper by the yard for their handbags because the manufacturer (not YKK...) are making nylon zippers with metallic painted teeth so you get the benefit of looking like a metal zipper without the difficulty of shortening metal zippers. I found a different seller with a nice variety and ordered a few different tapes with some pulls, but I went with the one I had originally planned, a gray and white striped tape with silver coils. I think it turned out so sharp, and I'm so glad! 


The bag went together pretty quickly and mostly easily, although I did break for a couple of weeks in the middle while I worked on the quilt top for my fabric challenge project. I managed to finish it, and the backing, and had a couple of days before I could get up to a different shop for the Aurifil thread I picked out for quilting (which I ended up going in a different direction, but that's another post...) so I finished up the bag. 

It was mostly easy until the very last finishing step, which is brilliant, in that it allows you to have a fully finished lining without binding or hand-stitching a hold closed, but it was tricky. I can't even describe it easily, but it's brilliant. I found a 505 glue stick at my local shop while I was buying batting for my challenge quilt and it helped a lot with basting for the final step. 

Now my biggest decision is whether I want to start using it now or whether I want to save it like it's a swap package for sewtopia. It's only about 5 weeks away at this point...

Monday, February 26, 2024

A Devon Pouch

I'm not a perfectionist, not really. I did tear the zipper out of the first pouch I made for the Sewtopia Swap, twice, but I'm not a perfectionist. And yes, if you were reading closely, you caught that "first" I put in front of pouch. Which strongly implies there is, in face, a second. And if you caught that, you would be right, but it doesn't make me a perfectionist, it really doesn't.

The thing is, I was just really questioning the pouch I made. It wasn't my best work. I didn't like it. I tried, and I thought I was making good choices, but it just didn't work. First, I accidentally cut the embroidered panel too narrow, so I had to make the pouch more narrow than intended. Well, the actual first was the fact that I chose the wrong color thread for the dark linen I embroidered. But, instead of redoing it at the time, like an intelligent person, I persevered. I reasoned that sometimes things don't seem like they're going to turn out until you're done and then they're fine! I reasoned that it was a gift for a random person I don't even know and it was very possible they would LOVE it. I reasoned that if I made a matching chapstick key fob, and filled the pouch with extras, it would make up for the deficiencies I saw in the pouch.

But all the reasoning I could muster couldn't change the fact that I did not like the pouch I had made and I felt badly giving something I did not like in a swap. 

So, I made a new one.


Pouches really don't take all that long, I probably spent more time talking myself out of making another one than I did actually making another one. 

I tried to do better work on this one. I added tabs to the zippers on the top. I used good fabric (even though it was all scraps). I did all the right things. 

And I love how it turned out. If you did a blind swap right, you shouldn't want to give away what you make, and that's exactly how I feel right now. 

I have to keep telling myself, I can make another one. I can make another one 

I used the Devon Pouch pattern by Sotak Handmade and it went much better than the pyramid pouches. I used a Rifle Paper Co print for the focal fabric on the front, a natural linen for the exterior, and blossom fabric from Riley Blake in green for the interior. I have more of all of it, so I really can make another one if I feel so inclined. 

I'm so glad I went ahead and did it.

And now, I'm starting work on my Super Secret Swap project. 

Spoiler: I decided to make MYSELF a super secret swap project 😂

I was going to sign up, because I want to fully participate in Sewtopia. BUT, I decided that instead, I'd just make exactly what I wanted for myself. So I'm making a Sandhill Sling and I'm using the good fabric, including a floral canvas by Rifle Paper Co for the focal print on the front and a cute stamp print from the Bon Voyage line by Rifle Paper for the interior. It's going to be GREAT. And I'm going to buy myself the treats I would want as extras and take them for myself. Yes, it's fun to get surprises picked especially for you. But I wasn't sure if I'd be up to it enough when sign ups happened, and I didn't dare sign up. Of course, I'm doing loads better now, but I didn't want to risk disappointing someone else. Plus, when I looked through past hashtags, people have gone NUTS on their packages and I didn't want to spend $50+ on extras alone. 

So, I'm making a swap package for myself. :) I think it's brilliant. 


I'm in the first prep stage and I always remember at times like this how much I hate interfacing. It's my least favorite part of sewing bags. But, it gives good structure, sigh. Hopefully I'll have a finished bag to show off before too long!

Tuesday, September 12, 2023

A Second Library Dress

I had picked out some Kona colors for an upcoming project and chose to order them through Hawthorne Supply Co, and whenever I order fabric online, I always look through the sale pages as well. Especially this time, because I needed some new pajama pants and prefer to make pajama pants out of less expensive fabric...I found some good ones, and I found a print that I thought my second daughter would really love. It has horses on it, and she's a bit obsessed with horses. She takes horse lessons and just loves them. Wants to have some when she's older. So, I thought she'd like a dress out of this fabric, but I asked her first, because I have made clothes for them without checking and sometimes they don't get worn. I didn't want to invest my time and money in a project if she wasn't going to like it. Luckily she did, and I thought it would be cute in the Library dress pattern by Oliver and S. She was a tad hesitant because she wanted a maxi length dress, but I just don't see a quilting cotton working well in a longer style like that, and I didn't have any patterns that were longline that. I went with the Library dress, and found a scrap big enough for the waistband in my drawer that she also approved, and got to work. 


I opted to leave off the collar because the print feels busy, and I'm glad I did. It made it go a bit faster but it also gives it a cleaner look. I added 5" to the bottom and probably should have added more. But she'll grow out of it, unfortunately, before that becomes a real issue, even though she wishes it were a tad longer. I made a 12, she's just almost 11 years old, and by measurements it should be a good fit, but it's a tad snug across her shoulders. Not uncomfortably so, yet, but she is growing. I'm also glad that lining up the print worked pretty well. I got it well centered for the front skirt and the bodice worked out as a happy accident. I was careful to make sure it was straight, but otherwise, the way it lined up looks good by chance. No picture of the back, but I had just enough buttons in my jar that worked well. The top button is actually different, it's about the same size, and about the same color, close enough you wouldn't notice if you didn't know to look. And I think they work well. 

She loves it, and I'm so glad. I hope she feels loved--so often when I make things, everyone gets one/something. But this time around she's the only one that got a dress, and she didn't even have to ask for it. 

Wednesday, July 5, 2023

Scrap Pouf

I saw the free pattern on Closet Core for a scrap pouf and immediately wanted to make one. I've become somewhat self-conscious about my fabric waste over the past few years, and I've tried a few different things to mitigate all the waste. At first, I looked into recycling the scraps. I already try to be very judicious and save in my scrap bin anything usable, but that can get out of hand, and there's always something that gets cut off. Eventually, I learned that a local food pantry that takes donations also advertised that they could reuse or recycle textiles, so a few times, I dropped a bag of unusable scraps off, and included worn out kid socks and undies and things. But it was hard to verify that they actually recycled, and I felt a bit bad about that, saddling them with my trash. A friend told me about H&M's textile recycling program, but at the time its as paused for covid...and then I found this free pattern for the pouf and thought it would be a fun way to use up some scraps and upcycle unusable scraps. 


It came together pretty quickly, and the only changes I made were to fuse interfacing to the pieced center instead of interfacing individual pieces, and to make the side taller. I didn't think a short ottoman was what I wanted. I think interfacing pieces might have been smarter, but I don't think it turned out poorly. And, when I made it, I was at a sewing night with friends and had my serger out but not my domestic, so I only serged the seams. This turned out to be a bigger error, and I had to repair it. Which is why you're getting a blog post, honestly, since I actually made it a while ago. I reinforced the seam that burst, and did so with a shortened straight stitch and an additional pass with the serger, and then I also reinforced the top seam as well. 


While I was at it, I decided to try to restuff it. I've had problems with it not holding its shape and I worried this was because I used lighter weight material, although I think it wasn't forbidden in the pattern. I had already sewn up a sack for scraps using an old piece I no longer wanted, and I put that inside so that if I ever needed to wash it, or change out the scraps, they would be contained. But, there were also a whole slew of worn out kid socks I had just stuffed in there. I opted to remove the socks and old clothes and will take those to H&M to recycle next time I'm in the area, I'm still using that service for worn out clothes. I reserve the pouf space for fabric scraps. I'm saving up for my next pouf (and hopefully I'll have more luck on my second go!) but I also added a bunch today to fill it in. 


So, to help with the shape, I stuffed more scraps in, and tried to shake them down into the pouf. Then I pulled the excess fabric of the sack up as much as possible and instead of just knotting the end like I had, I took a long selvage and tied it around the base as tight as I could.


 SO, I hope that without much space to move in the sack, it will help the scraps keep their shape a bit better. So far, it looks promising. Fingers crossed! A word to the wise: a scrap stuffed pouf is HEAVY. Mine is all the heavier because it's taller, of course, but even still. Packed full of scraps, it's heavy. Just in case that wasn't obvious. :)

Tuesday, June 27, 2023

A New Two Zip Hipster

I wasn't planning on making any bags anytime soon. Bags aren't always my favorite thing to sew; any bag worth it's salt (well, most of them, anyway...) has a zipper and other hardware. I have a lot of zippers and hardware in my stash because I'm picky about them and buy extras whenever I need to buy some to maximize shipping and to make sure I can sew when I want without waiting for hardware. Plus, I tend to make the same patterns, or similar enough patterns, that I know what sizes of hardware I need. I buy my hardware on Etsy from Bag Maker Supply, who has a great selection, great quality, and good pricing. They have really professional looking stuff that makes bags shine. Anyway, the point is, sewing zippers and hardware aren't my favorite part. And, some parts of bags get awfully thick with layers of fabric and interfacing (also not my favorite...).

So, I wasn't planning on making any bags anytime soon. But, I switched out one day to my two zip hipster which I don't use very often because the linen I used is starting to wear on the top (grr...) and I remembered how much I love that size and style. And, then I saw an instagram post (can't remember who, sorry...) and they used a pair of worn out jeans to make a bag. But the real kicker was a few days later when my husband needed to discard a pair of dockers he'd worn holes in. We were rounding up bags of worn clothes to recycle at H&M, and I pulled them out, remembering the IG post. 

I still didn't have any intention of making a bag anytime soon, but then I found myself between projects. I'd finished my trip sewing, and I was waiting for an order of fabric before I washed a bunch for a quilt project. But I didn't want to just...not sew. So I decided a new two zip hipster from old, worn out dockers was just the ticket.


This is the leftover fabric after I harvested all the usable fabric...plus the zip and the buttons which I'll save for other potential projects.


And it was. I opted to use some of a hoarded Alison Glass panel for the front focal print, and then I used Alison Glass fabric I had for the interior as well. I had a hard time deciding on a lining fabric because I sort of wanted to use the pink floral that I used for the interior pocket for the whole interior, but I have already used it as a lining in a bag. The turquoise works great, too, and I really love how it turned out. I think the yellow zips are great, and I think overall, the bag turned out better than I expected. I'm really excited to start using it, and I hope it will be more durable than my beautiful linen one that I'm trying to not overuse. 

The two zip hipster pattern is by Dog Under My Desk and I absolutely love her patterns. They're more like tutorials with all the photos and detailed instructions, they're well-tested, functional, and she takes care to minimize bulk. I highly recommend her patterns. The only change I made was to NOT add as much interfacing. I did not interface the twill fabric, since it's pretty thick as it is (at least where it's not worn thin from years of wear...). I think that's it. I did use the sew in interfacing, because even though it's thick fabric, it's surprisingly flexible. Or whatever the right word is. I wanted just a bit more structure. I'm pleased with the end result, so I think I made the right call. I was really worried about the strap being too thick if I interfaced it, and I think it's just right. 


Tuesday, June 20, 2023

Travel Pouches

I always think I can just whip up a pouch and it will be totally fine. And when I'm not careful, I'm inevitably disappointed. They are simple, but they do require a bit of care and finesse. Case in point, one of my twins wanted to make something for my sister, just randomly. I figured I'd made enough pouches to help her through it without re-reading instructions, and we just went for it, using the zipper length as a guide for how big to cut the fabric. 

I neglected to topstitch the fabric next to the zipper, though, so it tends to get stuck...

See, just a bit of care. 

The other day, I had an idea for a travel solution. I want to take a some loose silverware on our trip. We'll be doing some picnicking, I'm sure, since it'll be easier with kids, but also we'll be buying plenty of pastries and I'd love to enable sharing by taking a butter knife. I looked at travel sets, but the knives look pathetic, and I realized that they're just smaller utensils in a zippered pouch, often made of silicone or similar. I realized I could easily make a pouch, and I have some oilcloth, and then use some old silverware.

I couldn't find my old silverware, but I was able to buy some really inexpensive silverware from Wal-Mart. We're talking 3 knives for $1.25. Cheap.

But I was nervous about making the pouches because I needed them short and long. And I didn't have a pattern for it specifically...and oilcloth is trickier than quilting cotton...


I measured the knife, and then used Sotak's Essential Pouch for loose directions. I didn't make a contrasting bottom panel, and just went for it. 


The first one turned out okay, but not great. I used a metal zipper, which I think look so great generally, but it was obviously an exact length and I think would have been better 1/2" longer. The second one I used a regular wide purse zipper, and I also made the boxed corners just a tad smaller. I think it turned out better. And now we have two, one for gluten free silverware, and one for non-GF silverware. Obviously, utensils can be washed, but they'll go in the pouch unwashed after use, which would contaminate the pouch. So, two.

I also tried to make a small coin purse. I found a great yoga style security waistband that you wear under your clothing, and I thought it would be more secure to keep credit cards in a pouch that would be less likely to fall out. It's pretty secure, but I haven't used it yet, and I can just see a slim credit card getting pulled out by mistake and misplaced, which is the exact opposite point of the waistband. So I used a tutorial from Sotak Handmade for a small coin purse. I found some coordinating scraps and it went together really quickly.


The only hiccup was the very end when I turned it out and needed to sew the opening closed. She had you baste the inside panel all the way around and then add the exterior panel and leave an opening for turning. I didn't see any point in basting, so I just went for it, but that meant both the interior and exterior had holes  that needed to be closed. But what really didn't make sense to me in reflecting is that she had the hole to turn on the exterior. I think it would make more sense to have it on the interior. If I make another one, I'd try that.

It's also a tad small for a credit card...but it's nice that it's so small, I guess? I am undecided on whether I'll take it or not. Or make a slightly larger one. *shrug* I am very worried about pickpockets this trip; Europe is reportedly more crowded than ever before, and I'll have four children I'll be trying to keep track of and manage. I'll be pretty distracted, which makes for a prime pickpocket target. So I want to protect myself as much as I can. We'll see! 

Tuesday, June 6, 2023

Sewing lanyards

Later this summer, we're heading to Europe with the girls. I'm really excited, we have some really fun things planned! We will be spending a few days in both London and Paris, though, and I know they are going to be PACKED. Europe is packed right now, and it's only going to get worse as the summer goes on. We've got reservations made for dinners in London and we've already purchased tickets and a few other reservations, so I'm not too worried about getting into what we're interested in doing, but I am a tad worried about walking around in busy crowds with our four kids. 

SO, we decided to use airtags to keep track of them. I was looking around for necklace holders, and couldn't find any that were simple but secure (some look awfully breakable...) and then it occurred to me: simple lanyards. We could attach the airtags to keychain holders, and then use keyrings on the lanyards. I let my girls each pick pretty much any fabric from my stash, since it would require so little fabric, and I whipped them up a few days ago.


I did some googling for basic measurements, but didn't end up using them. I cut strips 2-1/2" wide by WOF, and then I pressed them in half lengthwise and then pressed the ends into the middle. I stitched down both long sides and then kinda held it up and measured around my own neck, figuring if I could get over my head it would be more than plenty for the girls. I settled on cutting the strips 30-1/2". 


Once I cut them, I serged the two ends together so they wouldn't fray, fed the keyring on, and then did two lines of stitches across the ends, one close to the edge and one 1/4" closer to the keyring, with a short stitch length. And that's it! Super fast.

Tuesday, May 23, 2023

Summer Sewing

I've been busy sewing for summer for my girls, and I'm not done yet! First up, I made a couple of t-shirts, one each for my older two girls, from leftover performance fabric I had bought for myself. One was an athletic material and the other was a merino wool. The performance fabric is a tad heavier than I'd like, and may be better suited to leggings, but I like the top, just not sure it's as perfect for the hot weather as the lightweight merino one is. 

Next, I made 3 pairs of Sunny Day shorts by Oliver and S for pajama bottoms for my girls. I let them pick quilting cotton from my stash I was okay with letting go of, and one of their choices surprised me, but they all turned out great. I wanted to make them pajama shorts because for our upcoming trip, we're aiming to pack super light because there won't be a lot of room in our rental car for a lot of luggage. So, shorts are preferable to traditional pj pants. 

Most recently, I finished a stack of 15 t-shirts. My oldest got two made from the Isidro pattern by Itch to Stitch with just a couple of modifications, the rest of the t-shirts are School Bus T-shirts by Oliver and S, and my second daughter got 4, one twin got 4, and the other got 5. I assembly line sewed them to an extent, doing them in groupings based on size and thread color. It took almost 3 weeks and I'm so glad to be done. It was a lot of serging! They seem mostly happy with them...hopefully they'll wear them! I like to sew them t-shirts because they're all so tall that it's hard to find them shirts that are long enough. And, bonus, most of the fabric I used for this stack was purchased at Black Friday from Girl Charlee and so they averaged $3-4/yard. Super cheap! 


I had to measure...6-1/2 inches tall! That's a lot of t-shirts!

Next, I need to pick up my fabric from Raspberry Creek and make some rash guard sets. Wish me luck...

Tuesday, April 11, 2023

Reading Pillow

Teacher Appreciation Week is happening at school right now and in the past, I've not given teachers gifts until the end of the year, but for some reason, I felt like doing it this week instead of waiting until the last day of school. I feel like it's kinda one or the other, right? Or am I really supposed to do both? I do give them Christmas gifts at Christmas (this year was a handmade embroidered linen kitchen towel and some homemade marshmallows), but it starts to feel like overload if we do teacher appreciation WEEK (when did it morph from a day into a week?!) AND year end gifts. It stumps me. 

So, teacher appreciation gifts this year. I had a great idea for my twins' kindergarten teacher and I'm actually really excited about it. I decided to make a reading pillow for her and include a picture book picked out by my girls. She has a preschool-age son, and I figured this would be something fun she could enjoy with him. So one day when I needed to stop by Joann's for thread, I looked at the canvas they had for something nice for a pillow. Joanns fabric is NOT my preference (I can't remember the last time I bought fabric there that I was intending to use for a serious project) but I didn't really want to wait for shipping. I found a perfect canvas print and a matching solid and I bought it so fast (well, as fast as shopping at Joanns can be--I always wait at least 10 minutes, often 15-20 to check out...so annoying!). 

I pitched the idea to my girls and they were...lukewarm about it. But I know it's a good idea, so they can just deal, haha. 


I spent a good hour picking a font and digitizing the READ embroidery design, and then got out my embroidery machine and got to work. 

Pillows are great because they really are decently fast as far as sewing projects go. I had a bit of trouble with the embroidery at first, but I got it all resolved and then spent another hour and a half sewing it all up. I'm really bad at invisible zippers. I find them incredibly frustrating, honestly. I have the invisible zipper foot, but my fabric always gathers anyway. It's like the foot is too tight for the zipper teeth, so it feeds the fabric on the bottom faster than the zipper can go? I don't know, it's really frustrating. But, I got it to work, and there's only a tiny little pucker that is more of a looser spot than a pucker, but it's hardly noticeable once the pillow form is in.

Let's talk about pillow forms, eh? A neighbor from my last neighborhood used to sew a lot and even sold pillows on Etsy a good 15 years ago. She turned me on to pillow forms from Crate and Barrel. I think they've gone up a bit, but they're still really affordable for what you get--a great down pillow. I order the 23" ones, that are now $18 but I could have sworn I paid $15? I bought 5 or so maybe 2 years ago and just kept them in a closet to slowly be used. I've now used 3 as gifts, I think? I made a monogrammed pillow for my cousin's wedding, and a Christmas pillow for a new neighbor who hadn't unpacked Christmas decorations yet. I'm out now, so I'll have to order more, but the quality is top notch and they're not much more than you pay at Joanns for crappy synthetic ones. 


My girls picked Sophie's Squash for the book.
It's really cute, one of their favorites!

Also, while we're talking pillow forms, let's talk about sizing. When we moved into our house, we bought some pillows from our interior designer's storefront (I hadn't yet tried making my own) and they were so luxurious. So full and firm, and great fabrics. One of my kids spilled on one so I took out the pillow form so I could more easily spot treat it or machine wash it, and I was amazed to see that inside the 18" or 19" pillow case was a 23" pillow form. No wonder they didn't look saggy! I follow the tutorial for pillows at deepthoughtsbycynthia.blogspot.com, and she says to cut your fabric no more than half an inch larger than your pillow form (with a half inch seam allowance) but I find even this too baggy. 

Unfortunately, I made this reading pillow a bit larger than I should have. With the additional pocket, I didn't want it to be too snug, and some of my pillows I've made are REALLY snug. So, I cut it 22", figuring that 21" finished would be snug enough. I wish I'd made it just a tad snugger. It's acceptable, but I would prefer a bit more full. Oh well, c'est la vie. But, if you are reading this and wondering how to make your handmade pillows really stand out, this is the trick and don't make the same mistake I did. Cut your fabric at least 1-1/2"-2" smaller than your form. 

Hopefully, our teacher loves it, because I think it turned out so cute. I'm really happy with it, and I think it's the perfect kindergarten teacher gift. 

Tuesday, April 4, 2023

Fira Top

I think it's pretty common to work on clearing things out during the first part of the year. One of the things I decided to work on was clearing out some old linen scraps I have from other projects. I love the linen from fabrics-store.com, but they only sell in full yard cuts, which means that I often have a lot left over, but not quite enough to do a lot with. And, I've also been thinking how nice it would be to use cloth napkins at the dinner table. Jeff's aunt uses them and just has a drawer full of eclectic cloth napkins, and a friend we stayed with in New England last fall also had a drawer full. They were so much nicer than our traditional paper towels, and I figured they'd be a great way to use some of this fabric that is crammed on my shelves.

But, I didn't want to use it for napkins if there was enough to use for something else, AND there were a couple linen items I wanted to make before the summer, so those items shot up the priority list so I could make them first and use any leftovers for napkins. 

First was my Fiore Skirt. I was short even, and had to use some scraps in a slightly different color. But I love how it turned out, and it cleared a piece from my shelf. 

Next up was the Fira Top, a pattern by Liesl and Co. I love that it's casual with interesting details. The cover photo is a top in linen, and it looks perfect. And I thought a linen top might just be the thing for our upcoming summer trip.


I made a muslin first to check the bust since it comes in different cup sizes but I am not at all comfortable measuring my high bust. I tried, again, and I think I'm an A/B cup in most patterns which really surprises me because so often shirts (RTW, mostly, but even some handmade) pull at my bust. What was annoying was that I sewed very quickly and not carefully because I thought I was just checking the bust, so the darts looked HORRIBLE in the muslin and I couldn't tell if it was the stiff cheap muslin fabric, or if it was the careless way I sewed the darts, or if it was the actual dart and I needed to adjust it. I asked a friend, and we decided to leave the dart placement, but shorten them by about an inch. I decided to just go for it since otherwise it fit, and hope for the best, which is not generally a wise strategy, but it worked out this time!

I really love how it fits and I think the color and fabric are great. Because of the nifty assembly, the yoke is double layered, which means it's a bit heavier than the rest of the top and I'm worried that might get a bit hot. Additionally, the neckline facing is lined with interfacing, and I always have problems with interfacing (maybe I should move away from SF101?) after the wash and find it ALWAYS needs pressing. So, we'll see how this one does. If it has to be pressed after washing, it probably will not make it on the trip, since I can't guarantee an iron will be available, and that's disappointing because I think otherwise it's a lovely top. Aside from pulling the dart back an inch, I didn't need to make any other fit adjustments. It's nice and long for me, which is unexpected since I'm so tall, and the neckline didn't plunge too low, which often bothers me on shirts. I find I get cold if the neckline scoops too low. The instructions were great, like all Liesl and Co patterns.

And, I had enough leftover fabric to make one napkin. Slow and steady! 

Tuesday, March 28, 2023

First Quarter Status

I end up hearing a lot about quarters when my husband talks about work. Quarterly goals, statistics, all sorts of things. I'm sure you do, too. And it just kinda bleeds into life, right? Well, I suppose really, it's okay, I mean, we are 1/4 of the way through the year already (Really?!) and I thought it would be a good time to check in with some in progress things. So here's my status.

I have two quilts at the quilter's that I'm expecting back any day now. They've been out for 6 weeks now, so it's about time. They are my All the Good quilt and a Christmas Shimmer quilt. No rush on either of them but I am starting to get antsy!

I just finished my sampler WIP, and I'm excited to have that wrapped up. It's waiting to go to the quilter's when I pick up my other two, along with my Little Women economy block quilt.

I am also working on my EPP WIP, and I've appliquéd (is that the right verb?) the EPP center onto a piece of fabric I've had in my stash for ages. I made a daughter a pair of pajama pants and had just enough left over for the center portion, which is great! I've also pieced the strips of churn dash blocks. Next up, I need to trim the center to size (I cut it large just in case it shrunk down while piecing, or in case I wasn't quite centered with it). That's got me a bit nervous, though, so I've been avoiding it, haha.


And, I'm working on a linen top right now. After I finished the sampler top, I decided to try this Fira top out of linen. I made a muslin to check the fit at the bust, and the darts were not happy (possibly due to the stiff muslin fabric, possibly due to my quick careless sewing since I thought I was checking the bust fit and not the dart placement...). I made a slight adjustment to them and I'm working my way through this pattern with a scrap of linen from fabrics-store.com from a different project. It feels good to use up leftovers! And, as long as I don't need the rest, I'll have enough to make a napkin, which I've also been slowly working on. I thought it would be nice to have some linen napkins, and that I would use up what I have left that isn't large enough for something else. They'll be mismatched, but I think that will just add to the charm. 

(Checking on the fit before I top stitch the yoke down on the shoulder)

So, next up are finishing the Fira top, finishing the EPP medallion quilt top, hopefully binding my quilts when I get them back, and then I want to make a couple of t-shirts for the summer in some specialty knits I bought from Salt Lake Sewciety. One is a merino wool, and the other is an athletic material. 

Tuesday, March 21, 2023

Fiore Skirt

I am really excited about the trip we are planning for the summer. We're going on a bike tour in France! The company we're using makes reservations at the hotels for you and provides all the bikes and routes, and you get to spend a week biking between hotels in France. I'm really excited, I think it'll be really great. But, it's the summer, in France, so it'll be hot, and I'll be wearing bike shorts, which aren't all that attractive, so I thought I'd whip up a linen skirt that I could quickly throw on over my bike shorts, and that would be nice and cool when we weren't on the bikes. I've already made a Fiore Skirt by Closet Core and I love it. I should have made it a tad bigger, as it sits higher on my waist than I like, but it's a great skirt. I made it out of a rifle paper canvas, so it's got good structure and I think it's a great length on me. I made the view with the buttons that hits mid calf (though on me it hits just below my knees, lol). 

This time, I opted for linen, a leftover cut I had in my closet. I traced it at the next size up and treated it like a wearable muslin, since I already knew my size, and went for the wrap version, which hardly needed a muslin anyway because you can adjust the buttons to your waist. I whipped it up pretty quickly, but thought I had placed my buttons well, but they were far too loose and the skirt looked a tad ridiculous. I didn't realize how important it was for skirts to sit at your natural waist.  I've got them sorted now, though, and though they could be a tad tighter, I'm okay with where they are. 


I used leftover linen from Fabrics-Store.com, and I was just shy. I had to use a slightly different purple linen for the the pocket and the facings. I used a couple of mismatched buttons from my jar, and I had thread leftover, so this project effectively didn't cost anything. (obviously I bought the fabric and other supplies, but for projects that have already been made, so it feels free, lol, but I guess a better word might be economical. And who couldn't use some economizing these days, amiright?).

I think it turned out great, and my biggest complaint is that I don't have many tops that look great with purple. Oh well, I've got some light merino wool in gray that I intend to make into a t-shirt, and it should work well. Oh, and somehow, after my first wear, the waistband seam ripped apart in the wash. I was able to handstitch it back together easily, but I thought that was odd. Not sure what happened. I also really love that it's the same pattern as my canvas skirt but looks entirely different because it's a different view and different type of fabric.

Monday, December 26, 2022

Christmas Sewing

I did a lot of Christmas sewing this year! I made Christmas pajamas for the girls (and for me, because, why not?) and I made them all dresses. The pajamas were "from Santa" and the dresses were my gift to them. We let them open them first before church (our church meeting started at 9am this year, so we opted to do Christmas morning after church) so they could wear them to church. I was worried because they don't always love the clothes I make for them, but I ran the pattern and the fabric by my oldest daughter before I ordered them (pattern from Vintage Little Lady, not sure I recommend, and hacci knit fabric from Girl Charlee Fabric, which I highly recommend), and she seemed happy with both, so I went for it. 

I ordered WAY more fabric than I needed, partially because I couldn't figure out how much I actually needed. When you make multiple of one pattern from one fabric, you usually don't need to just add the yardage up, but the pattern didn't even have efficient cutting directions for one dress OR total yardage requirements. Instead, it broke it down by pattern piece and never totaled them up. For instance, 1/2 yard for the bodice, 1/3 yard for the sleeve, etc. It was pretty pathetic. And irritating. So, I just wildly guessed at how much I needed, added a little extra, and then added a little extra on top of that because I bought it on a FANTASTIC black friday sale. Like, it was $3/yard. 


So now I have loads of fabric left and I could make myself a dress if I could figure out a way to hack it to my size. It was a basic pattern, I think I probably could. But I have so many other things on my list I'm not sure how soon I'll get to it. 

Anyway, when they opened them on Christmas morning, they were all absolutely thrilled. Like, beyond thrilled, they just grinned, they all rushed to put them on, and they all told me throughout the day how much they adored them. I felt so pleased! They did turn out pretty cute, and I'm happy with them. They did find a couple of holes of places I missed when I was serging it together, which is understandable because they have pockets, which are always tricky on a serger, and I was just doing so many. Assembly line often leads to slight misses like that for me. But, I'll get them all straightened out soon enough. 

Hope you had a lovely Christmas too, and if you sewed for you family, it was as well received as mine was! 

Tuesday, November 22, 2022

Christmas Banner

 I finished up my Christmas banner I mentioned last week just the other day and I love how it turned out! It was pretty quick, and I guess I was just nervous because of placing the embroidery, and then trimming them after to a uniform size...and not really knowing how long to make the binding...I do much better with patterns with measurements, haha. Flying by the seat of my pants is not my specialty!

But, it turned out great and I didn't need to trim too much. I did end up redoing a few as I mentioned, and instead of wasting the squares, I used them as backings for the blocks. This may not have been the best choice...I hang my banners in my stairwell in front of windows, and so during the day, especially the afternoon with the strong western sun coming in, you can see the outline of the embroidery. At the very least, I should have matched up the replaced blocks to their replacements so it would be less obvious...but it's okay. The color doesn't show through, just the outline of the letter, and its mostly not too noticeable. I was glad to not waste fabric. 


I used a gray stripe from Camille Roskelley's Christmas line and I think it turned out really great.

Now if only the rest of my Christmas projects can go as quickly and as smoothly as this one...

*fingers crossed*

Wednesday, October 19, 2022

Halloween WIPs

 I got my All the Good quilt laid out, but promptly had to pick it up and put it away so I could focus on Halloween costumes. It's just as well, I like to let layouts marinate and now that I've thought about this one, I'm not thrilled with what I've got. Now that I've thought about it for a week or so, I really want to bring the navy up so it's a rounder shape, and I want the "nucleus" to be closer to the center of the quilt and not so much in the corner. So I'll move a row to the left side, and possibly the top...all this switching sounds really tricky though so I'm not sure how to transfer my carefully-organized stacks of rows to the new shift...it'll be a big job. For after Halloween. 

And for Halloween, I got my four girls to commit a couple weeks ago so I could get to work. My second daughter mercifully chose to be a pirate, which my oldest had been 3 years ago. Or was it four? I can't remember. In any case, I only had to make a new skirt because the one from a few years ago was not big enough for my second daughter. But skirts are really easy and quick, and after I purchased the striped fabric, it took just about an hour to get it finished up. Love that.

My oldest and one twin want to be witches and want to match, and I had a super simple costume pattern with sizes for both of them that I'm working with. It has only 3 pattern pieces, and includes a gather neck with an elastic (which means no closures to worry about), and so I'm about done with that. My twelve year old has a vision, and making this simple pattern fit her vision has required a bit of finesse. She wanted puffy sleeves and flare out, so I took a cue from a different pattern and added an elastic casing to the bicep area (I got lucky with placement since I just guessed...). And I'm making a simple belt with eyelets from a different pattern (it's super basic, using the pattern is hardly required...) in a pretty lilac color to add some interest and some definition to the waist. 

The other twin wants to be a cowgirl, which isn't surprising at all, because she and two sisters are in horse lessons right now. I had a costume pattern I used a couple years ago for a witch costume (a different one...) for her, so I needed to retrace the size, but it's really cute. It's the most complex pattern but it's adorable. I bought a Robert Kaufman window pane woven gingham in blue and some tan canvas for the top skirt from Joanns, and some cute eyelet trim. I think it's going to turn out really cute and I hope she loves it. 

And I hope it doesn't take too long. I'd love to get this improv quilt sewn together, even though I know I can't rush it. And, I've got Christmas sewing to think about...this year, I'm making our annual Christmas pajamas because I just can't bear the disappointment and upset when the Santa pajamas don't fit right because my girls are so much taller than the average kid and off the rack clothes are just not made for them. Sigh. I ordered some cute Dear Stella nutcracker fabric for pajama pants and a great Art Gallery Fabric striped knit for the tops and I think they'll be really adorable. And if the girls whine and gripe about them, we'll have to find a new tradition because pajamas will be done, haha. 

Monday, September 5, 2022

Library Dress

I've been working on making all my girls dresses. Once you make one for one, if she loves it, all the rest of them want one, too. It a good problem, I suppose. As long as they actually like them. They all have been growing anyway, and have needed new dresses. 

Right around the time I was dealing with loads of requests, Oliver and S had their annual summer sale, where patterns were half off. I love to stock up when they have good sales, so I asked the girls for their opinions on patterns, and two of them jumped at this library dress, which I just think is the cutest. I love the collar, the contrasting waist band, everything. It's been on my wishlist for a few years, but I wasn't sure if they would go for it. Luckily they did, and I bought it, along with the Terrace dress pattern and the simple shorts pattern, since I didn't have one and it's such a basic. 


ANYWAY, once my large format printings had arrived (PDF Plotting is fantastic; fast and very affordable), I got to making it. I let my daughter pick fabric from my closet, from a selection I was willing to use, and she picked the pretty blue linen and this adorable plaid. I believe it's a Kaffe Fassett plaid, but I'm not sure since I've had it for several years and, as a woven, it doesn't have info on the selvage. The linen came from Fabrics-store.com. I thought it was a perfect pairing and I absolutely love how it turned out. 

I also managed to find enough buttons leftover from something else, or rather, something that must not have gotten made, since I had so many, and I love the contrast. They're actually really obnoxiously cheap buttons from Joanns and I'm glad to be rid of them; I used some on a different project for my girls and one of the buttons on that project broke in half. And they don't have rounded edges, they just generally feel cheap. (Lesson learned: don't buy cheap buttons from Joanns, they'll definitely feel cheap!) However, they were perfect for this project.

This dress is currently my make that I'm most proud of. I just love how it turned out!