Saturday, March 30, 2024

Garden Gem (a Hexibore quilt)

Somehow, I came across Jenny Haynes' Instagram feed and discovered her amazing curved piecing. I ended up signing up for her Hexibore class and ordering her acrylic templates because I had never seen anything quite like it and just HAD to make one for myself. She offers her more complex patterns only as online classes, and only live, though you do get a recording of the class afterward. 

This was the second iteration of the class, where she introduced a four-petal version, and that's what I opted to make first. Since, I have also made a six-petal top that I'm trying to decide how to have quilted. It's tough, I'll tell you. These quilts are so graphic that you really want to make sure the quilting will accent the design.


For the four-petal version I made first, I decided I HAD to have it custom quilted, and in the past, I've hired Marion McClellon for that. She always does amazing work! I just trust her, and know she'll do some amazing art. So, after I finished up the quilt top, which went together pretty quickly since it doesn't have many pieces. Jenny gave great tips on how to get the pieces lined up just right so you don't lose the curves. Her instruction was great, I wish the class were just a little more professionally done. It was very informal, which is why she hasn't created contents ready for streaming anytime. I can't really complain about the content as she really does give great instruction. And, it wasn't very expensive as far as classes go. I guess I'm mostly disgruntled because I'm really interested in some of her other courses, but I've never caught them with openings at times that would work for me. 

I just got back my quilt from Marion a week ago, and I finished binding it. I picked the binding out when I bought the fabric originally, which is so unlike me! Usually binding is an after thought. But I thought the orange would be striking. 


I was blown away by Marion's quilting when it came back, and I had tried extra hard on the piecing to get the points lined up just right, so I decided I will probably enter it in the Springville art museum quilt show this summer. And with that in mind, I decided to try a little harder on the binding. It didn't work out perfectly, I'm not good at binding. But I think it's okay. I backed it with minky which means the drape is excellent despite the dense quilting, and since I backed with minky, there's no way I could hand stitch it down. So, instead of sewing the binding first to the front and then turning it to the back, I stitched it to the back and turned it to the front so I could "topstitch" it down. I reasoned it would look more intentional and better. Of course, true to form for me, it's a tad wavy. I tried so hard! I cleared off my table and tried to not pull either the quilt or the binding. But it was a heavy quilt and that's hard to manage. Oh well...I don't really expect top marks from the show anyway. It's just fun to see your work hanging in a museum! 

Completed March 2024

Monday, March 18, 2024

Gratitude Quilt

Before Thanksgiving, I had an idea. I had just seen a blogpost by Amy Smart about her gratitude quilt, and it lit a fire in me. The wheels turned quickly, and even though I usually mull things way longer than is necessary, I quickly jumped to work. I pitched it to my kids and they liked the idea too, so we went for it! 

I largely used Amy Smart's pattern for the gratitude quilt, but I made some changes. I think I made more blocks, but I omitted the border. And instead of using a sharpie to write on the blocks, I opted to embroider them. I had my girls all come up with 10 things they were thankful for and then I color coded the blocks and had the girls all sew their own blocks. So, my oldest daughter's blocks are all the same yellow fabric, and my second daughter's are all the same blue. I added their name to one of their blocks so we'd be able to figure it out easily later.


My girls have a whole week off of school for Thanksgiving and we never travel, so this was a great activity for them while they were off of school. I did need to unpick and resew a few blocks, especially for my seven-year-olds, but they mostly did great. And I sewed all my husband's blocks, of course. 

Once they were done, I laid it out quickly and stitched the rows together, and then I had a stroke. I knew it wouldn't be done by Thanksgiving, since we were sewing the blocks the day before Thanksgiving, but I still hoped to finish it before the end of the year just to wrap it up.

That did not happen. But I got it up to my quilter in February (I couldn't easily get down on the floor to pin rows together after I was discharged because I was so stiff), and I got it back this week.

I put it aside while I worked on my Sewtopia challenge quilt (will post on that later!), but once I had sewn the binding down to the front of that quilt, I opted to bind this one. I used the brown fabric that I used for some blocks, and I don't love the print (it was free from a neighbor's destash) but it's a great color, especially for an autumn quilt. I think it's a great binding for this quilt. 

I'm so glad it's finished!

Friday, March 8, 2024

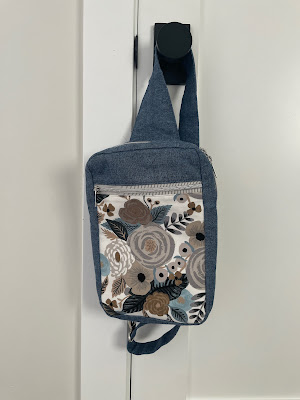
Sandhill Sling

I mentioned last time that in lieu of participating in the Super Secret Swap for Sewtopia, that I wanted to make myself a swap package, so to speak. I wanted to give myself permission to make something hard that I've wanted for a while in the pretty fabric. I intended to justify purchasing fabric if I chose, but in the end, I used fabric from my stash. I did have to buy a couple pieces of hardware, but otherwise, I had everything. I love being able to turn to my stash for most of the things I need. It's really fun to shop your stash and not be limited by what's available at the quilt shop. 


I decided that what I really wanted, what I had taken screenshots of most for a possible mosaic for the swap, was a sling bag. I purchased the Sandhill Sling pattern by Anna Graham of Noodlehead over Black Friday and settled on making it. 


Luckily, I have a nice selection of canvas in my stash, including a lot of Rifle Paper Co, and some Ruby Star. There are some really phenomenal canvas prints out there, and I settled on a floral Rifle Paper. It went great with a large scrap of Essex linen and I opted to line it with a postage stamp print by Rifle Paper, though I didn't have enough. I made the pocket out of a starry print by Rifle Paper, right? I'm pretty sure...


And, I used zipper by the yard for the first time. The pattern uses a double head zipper, and I found some YKK zippers at my favorite Etsy shop, Zipit, but then I realized that a lot of people are using zipper by the yard for their handbags because the manufacturer (not YKK...) are making nylon zippers with metallic painted teeth so you get the benefit of looking like a metal zipper without the difficulty of shortening metal zippers. I found a different seller with a nice variety and ordered a few different tapes with some pulls, but I went with the one I had originally planned, a gray and white striped tape with silver coils. I think it turned out so sharp, and I'm so glad! 


The bag went together pretty quickly and mostly easily, although I did break for a couple of weeks in the middle while I worked on the quilt top for my fabric challenge project. I managed to finish it, and the backing, and had a couple of days before I could get up to a different shop for the Aurifil thread I picked out for quilting (which I ended up going in a different direction, but that's another post...) so I finished up the bag. 

It was mostly easy until the very last finishing step, which is brilliant, in that it allows you to have a fully finished lining without binding or hand-stitching a hold closed, but it was tricky. I can't even describe it easily, but it's brilliant. I found a 505 glue stick at my local shop while I was buying batting for my challenge quilt and it helped a lot with basting for the final step. 

Now my biggest decision is whether I want to start using it now or whether I want to save it like it's a swap package for sewtopia. It's only about 5 weeks away at this point...